• Home
  • Recipe Index
    • Recipe Index
    • Breakfast/Brunch
    • Cakes and Puddings
    • Chocolate
    • Cookies and cupcakes
    • Custard and Mousse
    • Gluten Free
    • Ice Cream
    • Mains
    • Other Sweet Treats
    • Snack/Appetizers
    • Soups and Salads
    • Tarts and Pies
    • Vegetarian
  • About
  • Cookbook
  • Portfolio
  • Store
  • Press
  • Work with Me

Sugar et al

Because Life is a blend of flavours...

No Bake Oreo Cheesecake Strawberry Mousse Duo

27|07|2013

If you have been with me for a while now, you would know how much I like dressing up my desserts. Layers, swirls, drizzles, sprinkles…I can go on adding elements as long as they balance each other out. It’s like my favourite playtime fun as a little girl…dressing up my dolls in pink,with lace and frills, matching hairclips and shoes and so. I come up with ideas and love watching it all come together. Some turn out as I visualised, some don’t but there’s always a learning somewhere.

strawberry mousse and oreo cheesecake duo

Till about a couple of years ago my desserts would never go below 4 layers. I had the time and the patience. It’s a different situation now with two little heads constantly peeping into the refrigerator and wanting to know when they can eat. The refrigerator door is opened and re-opened at frequent intervals. The reason.. ‘ I’m checking if it has set’. I am loving the latest additions to the vocabulary. However, the more important reason is that I have ‘borrowed’ Oreo cookies for my dessert. So you understand, everybody has an equal claim to it.

strawberry mousse and oreo cheesecake duo

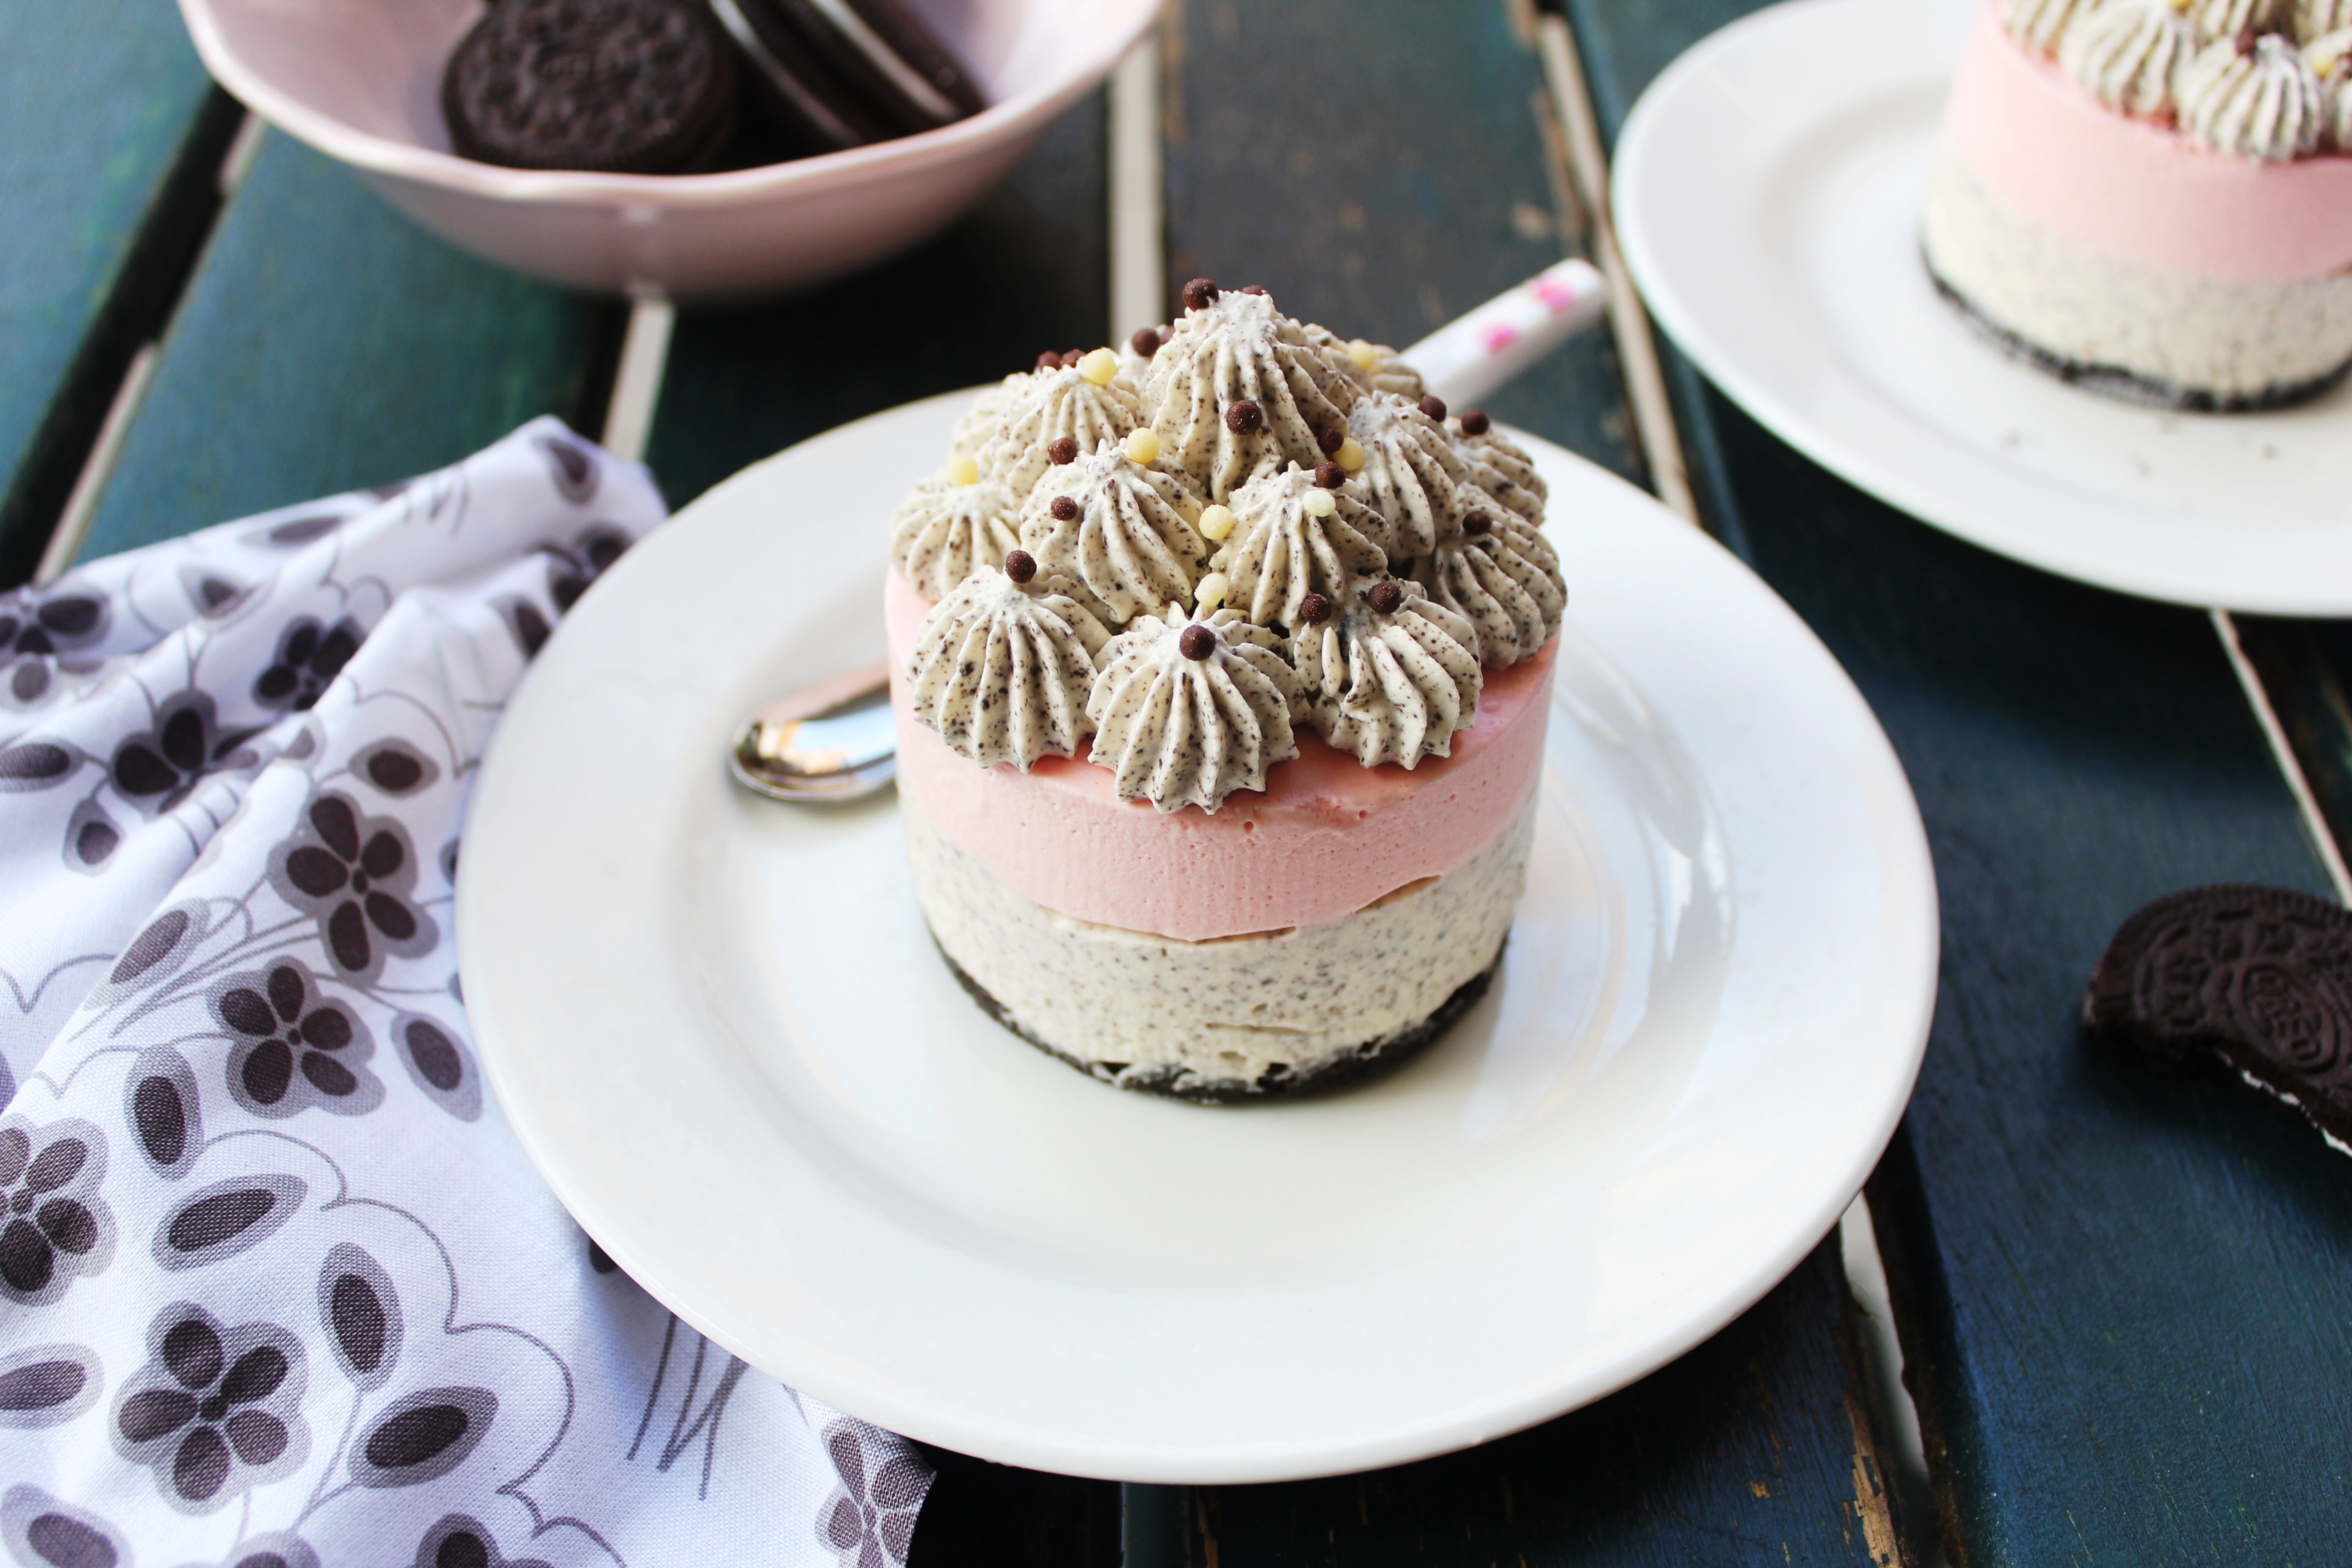
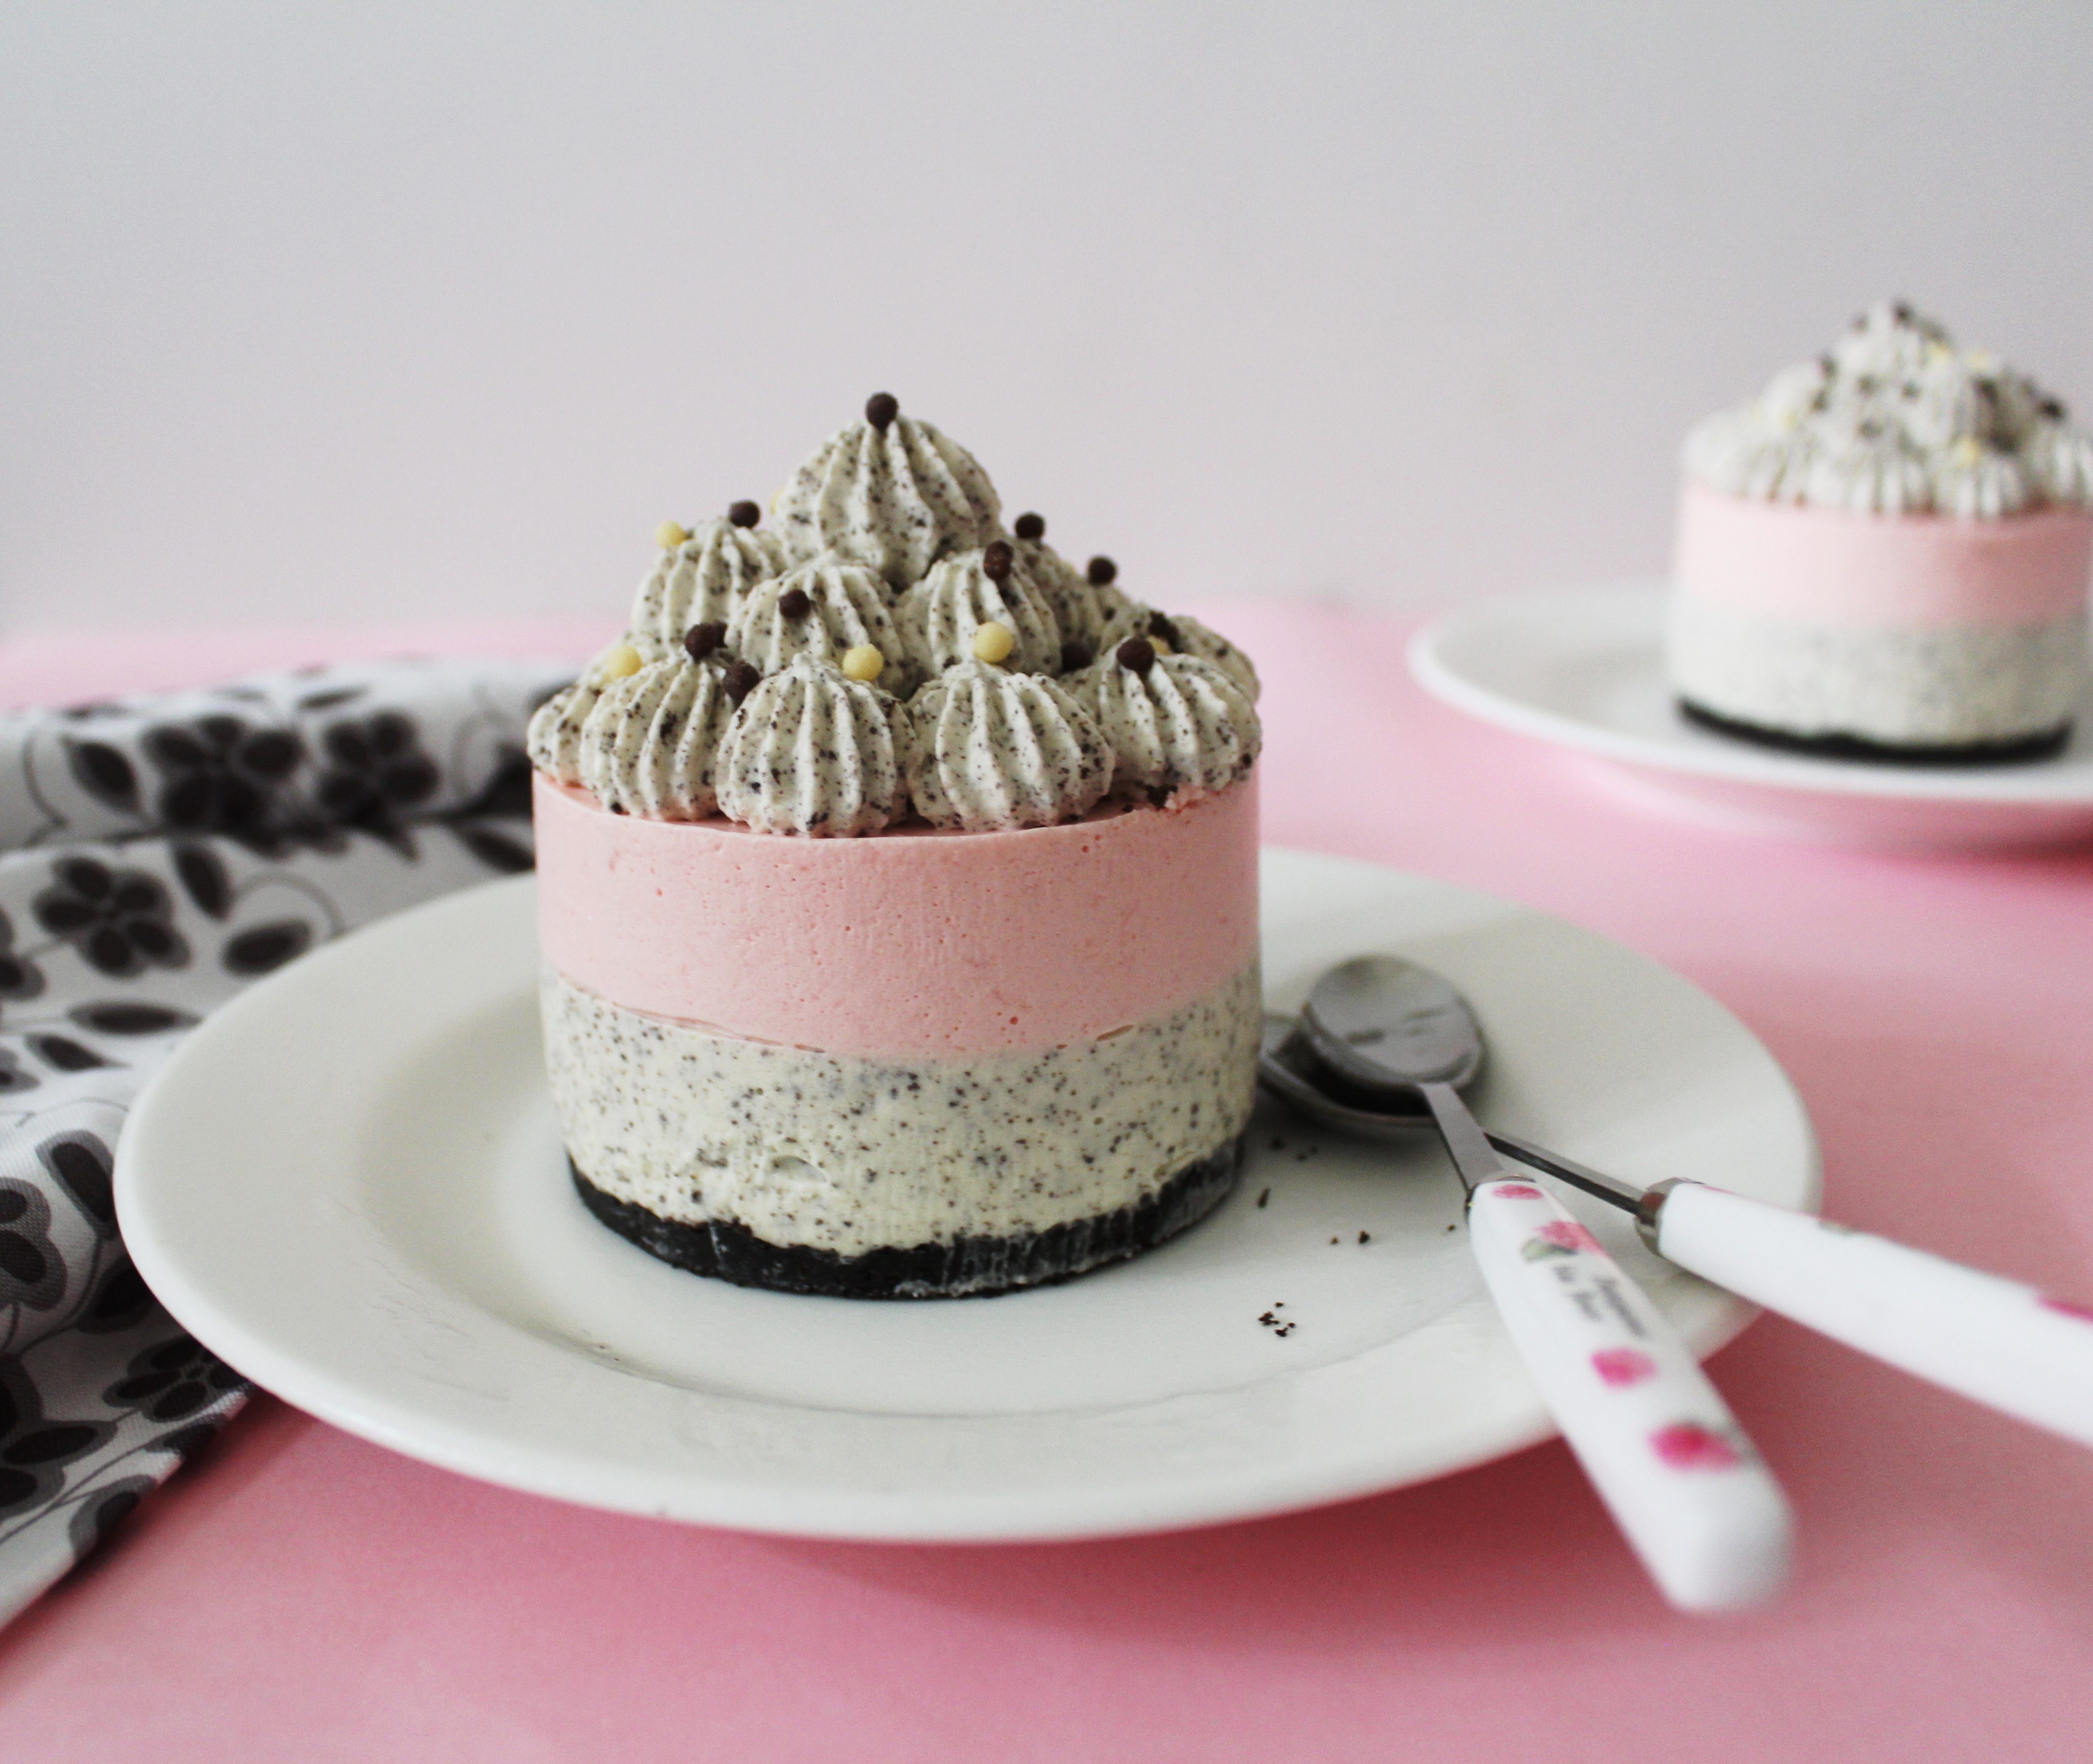
This is a big dessert but not really heavy. The cheesecake is on the richer side on account of the cream cheese so I decided to go with a lighter mousse. I have not used my usual egg-cream mousse recipe here, though personally I prefer that one. You can easily leave out the top layer and serve it with some fresh strawberries instead. Oreos are great even when they are crushed and they add a lovely texture to the cheesecake. The different layers can be made simultaneously and refrigerated to be assembled later or they can be made as and when the layer below is setting.

strawberry mousse and oreo cheesecake duo

No Bake Oreo Cheesecake Strawberry Mousse Duo
Yields 4

For the Oreo crust
150 g Oreo biscuits, divided (half to be used for the crust and half for the cheesecake)
40 g butter, melted

For the cheesecake
200 g cream cheese, room temperature
2 tbsp castor sugar
1/2 cup heavy/whipping cream, whipped to soft peaks
1 tsp powdered gelatine
1 tbsp warm water

For the strawberry mousse
1 cup strawberries, hulled and chopped
3 tbsp castor sugar
1 tsp powdered gelatine
1 tbsp warm water
1 cup whipping cream, whipped to soft peaks
2 drops pink food colouring

Process biscuits until they resemble fine breadcrumbs. Remove half the mixture and keep aside. To the remaining half, add the melted butter and process to combine. Place 3 ring moulds on a baking tray. Divide the mixture between the ring moulds and press against the base and edge to form the crust. Refrigerate for 30 mins or until firm

Meanwhile, make the Oreo cheesecake. Soak the gelatine in warm water and microwave for 10 seconds for it to dissolve completely. With an electric mixer, beat the cream cheese and sugar until smooth. Fold in the cream and the biscuit crumbs. Add the gelatine and mix to combine. Pour the mixture into the ring moulds on top of the crust till half filled. Refrigerate for 3 hours or until set. Reserve (refrigerate) the rest for top layer to pipe onto the strawberry mousse.

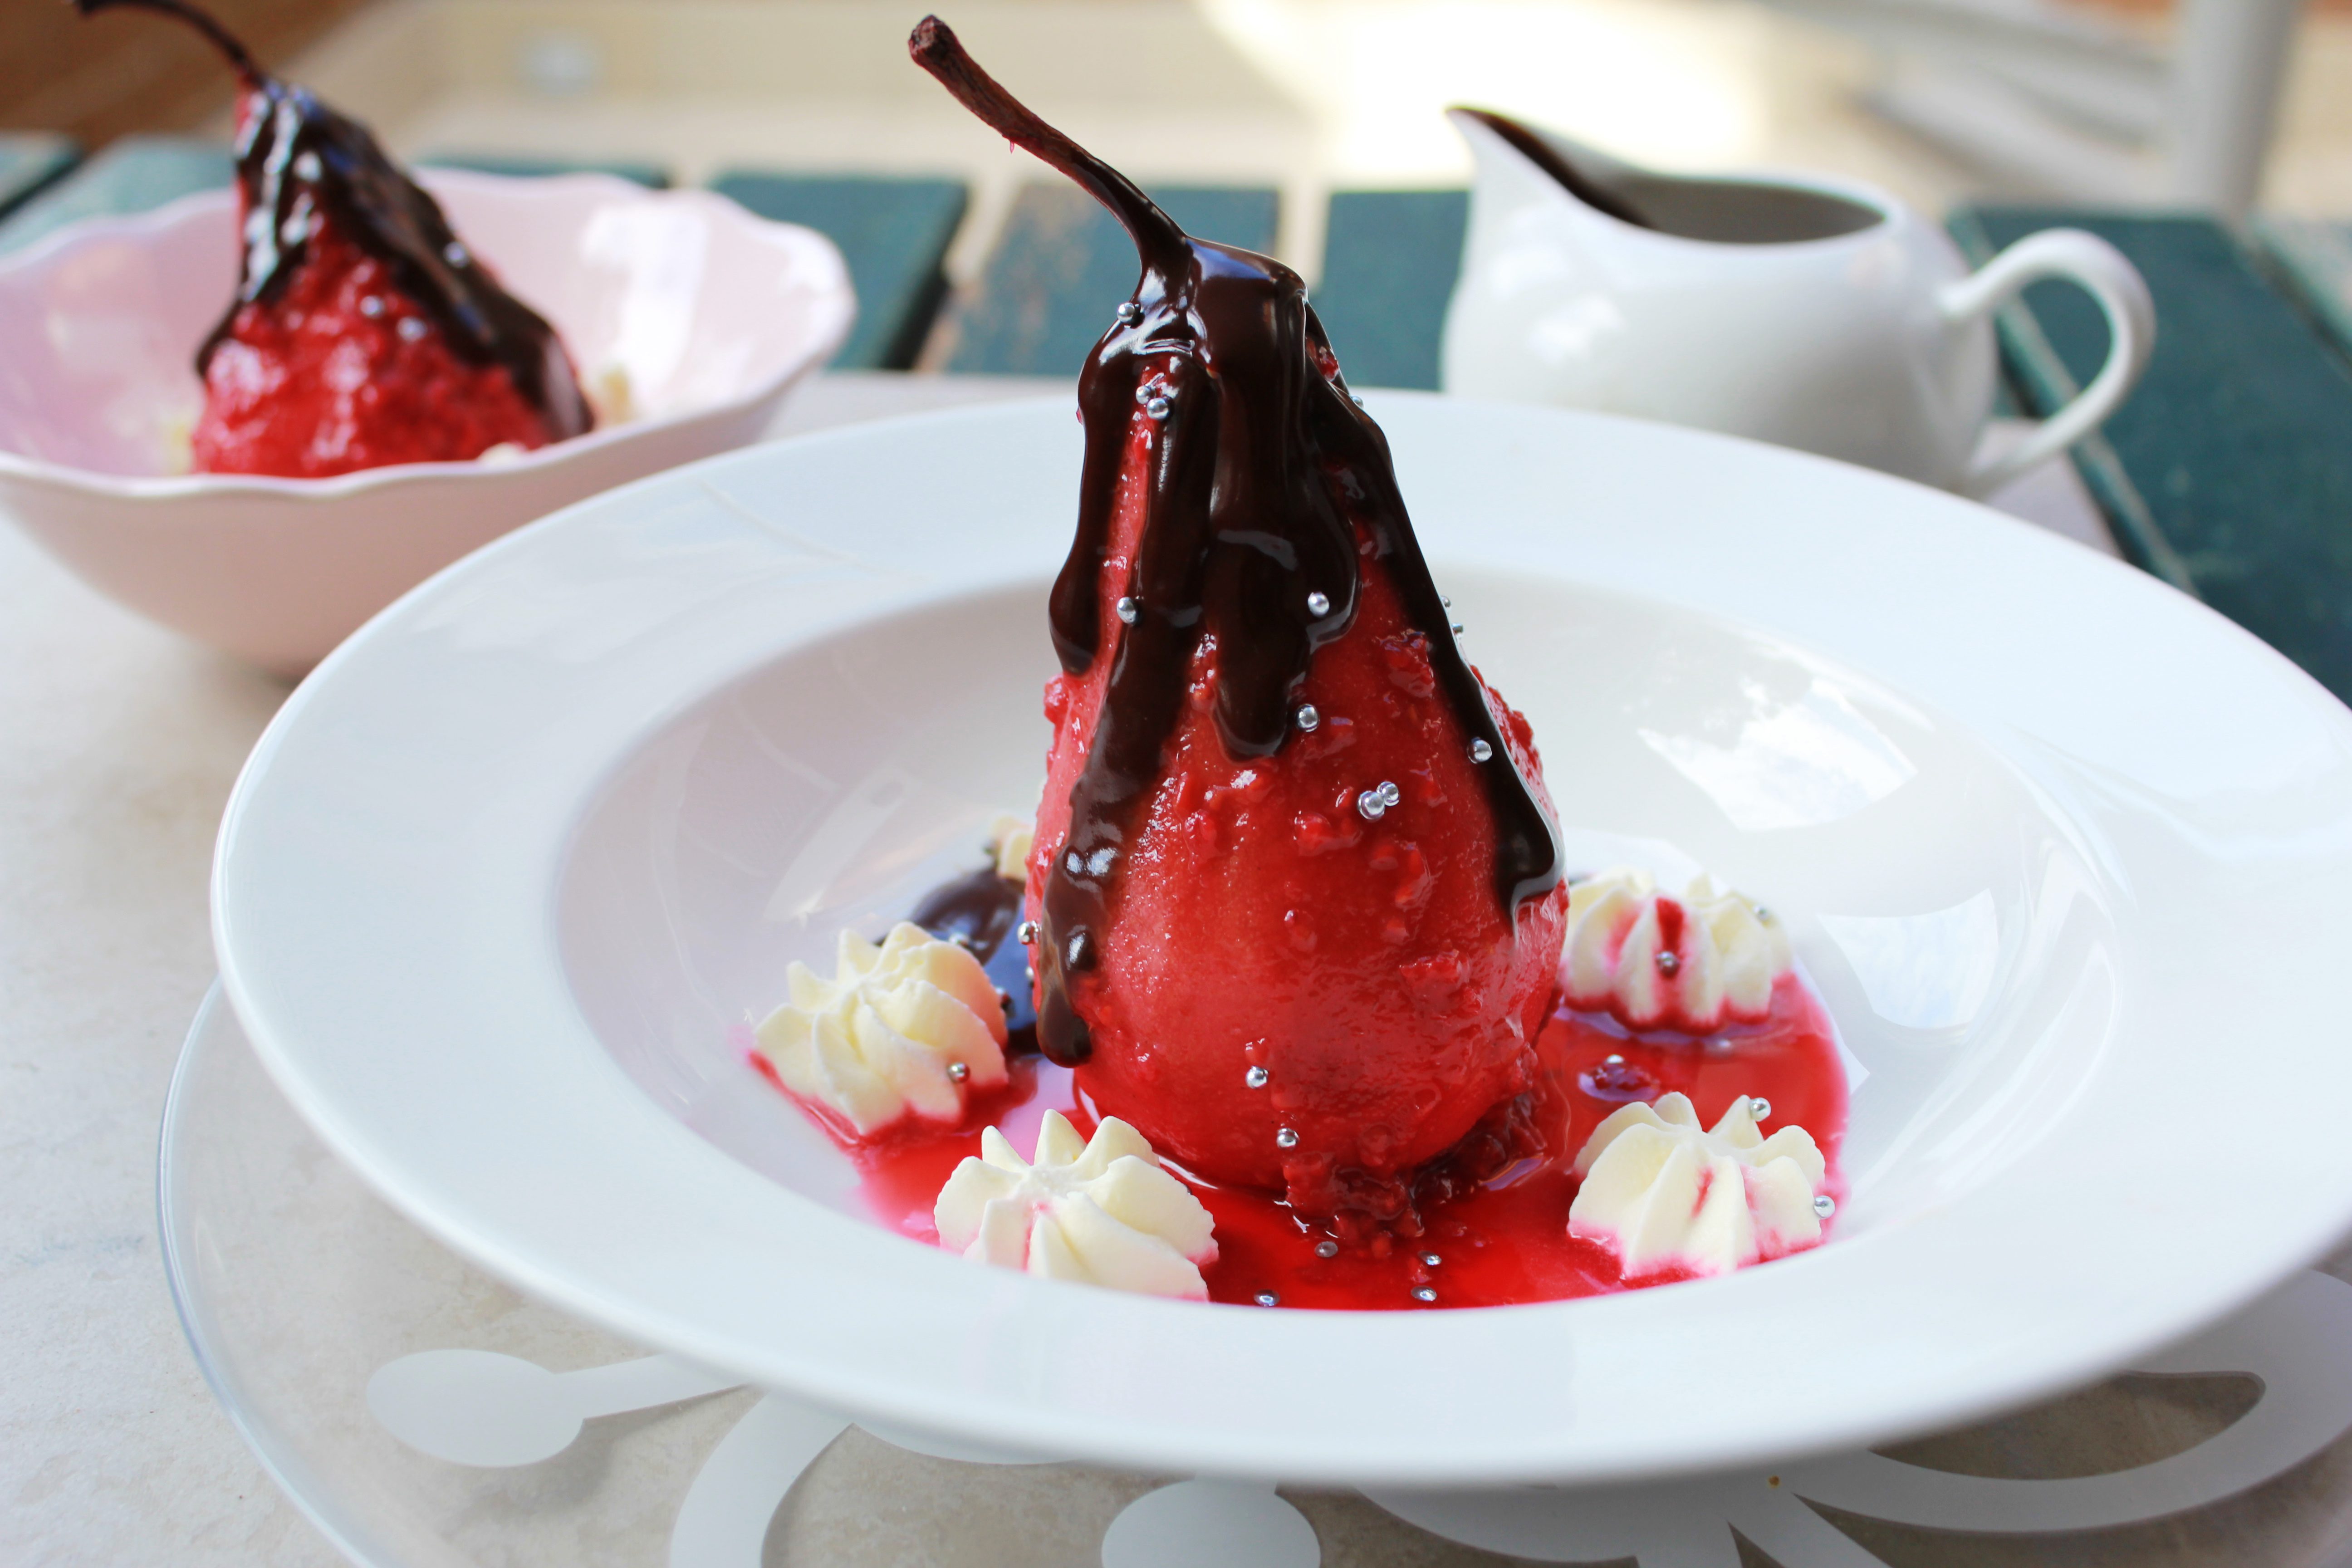
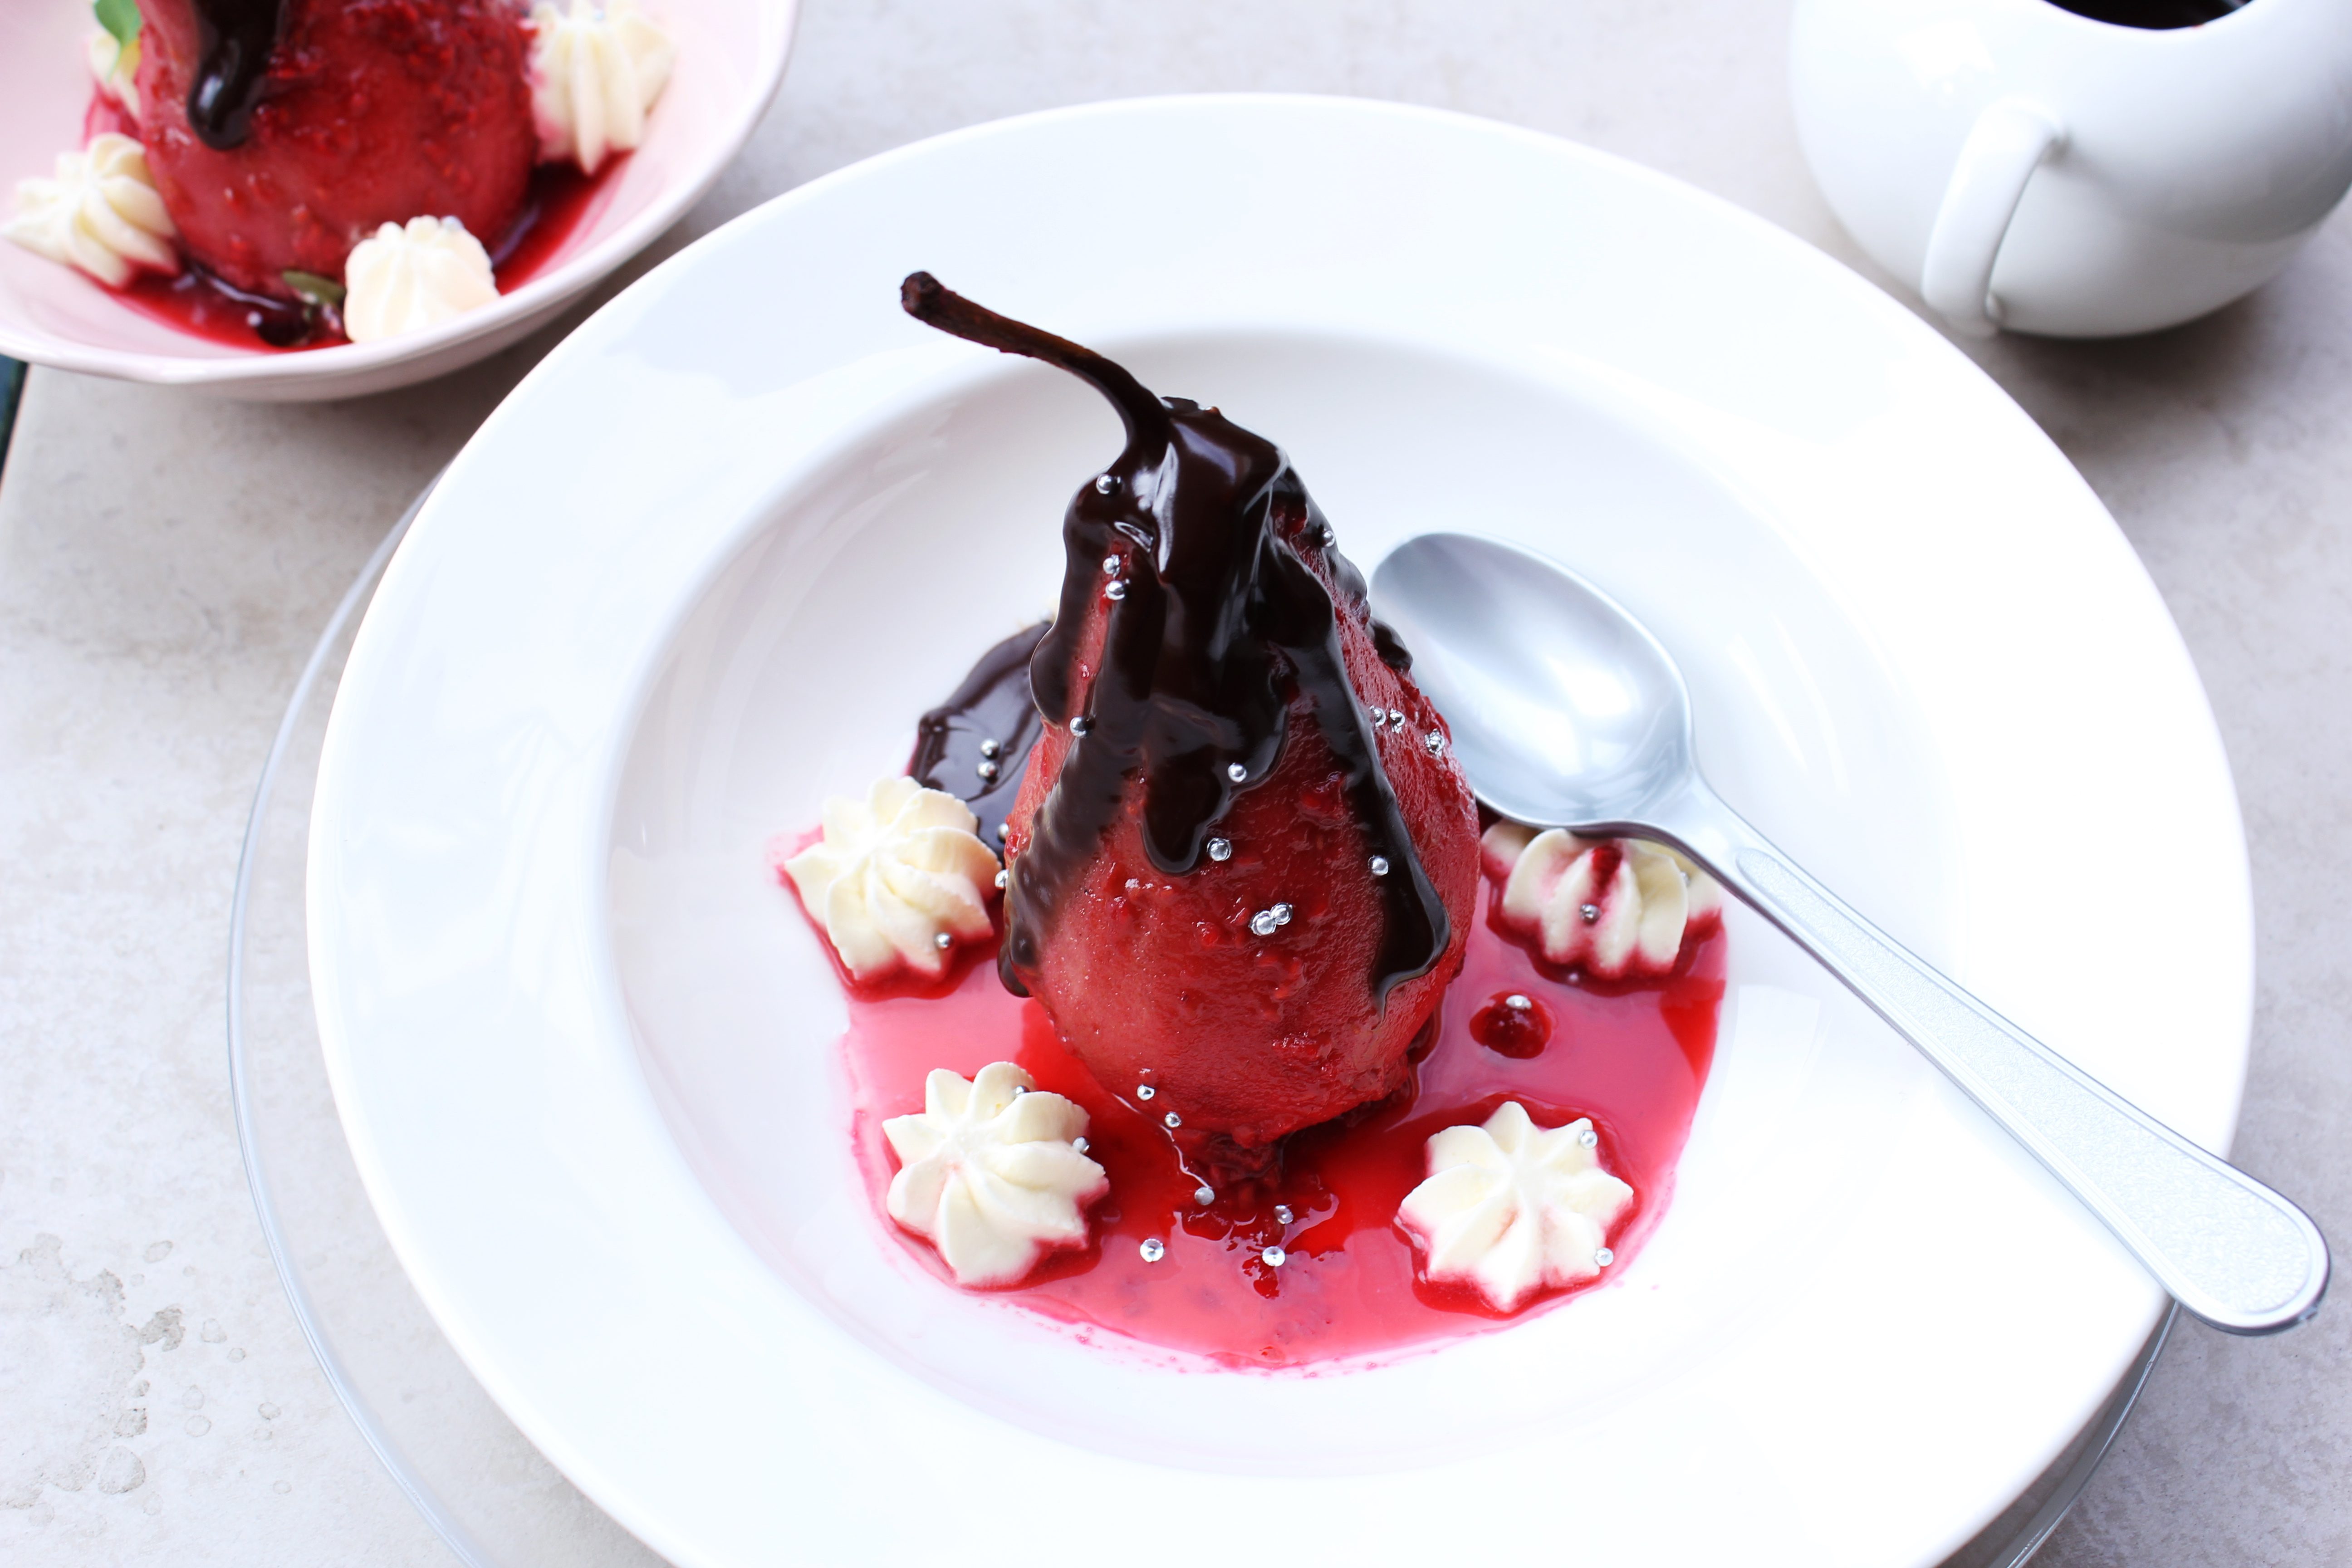
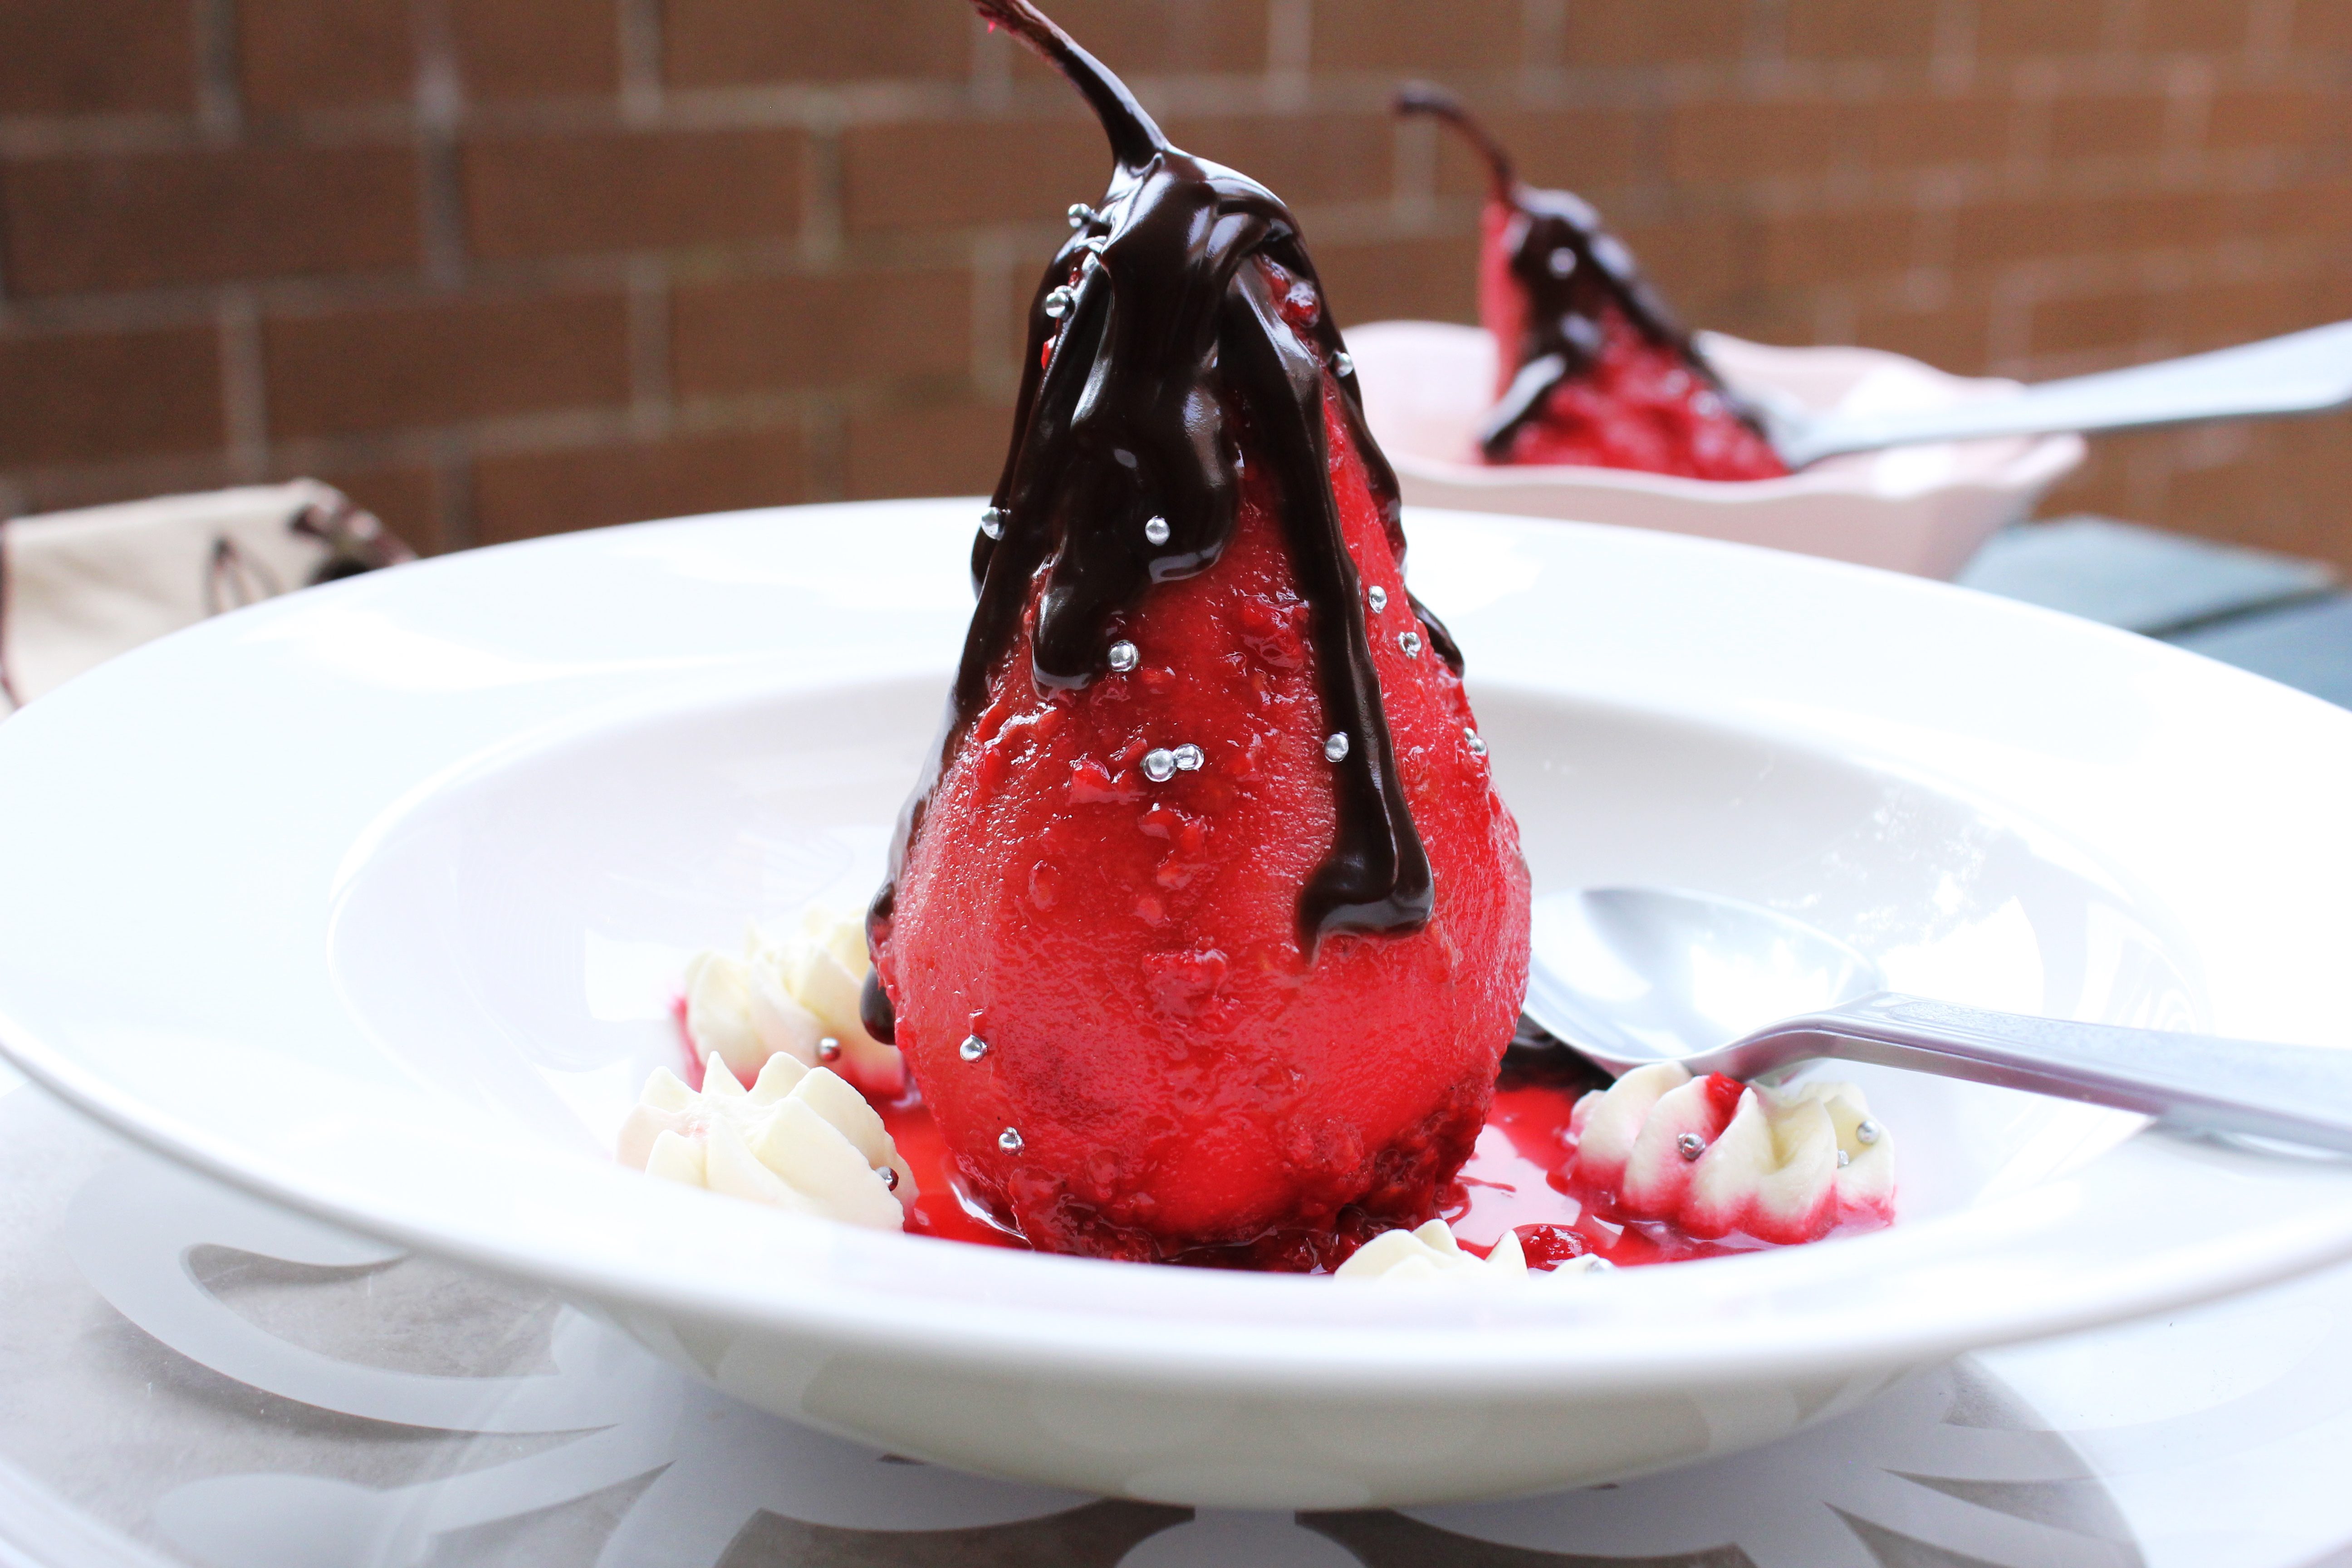
For the strawberry mousse, process strawberries and sugar to a smooth pulp. Strain and keep aside. Dissolve gelatine in warm water and microwave fo 10 seconds to dissolve completely. Cool and add to strawberry pulp. Fold the strawberry pulp slowly into the whipped cream. Add 2 drops of food coloring and mix well till colour is uniform. Pour over the chilled Oreo cheesecake. Refrigerate till set, about 3-4 hours.

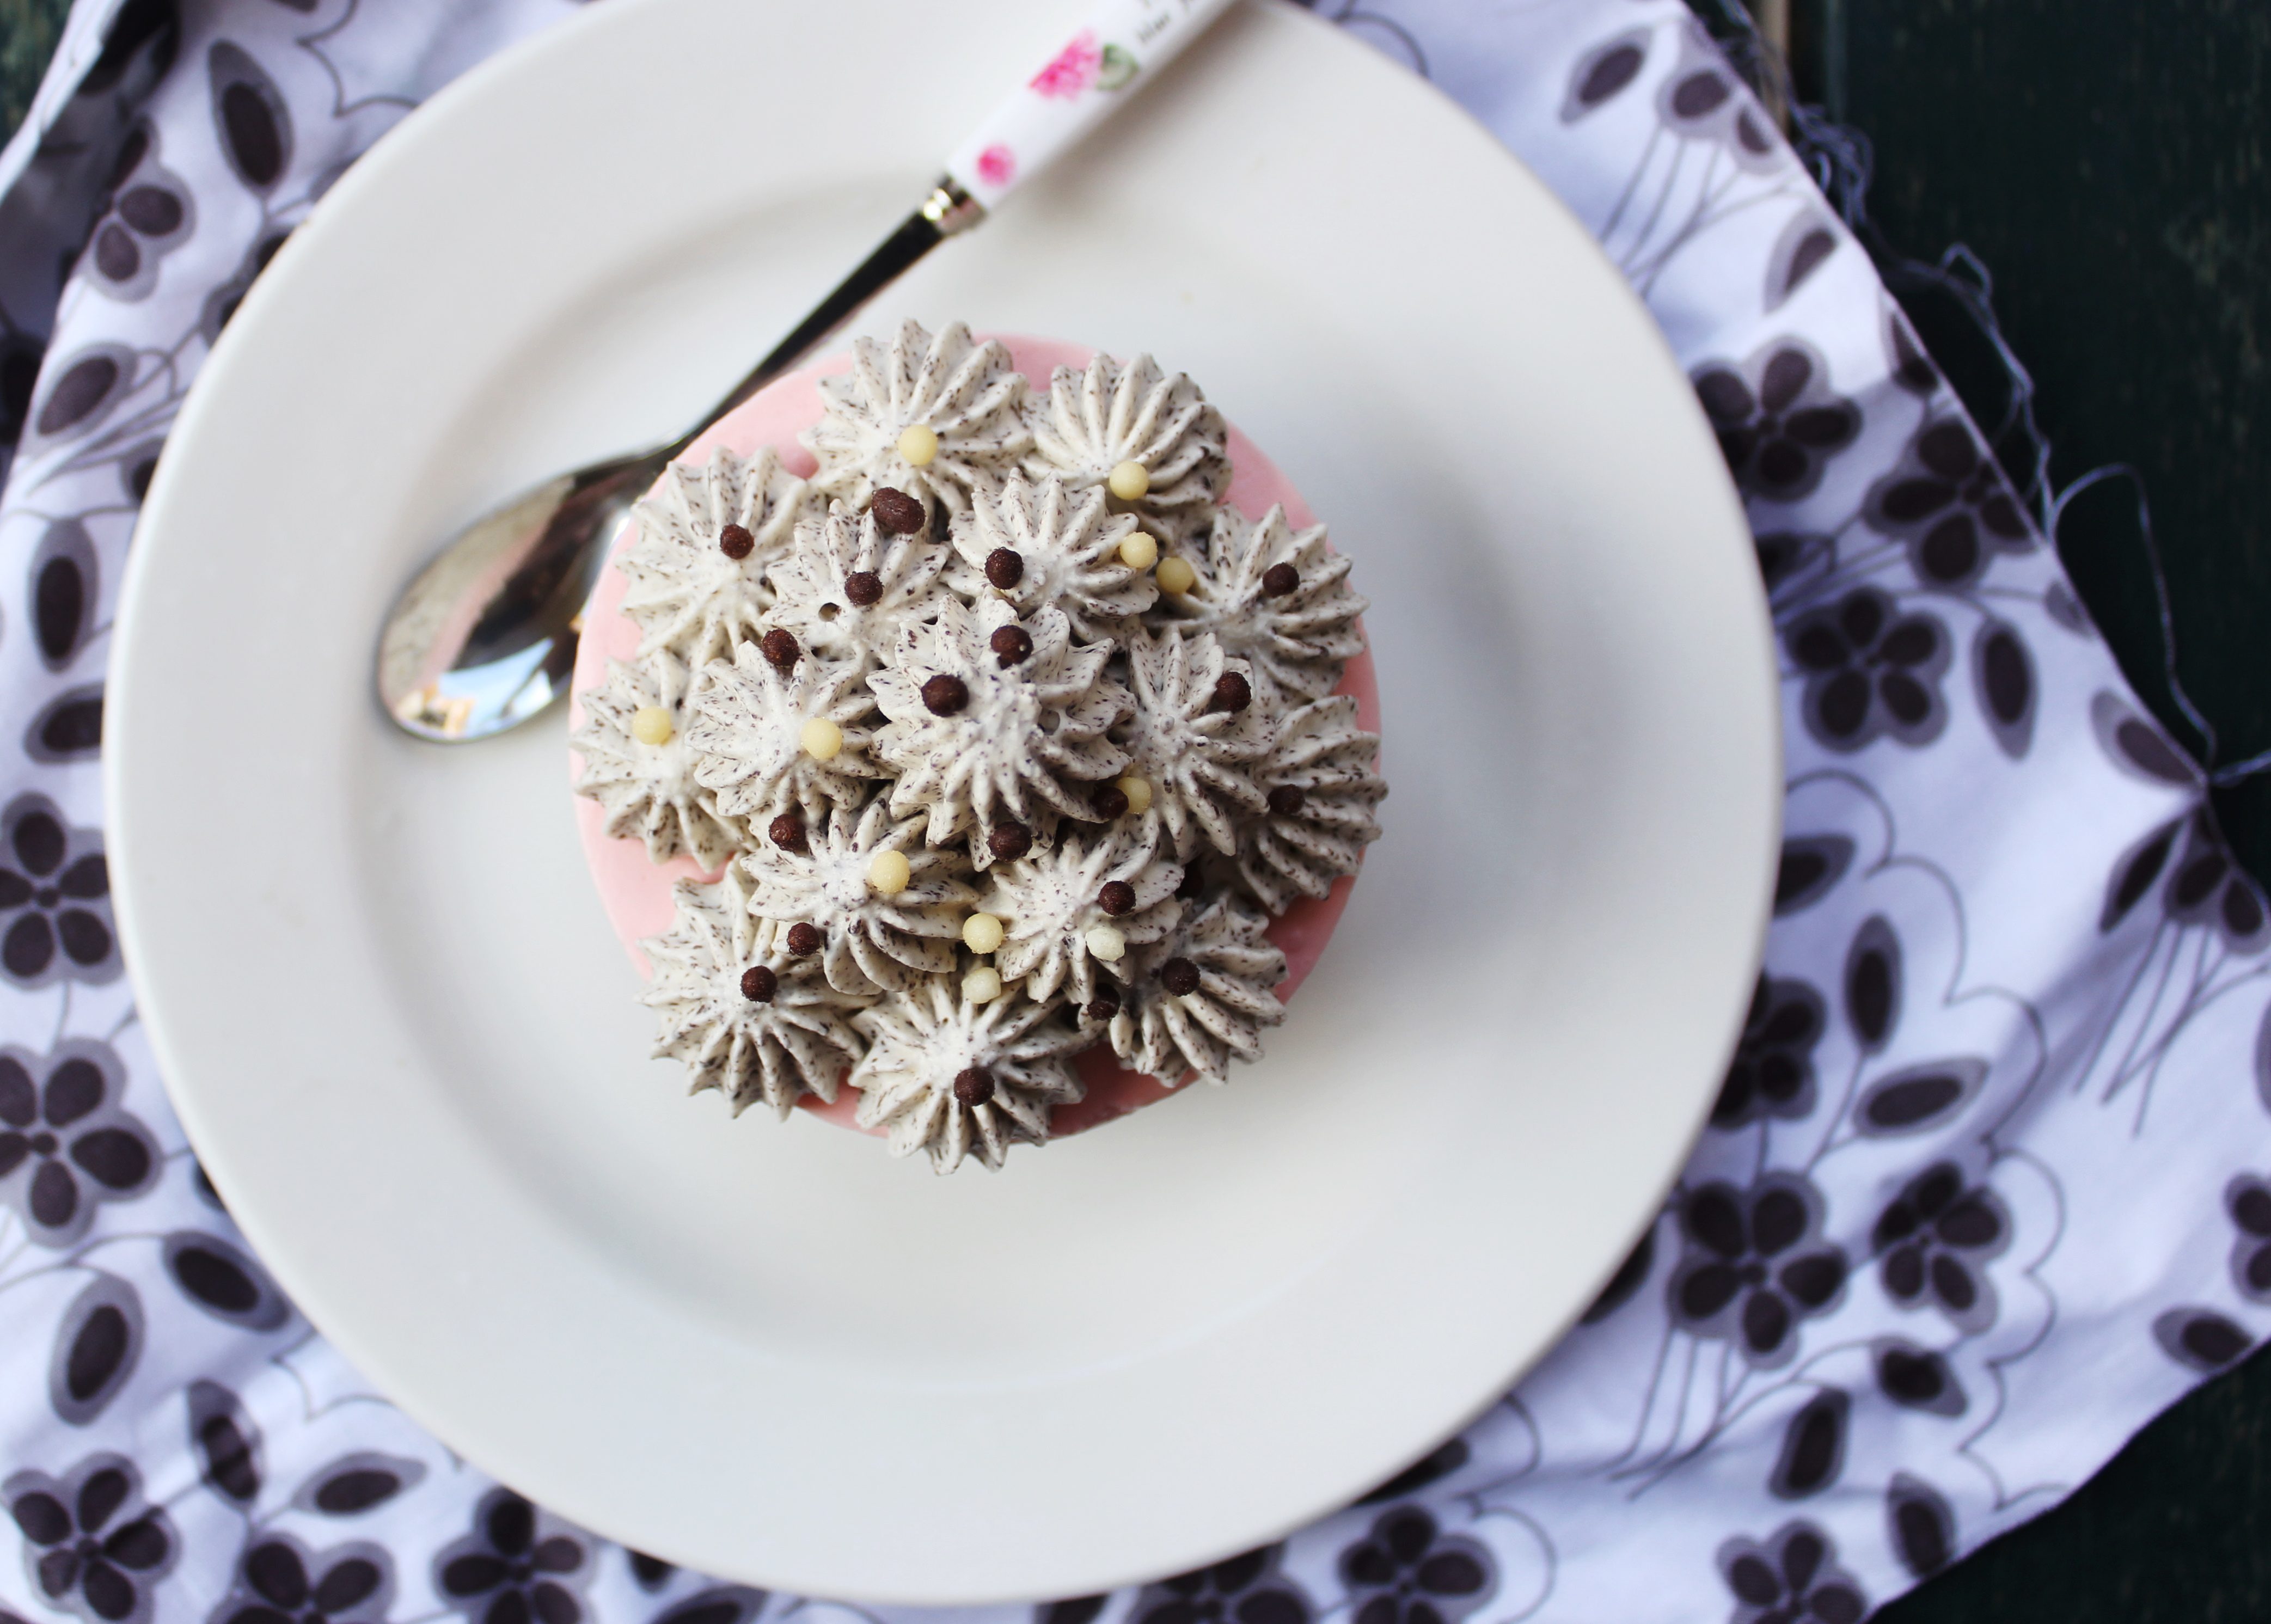
To serve: Release the dessert by gently lifting the ring moulds and applying gentle pressure from below. Fill up a piping bag with the reserved Oreo cheesecake. Pipe onto the strawberry mousse and decorate with sprinkles. Refrigerate till set.

Note: If you do not have ring moulds or mousse rings at home, you can layer the dessert in serving glasses.


Raspberry Poached Pears With Chocolate Sauce

22|07|2013

Poached pears in a beautiful pink raspberry puree and served with a homemade chocolate sauce.

All the dessert lovers of the world, in my opinion belong to two broad categories. The chocolate lovers and the non-chocolate lovers (do they even exist?). Okay, let me rephrase that…the chocolate lovers and the fruits-over-chocolate lovers. And of course, there are the ones like me who fall somewhere in between. The ones who like to enjoy the best of both worlds!

poached pears in raspberry and chocolate sauce

Poached pears make for a fancy yet healthy dessert. Though I have experimented with various fruits, pears are my favourite poach-able fruit. Not only do they take in the colour and the flavour, of the poaching liquid (which can be totally customised to your preference), they are pretty simple to cook with a handful of ingredients and can be made ahead in time. At one time, I was so obsessed with poaching pears in different combinations that I think I would have to create a separate category if I had to blog about them. The bottom line is, that the possibilities with them are endless.

poached pears in raspberry and chocolate sauce

There are so many varieties of pears to choose from but I personally prefer to use the Bosc pears as they retain their long slender shape well. Though it’s a fairly simple process, they key is not to undercook or overcook the pears. What we are looking for is a firm fruit, cooked evenly, without resistance when you cut through with a spoon. For this purpose, the pears need to be turned around in between. Also, letting the pears cool down in the liquid, intensifies the flavour and colour.
The chocolate sauce complements the deep flavour of the raspberries and elevates the dessert to a whole new level. I have included a non dairy version of the sauce too that will be slightly thinner than the first one but tastes almost as good. You can have the poached pears warm or cold. I like them warm with a bit of whipped cream to go alongside.

poached pears in raspberry and chocolate sauce


Raspberry Poached Pears with Chocolate Sauce
Serves 4

1 cup frozen raspberries
1 cup sugar
4 cups water
4 Beurre Bosc pears, peeled and cored

For the chocolate sauce
100 g dark chocolate, roughly chopped
1 cup pouring cream/single cream
25 g butter

For a dairy free, chocolate sauce
1 tbsp castor sugar
½ cup cocoa
¼ cup boiling water

Trim the bottom of the pear to make a flat surface so it can stand upright. Retain the stems for a nice presentation. Combine all the ingredients except the pears in a large saucepan. Over medium heat, bring it to a boil, stirring in between till the sugar dissolves. Reduce the heat to a simmer and gently add the pears. Cover and cook till tender turning in between until cooked evenly. To test this, poke with a fork. Remove from heat. Let the pears stand in the poaching liquid till cool. Remove the pears and strain the liquid to remove seeds or any fruit bits that may be present.
Pour the liquid back to the saucepan and bring to a boil. Reduce it till it reaches a syrupy consistency. Keep aside.

For the chocolate sauce, heat cream in a saucepan over medium heat, bring to a simmer, add the chocolate and whisk until melted, add the butter and continue to whisk until well combined.

For the dairy free version, combine sugar, cocoa and boiling water in a small bowl and whisk together until smooth.

To Serve, place a poached pear on a plate. Pour over the reduced raspberry sauce. Drizzle with warm chocolate sauce. Add a dollop of whipped cream or pipe little flowers of whipped cream around the pear.


Chocolate Pistachio Muffins

18|07|2013

Muffins were probably the first things I learnt to bake. As a child, I only knew two flavours. Vanilla and Chocolate. We had an old fashioned portable round oven which would sit on the floor during baking times and otherwise tucked away in one corner of the house. Baking was not very popular in Indian homes and my mother was probably one of the few bakers I knew existed at that point in time. Before I was allowed to take complete control of the oven, my job was to butter the muffin tins which were of all possible shapes and sizes. And to ward off my then toddler sister and crawling brother from attacking the oven. I enjoyed the first but loved the second one! Because it meant sitting close to the oven.

IMG_4061 (2)

Its funny when I think about how I would sit right next to the equipment and peek into its glass face to see the muffins rise before my eyes. Sometimes I would see my mother adding dried orange peel or nuts. Pistachios and cashew nuts were a favourite in my house and they would make an appearance in all sweet treats, Indian or otherwise.

IMG_4073 (1)

I took out coloured liners to bake these muffins but on an impulse decided to bake them in different sized tart pans. Just like I did when I was a little girl. We didn’t even know then that muffin liners existed. I am very nostalgic lately. And with good reason. I will be meeting my family after a year…in fact going back home after 2 years. I am more excited for my boys and of course their grand parents who find joy in nothing more than holding them close.

Coming back to the muffins, they are simple, moist and soft on account of the buttermilk and quite chocolatey too. No creaming of the butter so I love it all the more. The original recipe called for chocolate chips but I have replaced them completely with chopped pistachios. Hence they have a nice nutty crunch to them. It goes without saying that you can use any of your favourite nuts, chocolate chips, sultanas etc. These are perfect for the lunchbox or a tea time snack.

And even better accompanied by stories that you share with your children about what you baked or ate as a child…

IMG_4078 (1)


Chocolate Pistachio Muffins (adapted from Joy of Baking)

1/2 cup (113 grams) unsalted butter, melted  and cooled
2 large eggs
1 cup (240 ml) buttermilk
2 teaspoons pure vanilla extract
1 3/4 Cups (230 g) all-purpose flour
2/3 Cup (60 g) Unsweetened Cocoa Powder
11/4 Cups (265 g) Light Brown Sugar
1 tsp baking powder
1 tsp baking soda
1/2 tsp salt
1/2 cup chopped pistachios
extra pistachios for garnish

Preheat oven to 190 degrees C. Butter or line muffin cups with paper liners (I used tart pans).

In a large measuring cup or bowl whisk together the melted butter, eggs, buttermilk and Vanilla extract.

In another large bowl, whisk together the flour, cocoa powder, sugar, baking powder, baking soda and salt. Stir in the chopped nuts. With a rubber spatula fold the wet ingredients into the dry ingredients and stir only until the ingredients are combined. Do not over mix the batter or tough muffins will result.

Evenly fill the muffin cups with the batter using two spoons or an ice cream scoop. Sprinkle with the extra chopped pistachios. Place in the oven and bake until a toothpick inserted in the centre of a muffin comes out clean, about 15-20 mins. Transfer to a wire rack and let cool for about 5 mins before removing from pan.

Note: Baking times will vary according to the size of the muffin cups. If you are using two different sizes like me, you will need to check the smaller ones after 10 mins as they will bake in lesser time.


Gluten-free Amaretti Cookies

12|07|2013

‘What are you baking Mama?’ asked my 3 and a half-year old as soon as he opened his eyelids in the morning. The house was filled with the smell of freshly baked amaretti cookies. He leaped out of bed in excitement and stood in the kitchen trying to peek into the oven. The smell of almonds and caramelised sugar was enough to drive anybody crazy, let alone the rapidly developing senses of a little sugar hungry boy. He ran to tell his brother.

“Wake up, We will have cookies for breakfast’

When did I say that! I couldn’t help but smile at the sweet exchange of words taking place between them, around the cookies.

gluten free amaretti cookies

The temperatures have been dropping a wee bit every day and I find the best way to keep warm is to switch on the oven. Even if it means 6.30 in the morning.

gluten free amaretti cookies

These Italian cookies are little bites of Heaven. They are so so good. Almonds and sugar…what a magical pair! And the good news for you..no butter, no flour! They are ready in no time and they tend to leave me with a ‘is that it?’ kind of feeling. Delicate, light, airy with a crunchy exterior and a soft chewy centre. And the scent…Oh! I could bake them every single day.

gluten free amaretti cookies

You know, I just had a thought! If I should rename my blog..

…Sugar, Almond, Raspberry et al..

gluten free amaretti cookies


Amaretti Cookies (recipe  adapted from Eugenie kitchen)

Yields 15

1 egg white (strictly medium size)
1/3 cup castor sugar (75 g)
4/5 cup + 1 tablespoon ground almonds (85 g)
1/4 teaspoon almond extract/essence (or vanilla extract)
A Pinch of salt
Additional confectioner’s sugar for dusting

Preheat the oven at 200 degrees C. Line cookie sheets with parchment paper. Cookies are sticky. So if you want, use silicon pad or butter the parchment paper.

Beat the egg whites until doubled (not too firm). Add in the sugar and whisk just until combined. Fold in ground almonds, almond extract, and salt cutting the batter carefully with a spatula.

Make small balls with hands and place the cookies on the parchment paper. Dust them with confectioner’s sugar.

Bake for 10 minutes or until golden brown. Let them cool on a wire rack before serving.

  • « Previous Page
  • 1
  • …
  • 102
  • 103
  • 104
  • 105
  • 106
  • …
  • 111
  • Next Page »
Hey Sugar
Cake
Link to my Facebook Page
Link to my Instagram Page
Link to my Pinterest Page
Link to my Mail Page
Subscribe to this site
Fresh Awards
2019 Aus mumpreneur
2019 aus mumpreneur
Mumbrella

Copyright © 2025 · Sugar Et Al · Designed by Smitten Blog Designs · Log in