• Home
  • Recipe Index
    • Recipe Index
    • Breakfast/Brunch
    • Cakes and Puddings
    • Chocolate
    • Cookies and cupcakes
    • Custard and Mousse
    • Gluten Free
    • Ice Cream
    • Mains
    • Other Sweet Treats
    • Snack/Appetizers
    • Soups and Salads
    • Tarts and Pies
    • Vegetarian
  • About
  • Cookbook
  • Portfolio
  • Store
  • Press
  • Work with Me

Sugar et al

Because Life is a blend of flavours...

Pumpkin Pots de Creme

3|11|2024

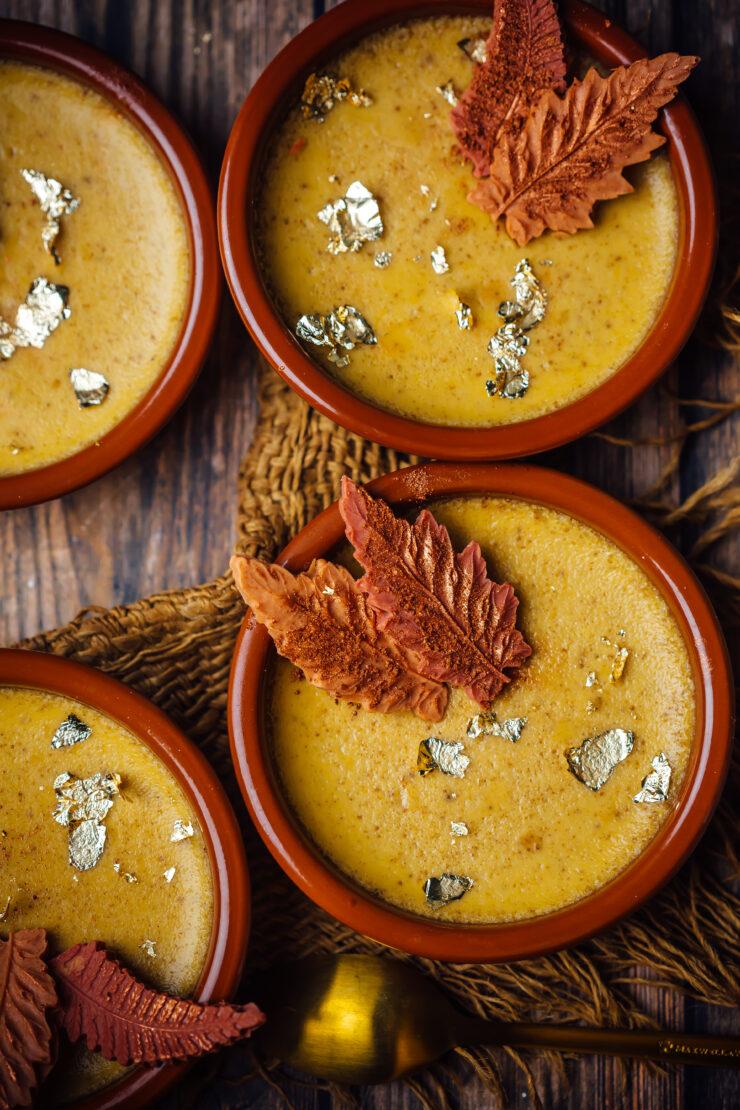
Gooey, creamy, rich, spicy and simply delicious, these pumpkin pots de creme are an easy dessert that can be made ahead for a crowd or even for a weekend indulgence. You could say, they are like digging into a divine pumpkin mousse.

Pumpkin Pots de Creme

Funny, but its’s spring in the southern hemisphere. There are a variety of fruits to choose from, yet inspired by pumpkin recipes all over my socials, I made not one but two pumpkin desserts on the same day. We don’t get store bought pumpkin puree in Australia so when I made a huge batch of puree, I wanted to put it to good use. Besides, pumpkin pots de creme is made using egg yolks for the rich texture. The egg whites were perfect to make pumpkin financiers/friands. I’ll share the recipe next.

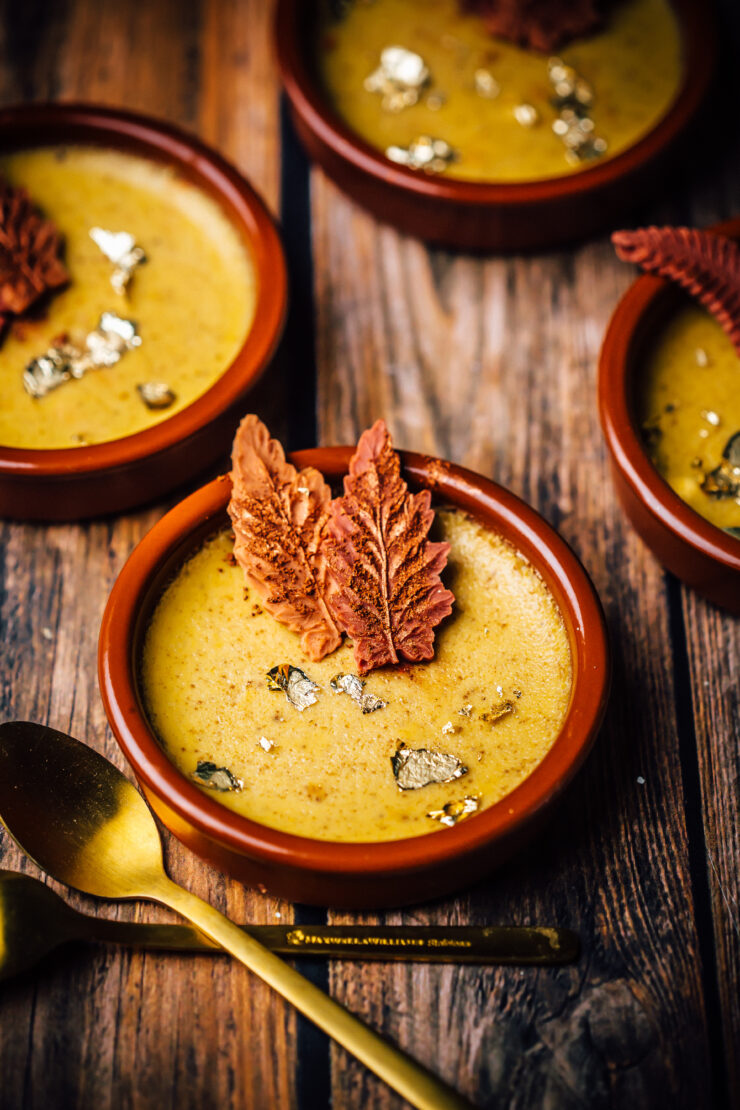
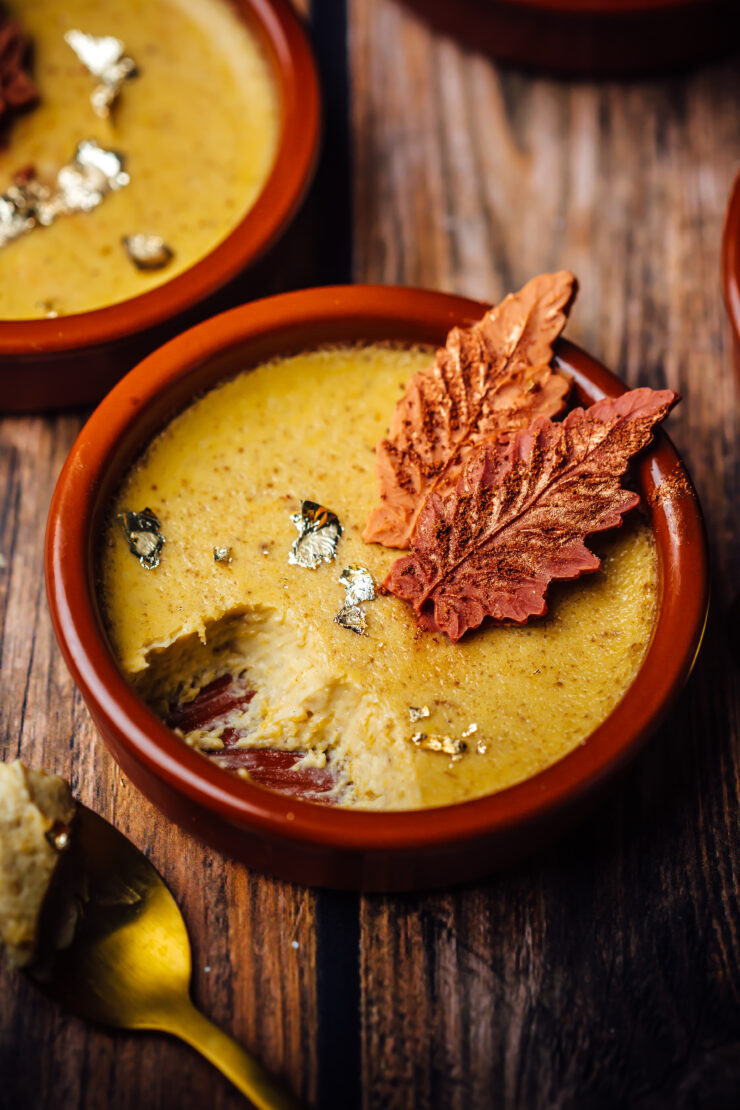
I decorated the pumpkin pots de creme by melting and coloring white chocolate into leaf molds for the autumn feels. Feel free to serve with candied pecans, grated dark chocolate or even crushed honeycomb.

Pumpkin Pots de Creme

If you love pumpkin desserts, don’t forget to check out this Pumpkin Creme Caramel and this Pumpkin Cake.

Pumpkin Pots de Creme
Makes 5-6 depending on the size of your cup

1/2 cup milk
11/2 cup heavy/thickened cream
4 egg yolks
1/2 cup firmly packed brown sugar
1/2 cup home made (or store bought) pumpkin puree
1/4 tsp powdered cinnamon
1/4 tsp powdered ginger
1/4 tsp ground nutmeg
white chocolate leaves, to decorate

Preheat oven to 160 degrees C ( 140 degrees for fan-forced ovens) .Combine cream and milk in a saucepan over medium heat. Cook, stirring constantly, for 5 minutes or until hot (do not allow to boil). Remove saucepan from heat.

Whisk egg yolks and sugar in a heatproof bowl until well combined. Add the pumpkin puree and spices and mix till blended. Pour the warm cream mixture over the egg yolk mixture, little at a time whisking constantly until smooth. Take care not to add the entire cream to the eggs together as it can overcook the eggs resulting in scrambled eggs.

Divide the custard into five or 6 lightly-greased, ramekins or ovenproof cups. Place in a deep baking tray. Pour boiling water into baking tray until halfway up sides of ramekins.

Bake custards, uncovered, for 30-40 minutes or until just set (while the centers are slightly jiggly when shaken). Remove from the oven and take the ramekins out of the water bath. Leave to cool to room temperature. Refrigerate for at least 2 hours or until set.

Pistachio Nankhatai Biscuits (Eggless)

24|10|2024

If you haven’t heard of Nankhatai biscuits before this, they are shortbread biscuits popular in India. The fact that they require only a few ingredients, are eggless and flavoured with spices and/or nuts makes them irrestible.

Pistachio Nankhatai Biscuits

The chickpea flour and semolina add to the bite and melt in your mouth texture of the Nankhatai biscuits but you are free to use plain flour instead. To keep them authentic, I’ve used ghee but unsalted butter is a great substitute. Giving in to the craziness of pistachio and pistachio based treats, I got my hands on some pistachio paste that I knew instantly I wanted to use in these biscuits. I used this one but i’ve heard that the same brand is cheaper at Costco. If you want to make your own, the Internet is flooded with recipes of pistachio paste.

The unique taste of pistachios paired with a hint of rose and cardamom not only makes them perfect for those who celebrate Diwali but with the upcomng holidays, they would make lovely edible gifts or the most beautiful treats to share with friends and family.

If you love pistachio recipes, you will love these Mini pistachio cakes

Pistachio Nankhatai Biscuits
Makes 18-20 biscuits

1 cup plain flour 
3/4 cup chickpea flour/besan (or use plain flour)
1/4 cup semolina
1/2 teaspoon powdered cardamom
1/2 cup ghee (or unsalted butter)
3/4 cup icing sugar
2 tablespoon milk (more if needed)
1/2 cup pistachio paste (home made or store bought)
Extra pistachio paste, to top
Dried rose petals, for garnish

Method : Place the plain flour, chickpea flour, semolina nd cardamom in a medium bowl. In a large bowl, beat the ghee and sugar until the mixture is smooth.

Add the dry ingredients. Mix well. Add milk and pistachio paste and mix well to bring the dough together. Cover the bowl and refrigerate for 15-20 minutes.

Preheat oven to 180 degrees C. Line two baking sheets with baking paper.
Roll out uniform sized balls, place them on the tray I cm apart. Slightly flatten them with your hands and top them with the extra pistachio paste (about a tsp), if using.

Place tray in the oven and bake for 20 mins or until the base of each biscuit starts to brown. Remove from the oven, allow to cool. Decorate with rose petals. Once cooled completely, store in an airtight container for up to a week.

Chocolate and Hazelnut Cookies

22|09|2024

Chocolate and Hazelnut Cookies

I started my cookie baking for the festive season early, this year. Almost every year I end up with a bunch of recipes that I worked on but are too late to post as it’s almost January by the time I can get to it. These Chocolate and Hazelnut Cookies are simply amazing. Not only do they come together in minutes, they are egg free, require no chilling of the dough or any rolling out and so on. They are extremely addictive due to the nuttiness of the hazelnuts that are complemented by dark chocolate.

I have used molds to create the design but if you don’t have a mold, use could use a sillicone muffin pan or simply bake the biscuits and then dip them in chocolate. Or you could create thumbprint cookies by filling the centres with chocolate. The possibilities are endless with these Chocolate and Hazelnut Cookies.

Chocolate and Hazelnut Cookies

Chocolate and Hazelnut Cookies
Makes 10-12 cookies

125 g (approx 1/2 cup +1 tbsp) unsalted butter, room temperature
1/2 cup (60 g) icing/powdered sugar
1/2 cup hazelnut meal
3/4 cup (94 g) plain flour

Preheat oven to 180 degrees C. Spray your cookie mold with non stick spray. Alternately, line a baking sheet with baking paper.

In a large bowl, beat the butter and sugar until light and fluffy. Fold in the hazelnut meal and flour until combined and a dough is formed that is almost firm and can be rolled into balls easily. Add a little more flour if required.

Scoop 1 tbsp of dough and place in the hole of each mold. Using the back of a spoon or with your fingers, press the dough lightly to take the shape of the mold. You don’t have to be perfect as the dough will rise and spread slightly to fit the molds. If not using a mold, simply roll the dough into balls and place on the baking sheet 1 cm apart. Make a small dent in the middle with the back of a spoon.

Bake for 25-30 minutes or until cookies are lightly browned and feel firm to touch. Remove from oven, allow to cool in mold for 15-20 mins, then gently turn the mold tray over for the cookies to slide out. Allow to cool completely before coating with chocolate. If you’re baking the cookies on a sheet, allow to cool and fill up with melted chocolate or ganache.

Pipe (or spoon) small amount of melted dark chocolate into a clean mold. Place cookies over the chocolate, allowing some of it to come up the sides. Place mold tray in the fridge to set. Repeat with remaining cookies. Cookies should easily come off the molds.

Lychee & Raspberry Tiramisu

31|08|2024

Lychee & Raspberry Tiramisu

Since you guys loved my Lychee & Raspberry Cheesecake so much, I decided to create the same flavour magic in a Lychee & Raspberry Tiramisu. After all it is such a delicate and beautiful combo. the best part about this Tiramisu is that it does not require you to add eggs other than the store bought ladyfinger biscuits that may have eggs in them.

To get a strong lychee flavour, the spongefingers are dipped in the lychee syrup from the can of lychees. How convenient is that! There is no wastage and saves you the time to make a syrup from scratch. The raspberry puree in the Lychee and Raspberry Tiramisu is a wonderful contrast to the creamy mascarpone and sweet lychee soaked biscuits.

Overall it is an elegant dessert, a delicious twist to a classic Tiramisu and very easy to put together. It can be made ahead and perfect for a crowd.

Lychee & Raspberry Tiramisu
Makes a 9 inch dessert (if round)

18-20 Ladyfinger biscuits, depending on the size of your pan
1 can pitted lychees in syrup (560 g)
1 tbsp frreze dried powdered raspberries
Raspberry Puree Layer (recipe below)
Mascapone Layer (recipe below)

Raspberry Puree
1 cup frozen raspberries (can use fresh too)
1/4 cup castor/granulated sugar
2 tbsp lychee syrup from the can

Mascapone filling
250 g mascapone cheese (or use cream cheese if mascarpone is not available)
1/3 cup (66 g) castor/granulated sugar
1 cup (240 ml) cold thickened cream/heavy cream
1 tsp vanilla extract

Prepare the lychees and lychee syrup : Place the syrup from the can in a shallow dish, reserving 2 tbsp for making the raspberry puree. Chop lychees into quarters. Set aside.

Make the raspberry puree : In a medium saucepan, place the raspberries, sugar and lychee syrup. Over low-medium heat, cook until raspberries break down and mixture has thickened. Approx 10-12 mins. Remove from heat, allow to cool down.

Make the mascarpone layer : With an electric mixer or by hand, beat the mascarpone and sugar until light (about 2 min). Pour the heavy cream and vanilla and beat until almost stiff peaks are formed. Cover bowl with cling wrap and store in the fridge until needed.

Assemble : You could use a 9 inch cake pan or pie dish or an 8×8 square cake pan. Working one at a time, dip about half the quantity of ladyfinger biscuits in the lychee syrup and place in a single layer in the bottom of pan. Make sure to do it quickly, not letting them soak too long or they may fall apart. Break ladfingers in half and quarters if needed to fill up gams until you have an even layer.

Spoon half the raspberry puree and spread evenly with an offset spatula. Scatter half the chopped lychees over the raspberry layer.
Dollop about one-thirds of the mascarpone filling over the lychees and even out with an offset spatula.
Repeat the process with the remaining ladyfingers, raspberry puree and lychees. For the last layer, place the mascrpone filling into a piping bag and pipe kisses or you could just spread it with a spatula if you don’t want to use a piping bag.

Dust with raspberry powder. Cover the dish with cling wrap taking care not to smudge the piped mascarpone. Refrigerate for 4-6 hours, preferably overnight.

  • « Previous Page
  • 1
  • 2
  • 3
  • 4
  • 5
  • …
  • 111
  • Next Page »
Hey Sugar
Cake
Link to my Facebook Page
Link to my Instagram Page
Link to my Pinterest Page
Link to my Mail Page
Subscribe to this site
Fresh Awards
2019 Aus mumpreneur
2019 aus mumpreneur
Mumbrella

Copyright © 2025 · Sugar Et Al · Designed by Smitten Blog Designs · Log in