• Home
  • Recipe Index
    • Recipe Index
    • Breakfast/Brunch
    • Cakes and Puddings
    • Chocolate
    • Cookies and cupcakes
    • Custard and Mousse
    • Gluten Free
    • Ice Cream
    • Mains
    • Other Sweet Treats
    • Snack/Appetizers
    • Soups and Salads
    • Tarts and Pies
    • Vegetarian
  • About
  • Cookbook
  • Portfolio
  • Store
  • Press
  • Work with Me

Sugar et al

Because Life is a blend of flavours...

Raspberry and Chamomile Cake

18|08|2024

If you thought tea was just an aromatic beverage that made your mornings and afternoons and sometimes nights better, you have to try them in baked goods. I’m not just referring to Chai and Earl Grey or the populat matcha tea. I’m talking about the delicate, floral flavour of chamomile tea. Who knew a couple of tea bags steeped in milk could pack so much flavour into this Chamomile Cake.

Raspberry and Chamomile Cake

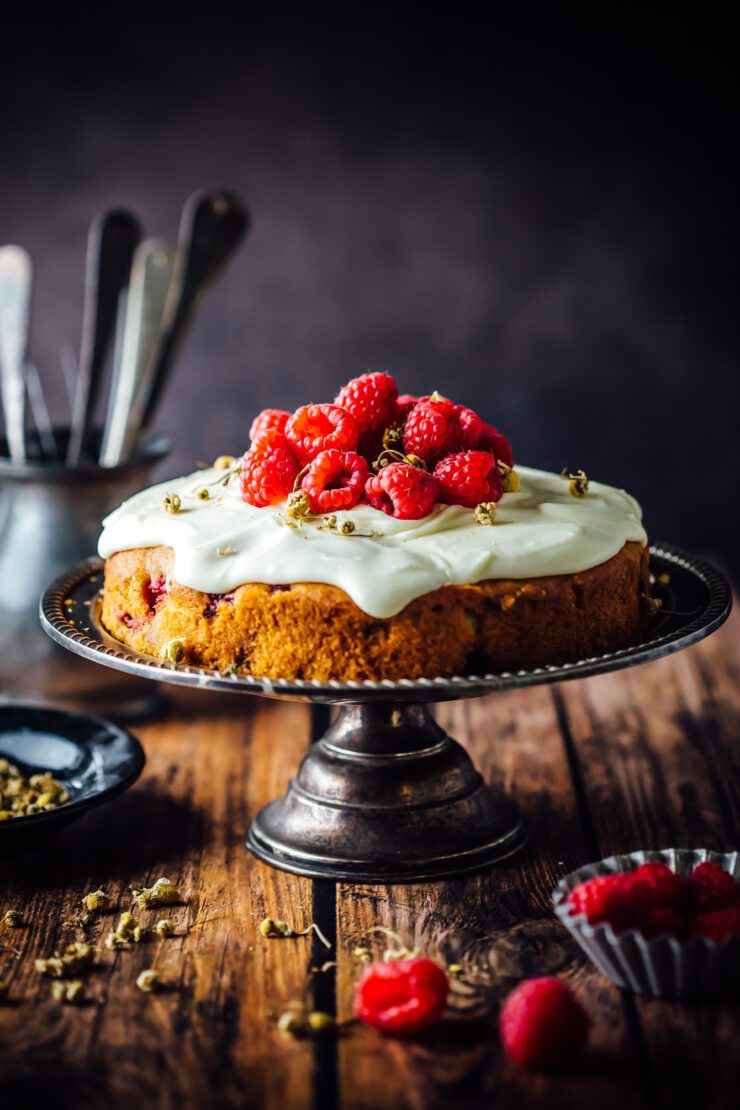
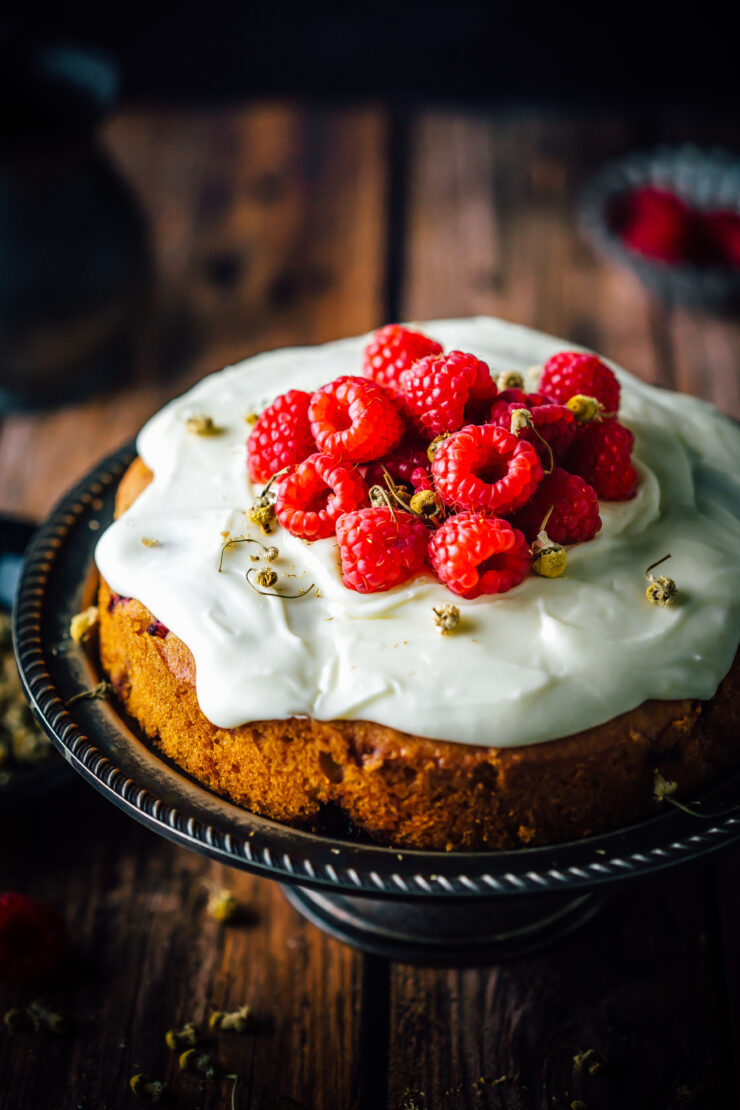
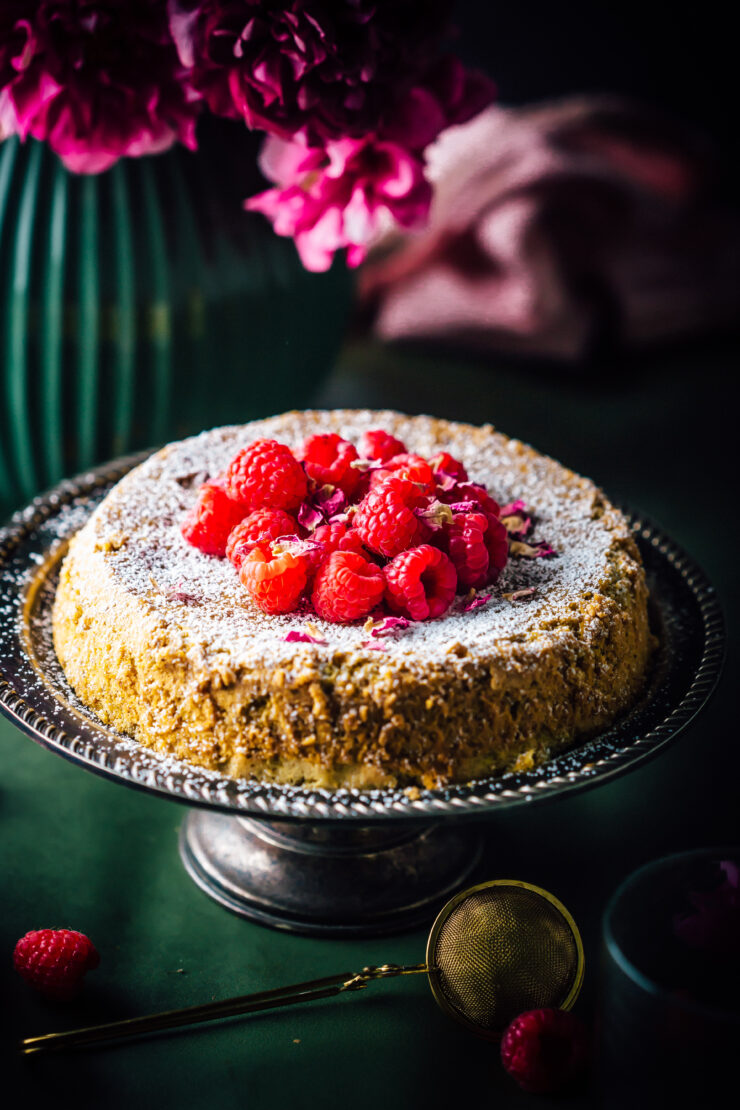
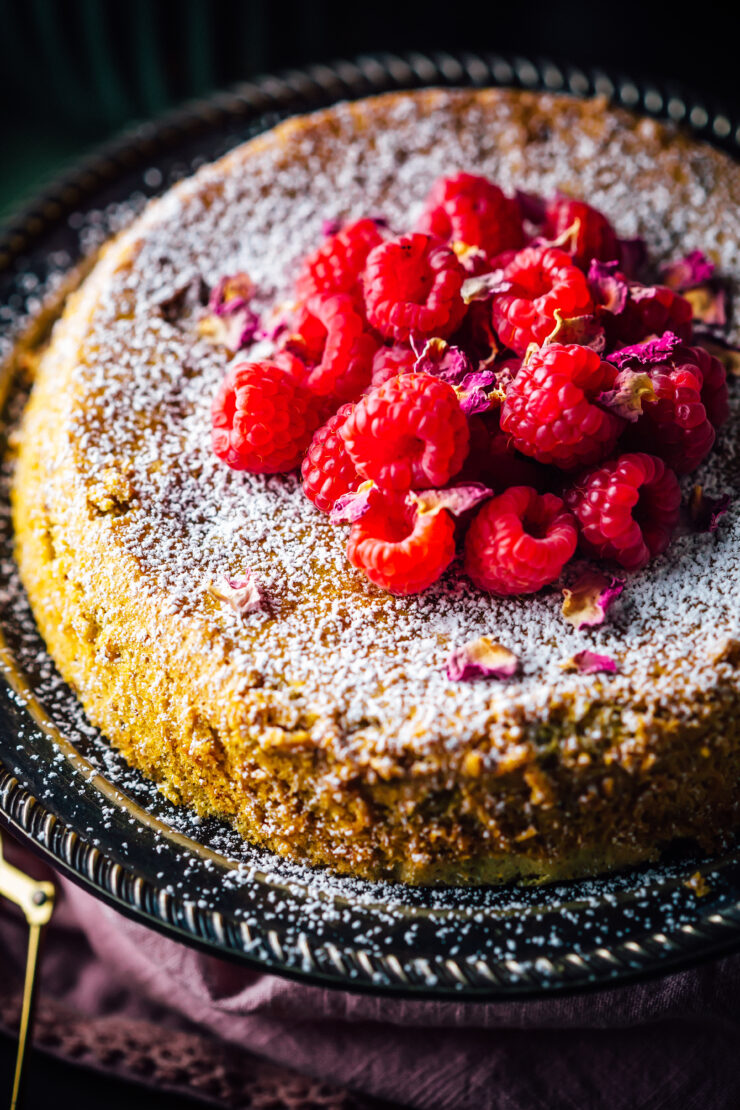
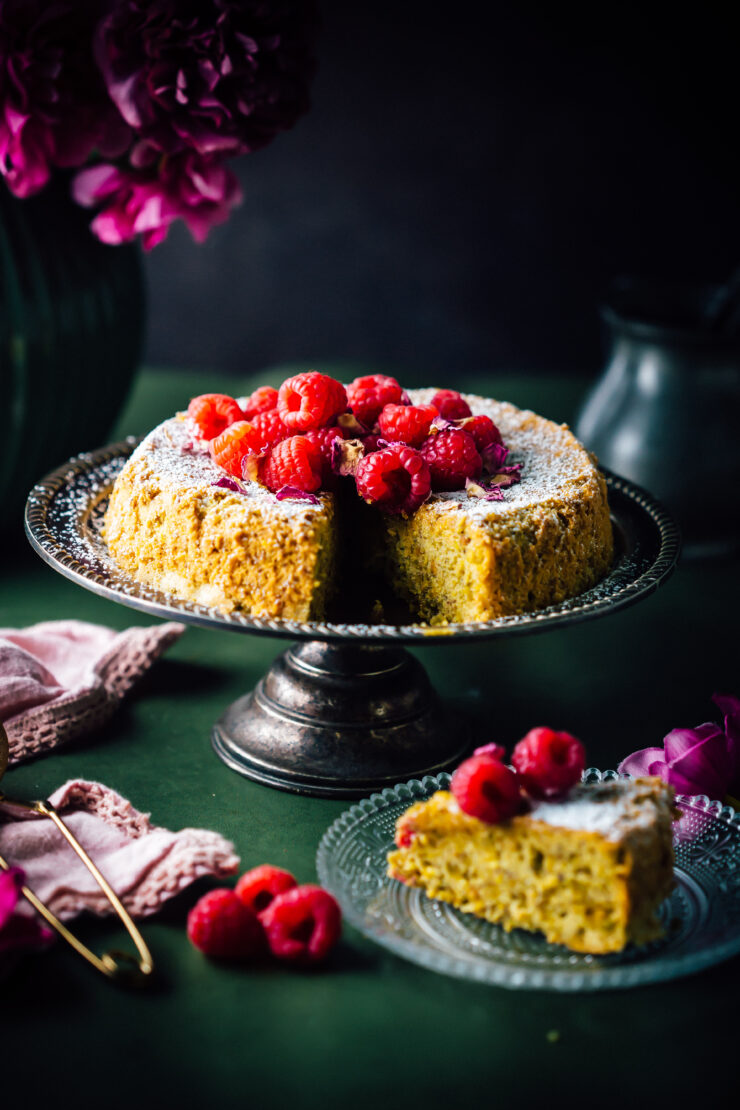
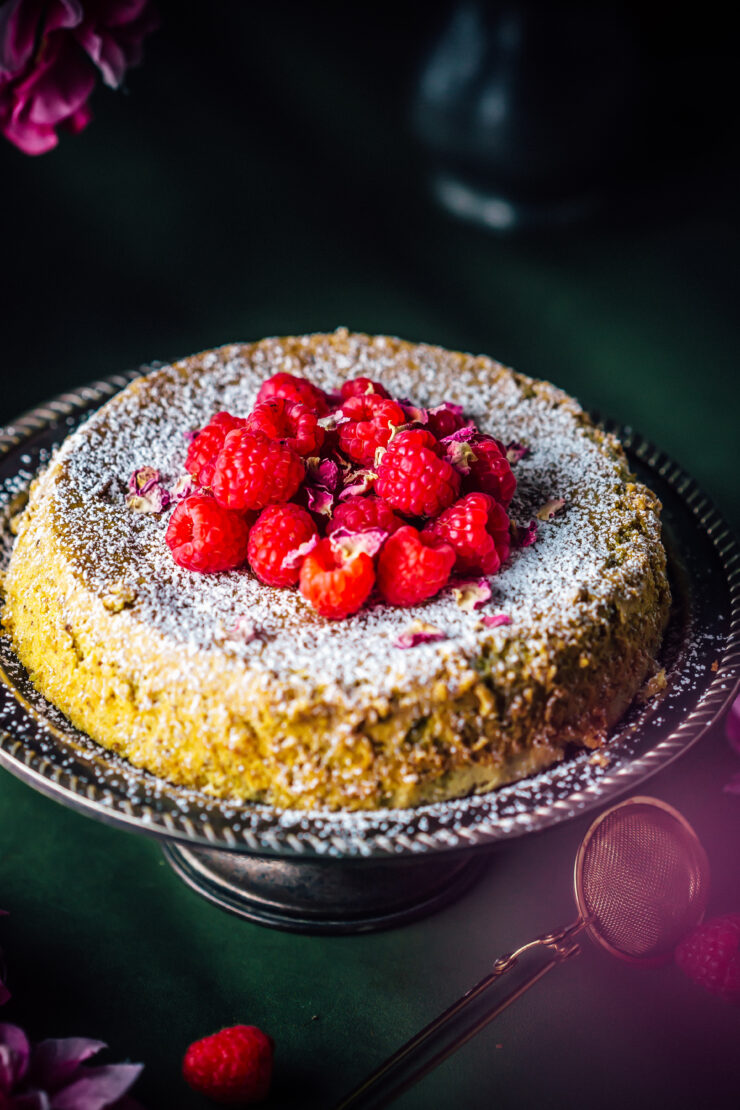
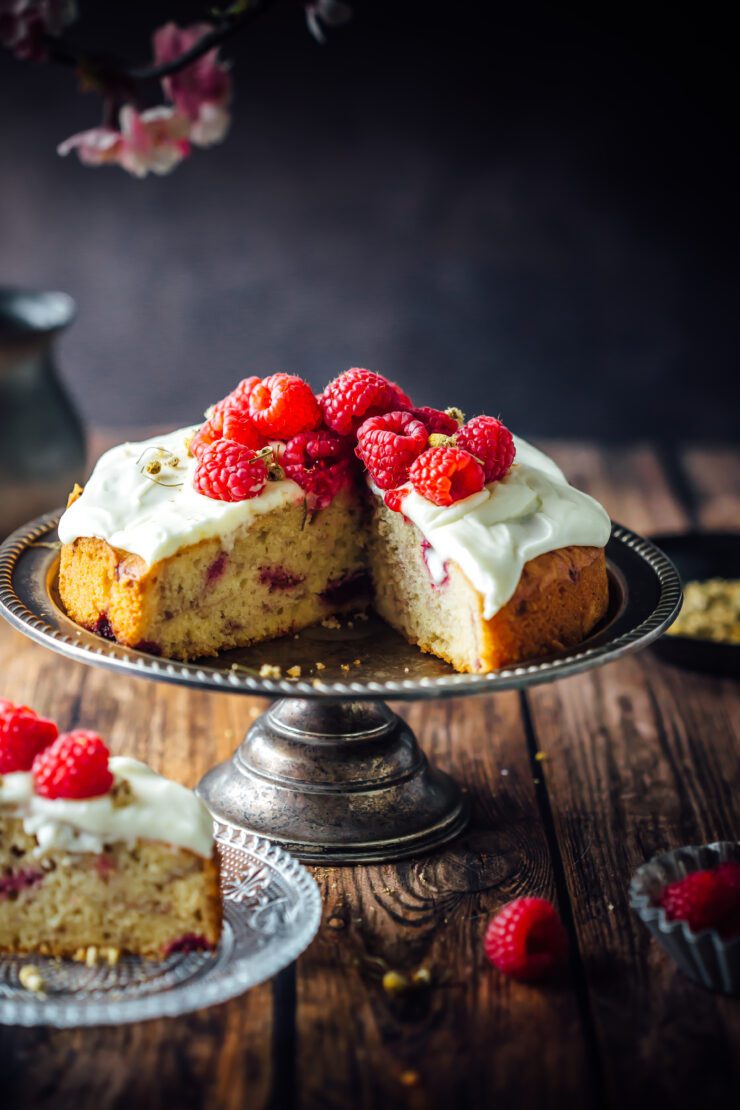
If like me, you’re a little tired of the same old flavours in cake and have made enough Biscoff and cookie dough treats, it’s time to try out this new sweet tea infused number that will blow you away with it’s elegant simplicity. The raspberries lend a gogeous colour as well as a taste punch in every mouthful. The ground almonds provide a delicious nutty texture while the sour cream icing ties them all together. This Raspberry and Chamomile Cake comes together very quickly, yet with an impressive outcome.

Raspberry and Chamomile Cake

If you’re a fan of raspberry cakes, check out this Raspberry and Yoghurt Cake or this No bake Raspberry and Lychee Cheesecake

Raspberry and Chamomile Cake
Makes a 7 inch round cake

½ cup (120 ml) milk
2 teabags, chamomile tea
1/3 cup (75 g) unsalted butter, room temperature
1/3 cup + 1 tbsp (81 g) granulated/castor sugar
2 eggs
3/4 cup (94 g) self-rising flour
1/2 cup (51 g) almond meal (ground almonds)
1/2 cup raspberries (fresh or frozen), extra for decoration

Sour cream icing
2/3 cup (79 g) powdered sugar
2 tbsp (30 ml) sour cream
1 tsp vanilla essence

Make the cake: In a small saucepan, over low, warm the milk. Remove the saucepan from heat and place the tea bags into the milk. Allow to infuse for 30 minutes. Press the tea bags with the back of a spoon to extract more flavour from the tea bags. Discard the tea bags and set the milk aside to cool to room temperature

Preheat the oven to 350°F (177°C). Grease the base and sides of a 7-inch round pan and line the base with baking paper.

In a large bowl, beat the butter and sugar mixture until pale and fluffy. Add the eggs one at a time, beating well after each addition. Fold in the flour and the almond meal alternating with the milk until just combined. Fold in the raspberries. Transfer the batter to the prepared cake pan. Smooth the surface with the back of a spoon.

Bake for 40-45 minutes or until a skewer inserted in the middle of a cake comes out clean. 
Remove the cake from the oven. Leave aside, then gently run a blunt knife around the edges to loosen the cake. Carefully turn it onto a wire rack to cool completely. Once cooled down, pour the sour cream icing over the sides and the top of the cake. Top with fresh raspberries and decorate with dried chamomile flowers.

To make the sour cream icing: In a small bowl, sift the powdered sugar. Add the sour cream and vanilla essence. Stir the mixture with a spoon until well combined.

Pear and Raspberry Cake

9|08|2024

The lead up to Spring is one of my favourite times in the year. The cherry blosoms start blooming, pears are in abundance while berries became slightly more affordable. This pear and raspberry cake is a delicious combination of what August has to offer.

Pear and Raspberry cake


Bosc pears are perfect with their slender necks and soft. juicy interiors. The sweetness goes well with tart raspberries. The pear and raspberry cake is such a great accompaniment to tea or coffee, like a great tea cake should be like. Not overly sweet and with a tender crumb.


Now that spring is almost here, I’m thinking of blood oranges, lemon, rhubarb, blueberries and so many fruits to bake with. What kind of cakes or desserts do you want me see here? Any fruit that you’d like me to bake with? Let me know!

Pear and Raspberry cake


If you enjoy pears in cake you will love this Ginger Cake with Salted Caramel poached Pears or this Shiraz Chocolate Cake with Shiraz Pears

Pear and Raspberry Cake
Makes an 8 inch round cake

125 g unsalted butter, softened
1 cup castor/granulated sugar
3 larg eggs
1 tsp vanilla extract
1 and 1/2 cups self raising flour
3/4 cup greek yoghurt
1 cup raspberries, I used frozen

1 Pear, thinly sliced lengthwise (I used a Bosc pear)
Icing sugar, to dust (optional)

Preheat oven to 180 degrees C (160 degrees C for fan forced). Grease the base and sides of an 8 inch round cake pan and line the base with baking paper.
Beat the butter and sugar until pale and fluffy. Add the eggs one at a time, beating well after each addition.
Gently fold in the flour and yoghurt until well combined. Fold in a quarter of the raspberries.
Pour the batter onto the prepared pan. Dot the remaining raspberries over the top of the batter. Bake for 25 mins, then gently arrange the pears on the top of the cake. Bake for another 15-20 mins or until a skewer inserted in the middle of the cake comes out clean.
Remove from the oven. Leave in pan for 5 minutes, gently turn on to a wire rack. Enjoy warm or at room temperature with a side of whipped cream or vanilla ice cream.

Easy Pistachio Cake

1|06|2024

This Easy Pistachio Cake is the most amazing thing I baked recently. With a hint of rosewater and a beautiful crumb, owing to the addition of nutty pistachios and almonds, this cake is a keeper. What makes it even more special is that there is no flour or butter in the cake. Just a handful of ingredients and a simple process to put together a treat as lovely as this one.

Easy Pistachio Cake

I have used a mix of pistachio and almond meal as I didn’t have enough pistachios at home. But you are free to be as creative as you like. You could make it with just the pistachios or sub any nut of your choice. Initially I wanted to decorate the cake with a ricotta frosting. Upon baking I felt that this Easy Pistachio cake was pure joy and needed nothing else. A dusting of icing sugar and some fresh raspberries to serve, that’s it!

Easy Pistachio Cake

If you love the combination of pistachio and rose, you will love my Rosewater Semolina Cake

Easy Pistachio Cake
Makes a 7 inch round cake

4 eggs, yolks and whites separated
3/4 cup granulated/castor sugar
1 tbsp rosewater (or use vanilla essence)
1 cup raw, shelled, pistachios, ground to a coarse meal
1/2 cup almond meal
icing sugar, to dust
fresh raspberries, to serve

Preheat oven to 180 degrees C (350 degrees F). Grease the base and sides of a 7 inch round pan and line the base with baking paper.

In a medium bowl, place the egg yolks, sugar and rosewater together and whisk until combined. Add in the pistachio meal and almond meal and mix well. Mixture will be quite thick.

In a separate bowl, beat the egg whites until stiff peaks. Fold in the egg yolk mixture, a little at a time, trying not to deflate the egg whites until the entire mixture has been combined.

Pour into the prepared cake pan. Bake for 35-40 minutes or until cooked through (do not overcook or it will turn out dry) a skewer inserted in the middle of the cake, comes out clean.
Remove from the oven, leave aside for 10 minutes. Run a blunt knife around the edges to loosen the cake. Gently turn onto a wire rack to cool completely. Once cooled to room temperature, dust with icing sugar.

Red Velvet Cookies

11|05|2024

Who doesn’t love Red Velvet Cookies? There are two occasions when i bake them every year. During Chrismas and during Mother’s day. There is something so elegant about the colour and the taste of a red velvet dessert. It has an underlying taste of chocolate but not very chocolate-y.

Red Velvet Cookies

Because these were meant for Mother’s day I baked them in my favourite molds for the beautiful heart shape. Link here. The centres have been filled with a delicious cream cheese icing that is quick to make.

I hope you enjoy a beautiful Mother’s day with your family. If your Mum is far away like mine, make sure you tell her how much you miss her and definitely bake something for her when you see her, What I would do to share my treats with my Mum right now! Someday soon.

Red Velvet Cookies

Looking for more heart shaped treats, try these Blueberry Friands/Financiaers.

Red Velvet Cookies
Makes 12 heart shaped cookies

1 cup (125 g )plain flour
2 tbsp (11 g) Dutch processed cocoa powder
1/4 tsp baking powder
1/4 tsp baking soda
1/2 cup (114 g) unsalted butter
1/2 cup (100 g) castor/granulated sugar
1 egg
1 tsp vanilla extract
red gel food paste
gold leaf, to decorate
icing sugar, to dus (optional)

Cream Cheese Icing
1 tbsp cream cheese, room temperature
3 tbsp icing/confectioner’s sugar
1/2 tsp vanilla essence
1 tsp milk

Method : Preheat oven to 180 degrees C (350 degrees F). Lightly grease a sillione mold and set aside.

In a medium bowl place the flour, cocoa, baking powder and baking soda tpgether and mix. In a large bowl, beat the butter and sugar together until light and fluffy (about 2 mins). Add the egg and vanilla and beat until combined.

Fold in the flour until just combined. Mix in the food colour until the desired shade is achieved. If the dough appears too sticky to work with, place in the fridge for 15-20 mins. Otherwise, working quickly, scoop out 1 tbsp of dough and place in the hole of each mold. using the bag of a spoon or with your fingers, press the dough lightly to take the shape of the mold. You don’t have to be perfect as the dough will rise and spread slightly to fit the molds.

Bake for 15-20 miuntes or cookies are lightly browned and feel firm to touch. Remove from oven, allow to cool in mold for 2 minutes, then gently turn the mold tray over for the cookies to slide out. Allow to cool completely before icing.

To make the cream cheese icing, place all the ingredients in a small bowl. Stir well to combine.

To assemble, pipe or fill using a small spoon, the cream cheese icing in the centre of the cookie. Allow to set until firm, about 30 mins. Decorate with gold leaf. Dust with icing sugar if desired.

  • « Previous Page
  • 1
  • 2
  • 3
  • 4
  • 5
  • 6
  • …
  • 111
  • Next Page »
Hey Sugar
Cake
Link to my Facebook Page
Link to my Instagram Page
Link to my Pinterest Page
Link to my Mail Page
Subscribe to this site
Fresh Awards
2019 Aus mumpreneur
2019 aus mumpreneur
Mumbrella

Copyright © 2025 · Sugar Et Al · Designed by Smitten Blog Designs · Log in