• Home
  • Recipe Index
    • Recipe Index
    • Breakfast/Brunch
    • Cakes and Puddings
    • Chocolate
    • Cookies and cupcakes
    • Custard and Mousse
    • Gluten Free
    • Ice Cream
    • Mains
    • Other Sweet Treats
    • Snack/Appetizers
    • Soups and Salads
    • Tarts and Pies
    • Vegetarian
  • About
  • Cookbook
  • Portfolio
  • Store
  • Press
  • Work with Me

Sugar et al

Because Life is a blend of flavours...

Chocolate and Coconut Slice

22|06|2014

I love recipes that can be made without prep or planning. Shopping for ingredients is always fun but once in a while it’s nice to be able to make something with regular pantry ingredients. One-bowl recipes make life so much easier. The last thing you want to do in winter is wash heaps of dishes. And the one thing in winter that you love to do is use the oven.

IMG_0457-2

This recipe is all of the above and tastes amazing. I discovered chocolate and coconut as a combination only recently. Individually I’ve cooked or baked with both for as long as I can remember. Put together in a slice or bar, I found it hard to stop eating them.

IMG_0466

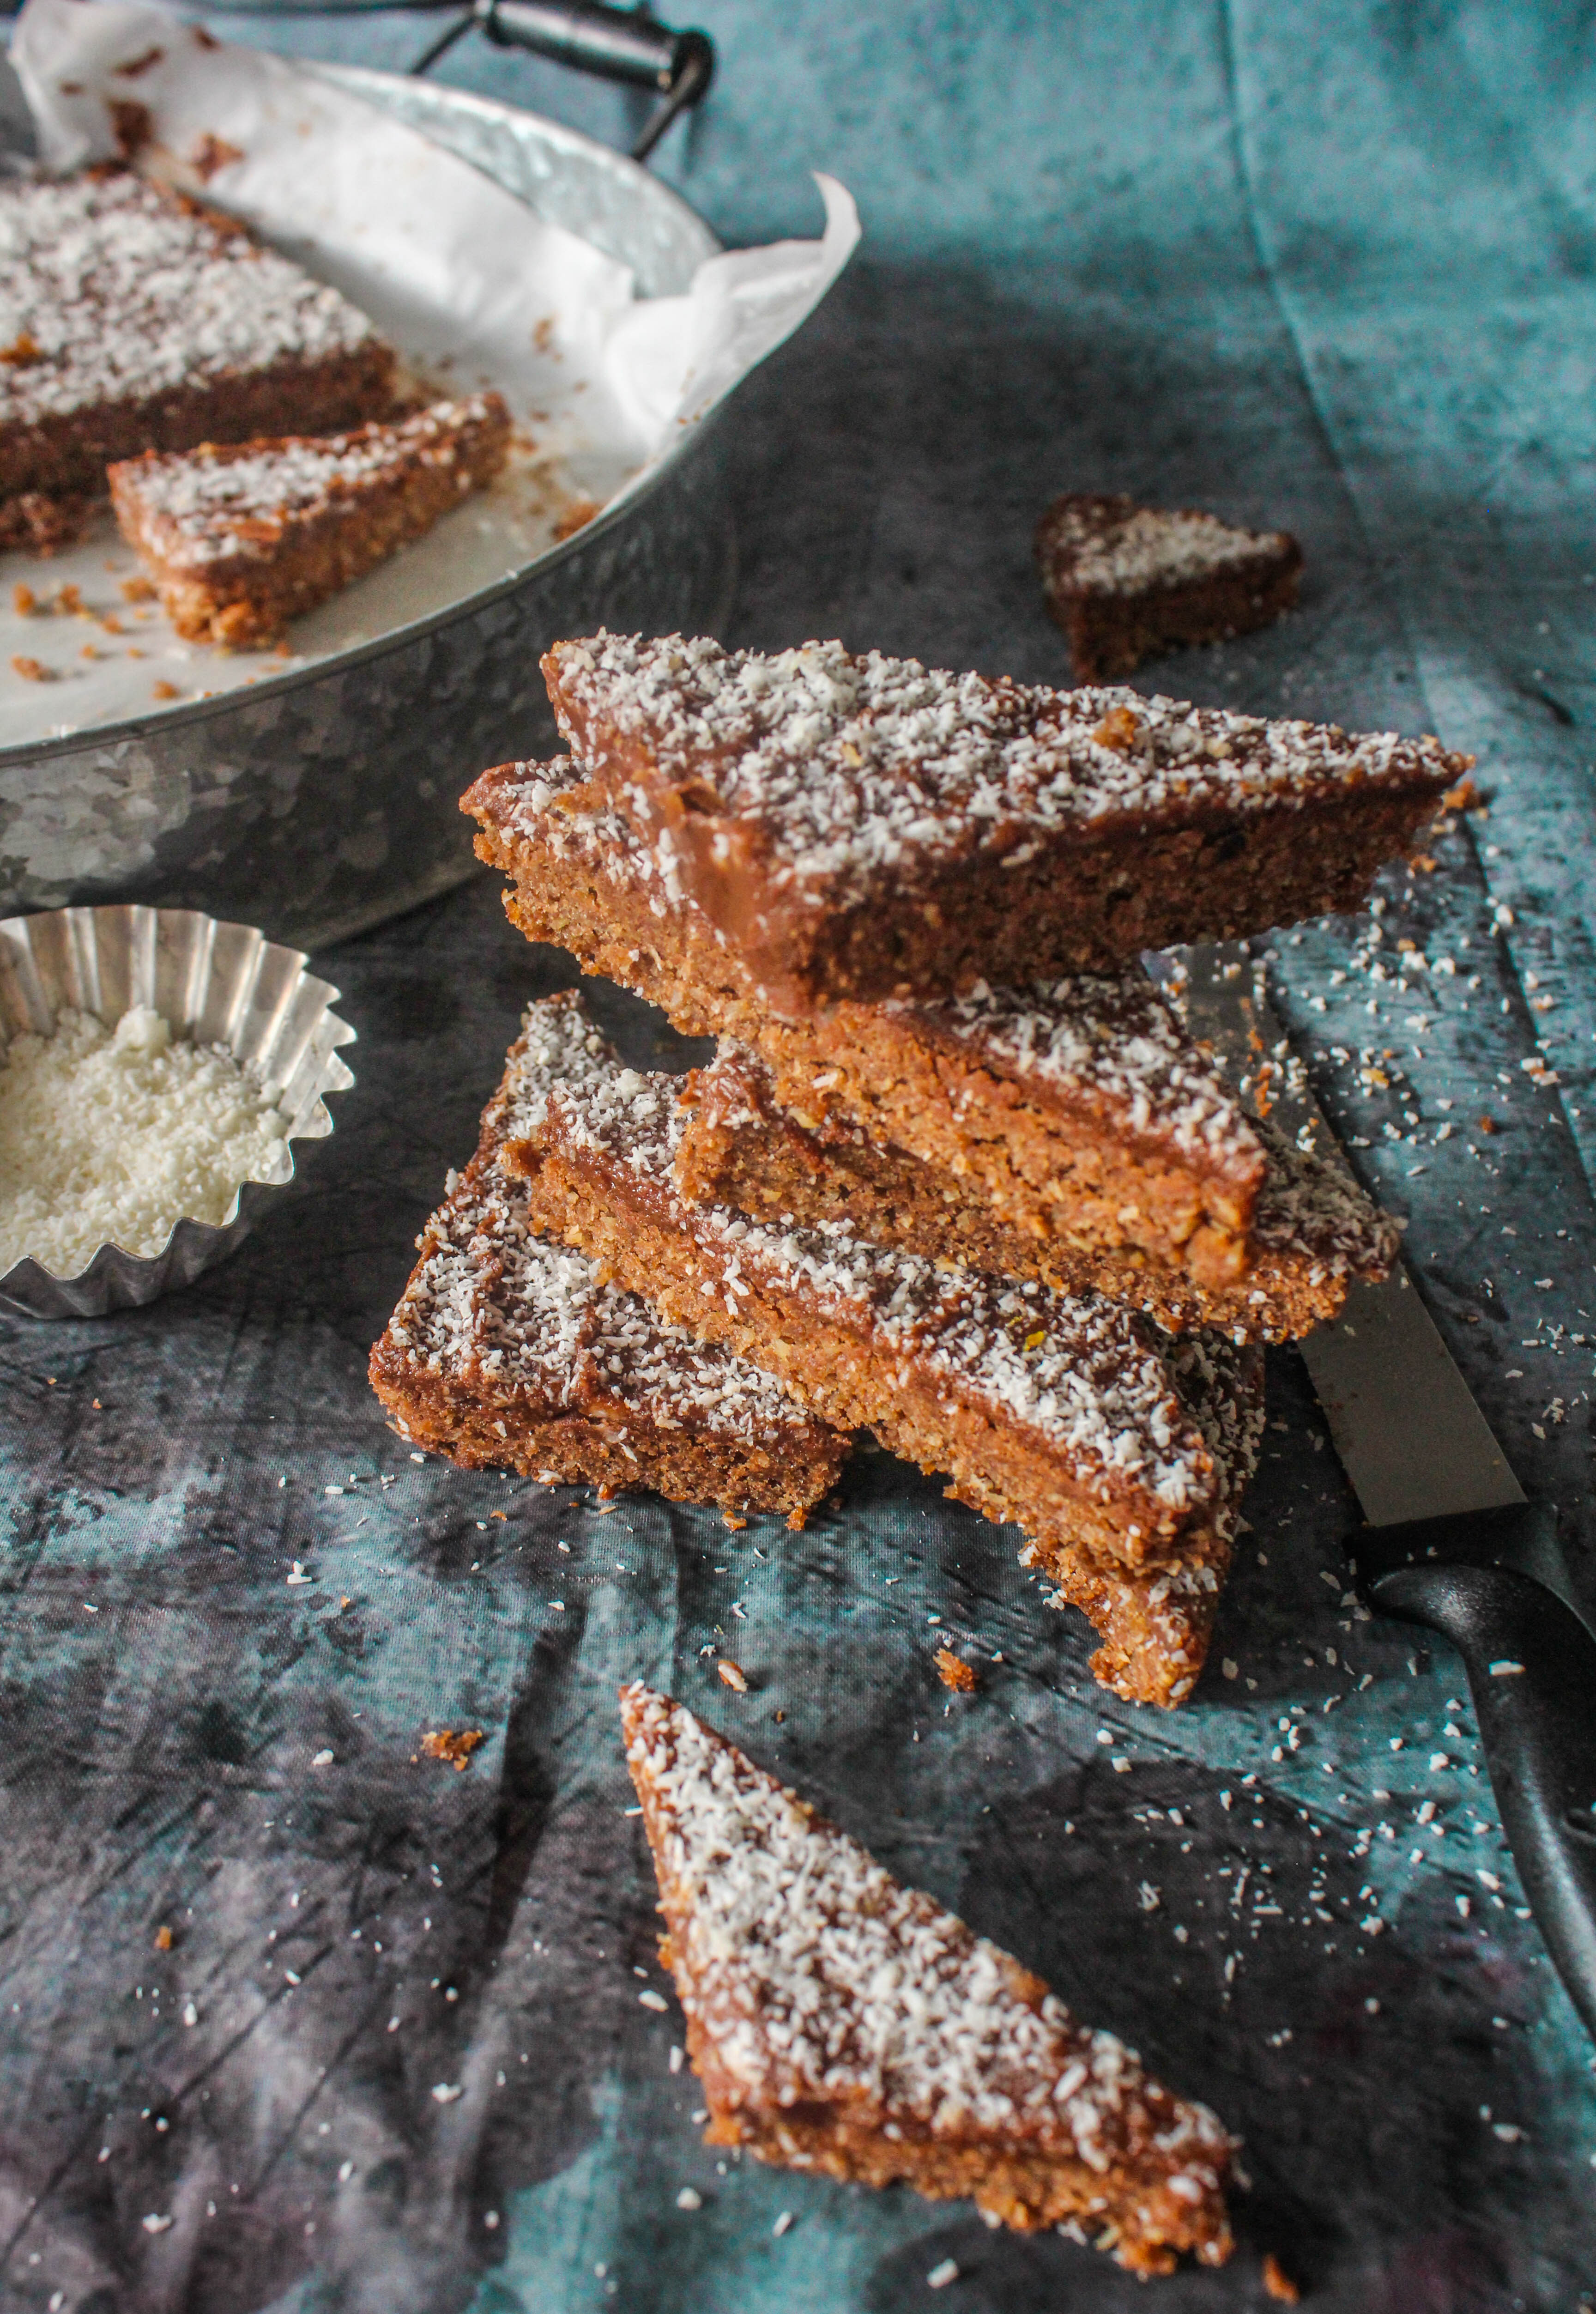
Technically, there is no chocolate in the recipe however it tastes as good as chocolate. They are fudgy almost like brownies but not soft. They have a great texture and the icing makes them really indulgent.

IMG_0469

Chocolate and Coconut Slice (adapted with variation from Taste.com)
Yields 16 slices

150g butter, melted, cooled
1 cup firmly packed brown sugar
1 egg, lightly beaten
1 teaspoon vanilla extract
1/2 cup plain flour
1/3 cup self-raising flour
1/4 cup cocoa powder
3/4 cup desiccated coconut

Chocolate Icing
1 cup icing sugar mixture
1/4 cup cocoa powder
2
0g butter, finely chopped
2 tbsp. boiling water

Preheat oven to 180 degrees C. Grease a 20cm x 30cm rectangular pan and line with baking paper extending paper 2cm from edge of pan at long ends.
Place butter, brown sugar, egg and vanilla in a large bowl. Stir until well combined. Sift over flours and cocoa. Add 1/2 cup coconut. Stir to combine. Spread mixture into prepared pan. Bake for 25 to 30 minutes or until firm to touch

Make Chocolate icing: Sift icing sugar and cocoa into a medium heatproof bowl. Add butter and boiling water. Stir until smooth. Spread hot slice with icing. Sprinkle with remaining coconut. Set aside to cool completely in pan. Cut into pieces. Serve.

Rainbow Veg Wraps

20|06|2014

A few months from now, my twin boys will be starting school. Along with the excitement there is also a tiny bit of anxiety about how we will cope up with the new changes as a family. It is a big transition, after all. Among the various things that I have been dwelling upon, lunchbox is certainly one of the top things on my list.

IMG_0449-2

I am on the lookout for portable, nutritious, exciting and of course tasty food that makes the settling process fun for the little ones. It’s almost like carrying a bit of home..our culture..our traditions and some emotions lovingly put together in a box. Food is comforting. Food makes everything better. Doesn’t it? As a child I remember how excited I was to take a peek into my lunchbox and finish it all up in seconds.

IMG_0451

I came across this recipe idea by Jamie Oliver in a magazine. There were no specifics, just the ingredients to be mixed, filled and rolled up in a wrap. I have used quantities in the filling that I thought would be enough for two. The wraps are not only delicious but filling and healthy.

IMG_0455-2

Rainbow Veg Wraps (inspired by Jamie Oliver)
Serves 2

1 cup finely grated carrots
1 cup finely grated beetroot
1 cup finely grated cabbage
1 tbsp. lemon juice
1 tbsp. extra virgin olive oil
A handful, parsley and mint
2 small wholegrain tortilla wraps
1/4 cup feta, crumbled
sesame seeds, toasted (optional)

Mix the carrots, beetroot and cabbage together in a bowl. Add the mint and parsley leaves. Toss in the lemon juice and olive oil. Divide between the wraps. Crumble over the feta. Sprinkle with sesame seeds. Roll up the wraps, tucking them in at the sides. Cup in half, wrap and pack.


Strawberry Almond Cake with Lemon Sour Cream Frosting

15|06|2014

Almond cake with strawberry jam for a delicious nutty texture and an easy lemon sour cream frosting and fresh strawberries to top the cake. 

I’ve not been feeling like myself over the last few days. Rather, I’m feeling like my old-self before I became a mother. Carefree, energised, relaxed and slightly funny. Because even that takes some getting used to. My parents and my sister, who are staying with us at the moment apparently decided that I would be on a break till they are around and they are sharing the day-to-day responsibilities between themselves.

strawberry almond cake

‘Take a break’ they told me. So, I took long showers, watched movies in fast forward mode, slept on the couch afterwards, visited a craft store I’ve been meaning to since months, eaten calories laden curries and flatbread. And baked cakes. For me, that has always been a way of de-stressing. With people to share them with, it just got a lot more exciting.

strawberry almond cake

The cake uses strawberry jam for a subtle strawberry flavour. Almonds give it a moist nutty texture which is only typical of a nut-meal based cake. The great thing about the cake is that it is so simple to make by just throwing everything together in a bowl, that it can be created at the spur of the moment. The lemon sour cream frosting is equally quick and easy. Overall, this is one cake you would want to make over and over again for its simplicity yet refined flavours.

strawberry almond cake

Strawberry Almond Cake with Lemon Sour Cream Frosting (adapted with variation from Taste.com)
Serves 5-6

Strawberry Almond Cake
175 g butter, at room temperature, roughly chopped
3/4 cup castor sugar
3/4 cup self-raising flour, sifted
3/4 cup almond meal
1/4 cup strawberry jam
3 eggs, at room temperature, lightly whisked
Fresh Strawberries, to serve

Lemon Sour Cream Frosting
1 1/2 cups icing sugar mixture
1/4 cup sour cream
1 lemon, rind finely grated

For the Strawberry Almond Cake: Preheat oven to 180 degrees C. Lightly grease a round  19 cm cake pan and line the base with baking paper.
Use electric beaters to beat the butter, sugar, flour, almond meal, jam, almonds and eggs in a large bowl until combined.
Pour the cake mixture into the prepared pan and use the back of a spoon to smooth the surface. Bake in the oven for 45-50 minutes or until a skewer inserted in the centre of the cakes comes out clean. Remove from oven and set aside to cool completely.

For the Lemon Sour Cream Frosting: Sift icing sugar into a bowl. Add sour cream and lemon rind. Stir until well combined. Pour icing over cake. Allow to set. Decorate with fresh strawberries. Serve.


Green No-Cheese Pizza with Broccoli Pesto, Chicken and Sour Cream

12|06|2014

I am on a Pesto making mission. I have two jars permanently dedicated to it. The sight of it makes me feel good like nothing else. This feel-good is different from the one I get from baking cakes:-) But I guess it’s fierce and it’s related. One exists on account of the other. Well, it’s hard to describe but let’s say I have a place and passion for both in my life. Weird?

IMG_0278

You know there are times I tell my husband that I would like to have my own little chicken farm, have them lay eggs and then bake with them. That is my favourite culinary dream. It’s not impossible but at the moment I cannot even imagine squeezing in a teeny-weeny responsibility into my daily routine. On the other hand however, I have a little herb garden that doesn’t take up too much of my time but it provides so much of the flavour, nutrition and green that is needed to complete my meals.

IMG_0270

I don’t follow a strict recipe anymore while making pesto. Most often, it is a bit of this and that (herbs and nuts) to bring together my magic green potion. That is the amazing thing about pesto. It is versatile, adaptable and personal. The kale pesto I posted a couple of weeks ago turned out to be an instant hit so I decided to share my broccoli pesto. Unlike the kale pesto, this one goes down well with my kids. Kids seem to love broccoli. And if you love broccoli, you are going to love this pizza too. I don’t like my pizzas loaded with toppings…a few complementing flavours that you can identify as you eat does it best for me.

IMG_0273

While broccoli is the core ingredient here, you can substitute the other herbs and nut as per convenience and availability. I’ve made this pesto with green chillies earlier but If kids are eating, I prefer to leave them out. The pesto is flavourful enough to replace tomato and cheese in a pizza. So it is certainly healthier. I LOVE cheese but it’s nice to try out different things. In this recipe I have used store-bought smoked chicken which is handy to dish out quick meals. I also tend to use leftover roasted chicken from the previous day which I reserve for making quick curries and snacks. Frozen pizza dough, a jar of home-made prepared pesto, leftover chicken and a dollop of sour cream…it is as simple as that to make your pizza from scratch.
The broccoli pesto can also be used with pasta, on toast and soups. Vegetarians can replace the chicken with tofu or mushrooms.

IMG_0280

Now for the winner of the Harris Coffee give away who receives a fabulous Harris coffee pack.
The winner is Krissie from Pearls of Style. Congratulations Krissie! You will be receiving your package shortly.

Green No-Cheese Pizza with Broccoli Pesto, Chicken and Sour Cream
Serves 3-4

Pizza Dough (makes two 12 inch pizzas)
3 cups Plain Flour
2 tsp/7g/1 sachet dried yeast
1/2 tsp castor sugar
1/2 tsp salt
1 1/4 cups warm water
1 tbsp olive oil
Olive oil, for brushing
Semolina or Polenta, to dust

Pizza Topping
1 recipe Broccoli Pesto
1 smoked chicken breast (or fresh, cooked chicken), roughly chopped
1/2 red onion, finely chopped
1/2 cup sour cream
Baby Spinach and Rocket leaves, for garnish
Cracked Pepper, to serve
Extra virgin olive oil, to drizzle (I use garlic infused extra virgin olive oil)

Broccoli Pesto
1 head broccoli (about 400 g), cut into florets
3 cloves garlic,
1 tbsp. almonds, toasted and roughly chopped
1/4 cup basil leaves
2 springs thyme
1 tbsp. freshly squeezed lemon juice
salt and pepper, to season
2 tbsp. extra virgin olive oil

Make the dough: Combine the dry ingredients in a large bowl and make a well in the centre. Add the warm water and olive oil. Mix together and use your hands to bring it to a soft dough. Knead it on a floured surface to make it smooth and pliable. Return it to the mixing bowl that has been brushed with oil. Add the dough and turn to coat.
Cover with a damp tea towel. Set aside in a warm place for 30 minutes or until dough doubles in size. Punch down dough with your fist. Remove the dough from the bowl and knead it gently for a minute. Halve the dough (for one 12 inch pizza) and roll it out to the desired portion and thickness.

Make the Pesto : Heat 3/4 cup salted water on medium heat in a saucepan. add the broccoli and simmer for 3- minutes until just tender. Most of the water would be absorbed by now. Cool the mixture slightly. Add to the processor along with garlic, basil, thyme, almonds, lemon juice. Process to a coarse paste. Season with salt and pepper. Add the olive oil and mix until smooth. Store in the refrigerator until needed.

Make the pizza: Preheat the oven to 220 degrees C. Dust pizza tray with semolina or polenta. Place the rolled out dough onto the prepared tray. Spread a thick layer of broccoli pesto around the base of the pizza. Top with smoked chicken and red onion. Season with salt and pepper and drizzle with olive oil. Bake for 10 minutes or until base is crisp. Remove the pizza from the oven, dollop with sour cream and top with leafy greens. Serve with an extra drizzle of extra virgin olive oil and cracked pepper.

  • « Previous Page
  • 1
  • …
  • 80
  • 81
  • 82
  • 83
  • 84
  • …
  • 111
  • Next Page »
Hey Sugar
Cake
Link to my Facebook Page
Link to my Instagram Page
Link to my Pinterest Page
Link to my Mail Page
Subscribe to this site
Fresh Awards
2019 Aus mumpreneur
2019 aus mumpreneur
Mumbrella

Copyright © 2025 · Sugar Et Al · Designed by Smitten Blog Designs · Log in