• Home
  • Recipe Index
    • Recipe Index
    • Breakfast/Brunch
    • Cakes and Puddings
    • Chocolate
    • Cookies and cupcakes
    • Custard and Mousse
    • Gluten Free
    • Ice Cream
    • Mains
    • Other Sweet Treats
    • Snack/Appetizers
    • Soups and Salads
    • Tarts and Pies
    • Vegetarian
  • About
  • Cookbook
  • Portfolio
  • Store
  • Press
  • Work with Me

Sugar et al

Because Life is a blend of flavours...

Polka Dotted Chocolate Pecan Brownie Tart with Chocolate Ganache

5|11|2013

Do you know what is the hardest part of photographing your favourite food? Protecting your lenses and camera from getting food stained. Because every other minute you are picking up the food and eating it. What a ridiculous thing to do but can I I tell you, its easier said than done!

IMG_6354 (1)

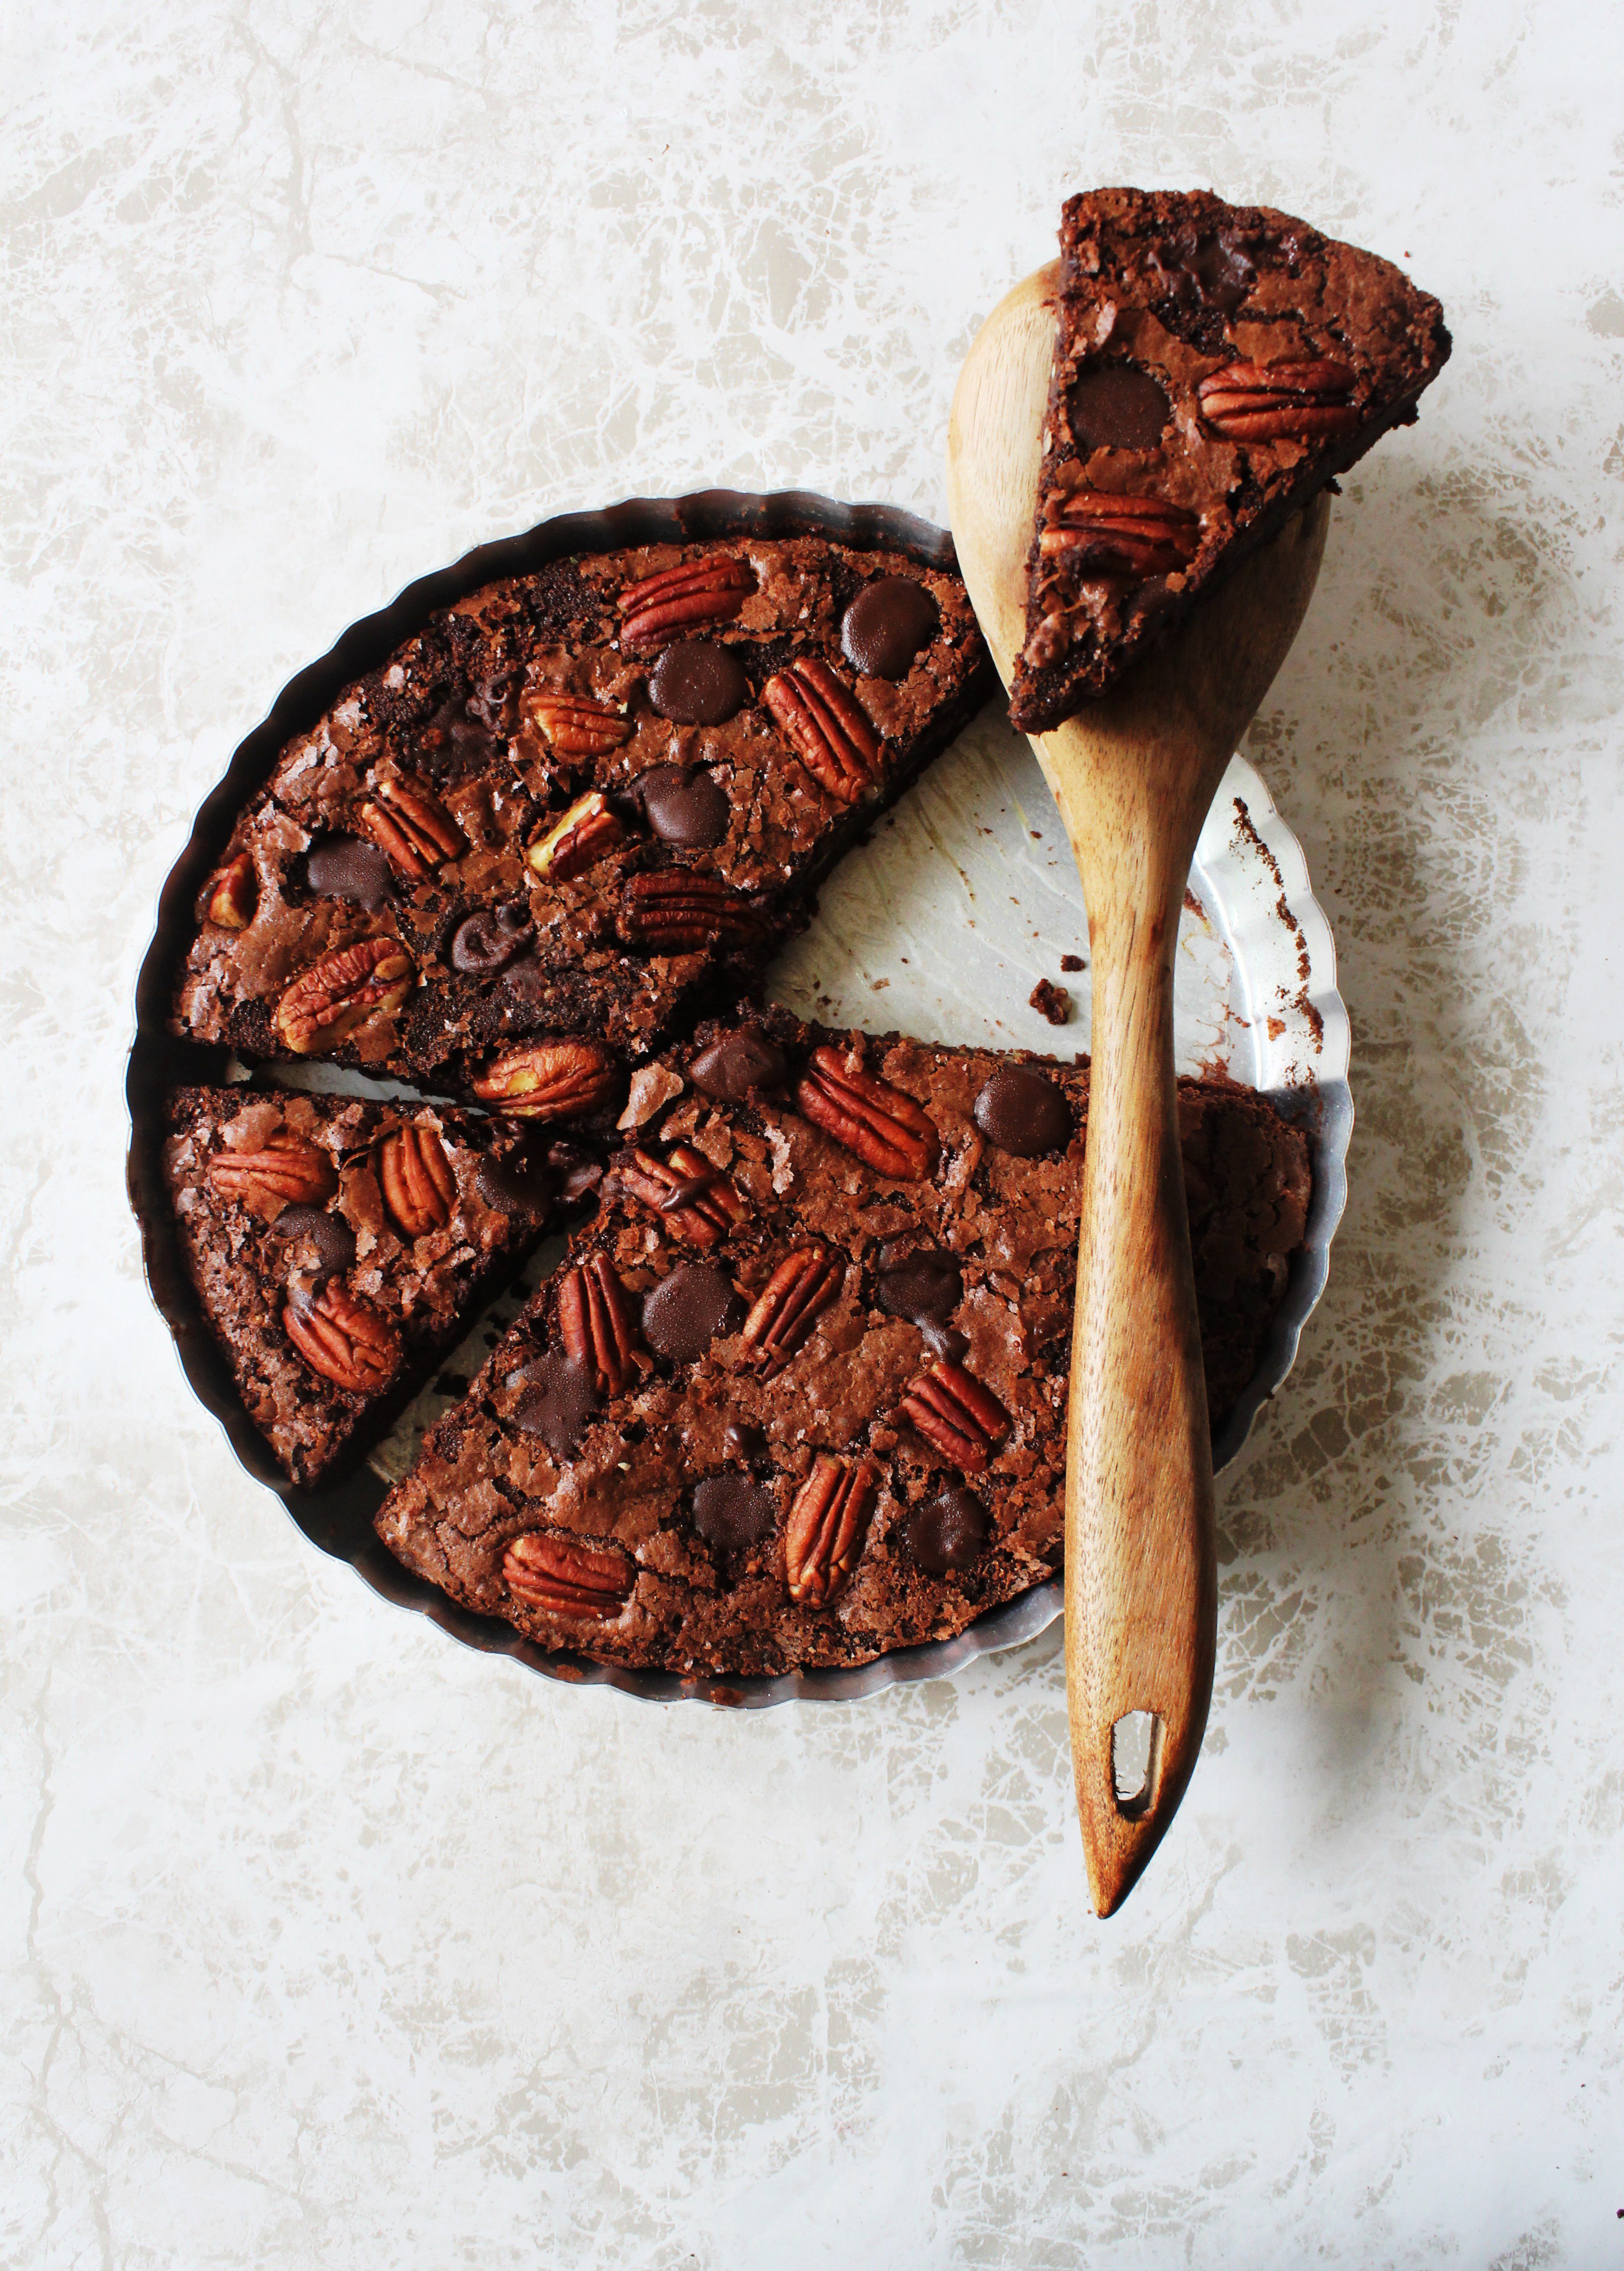
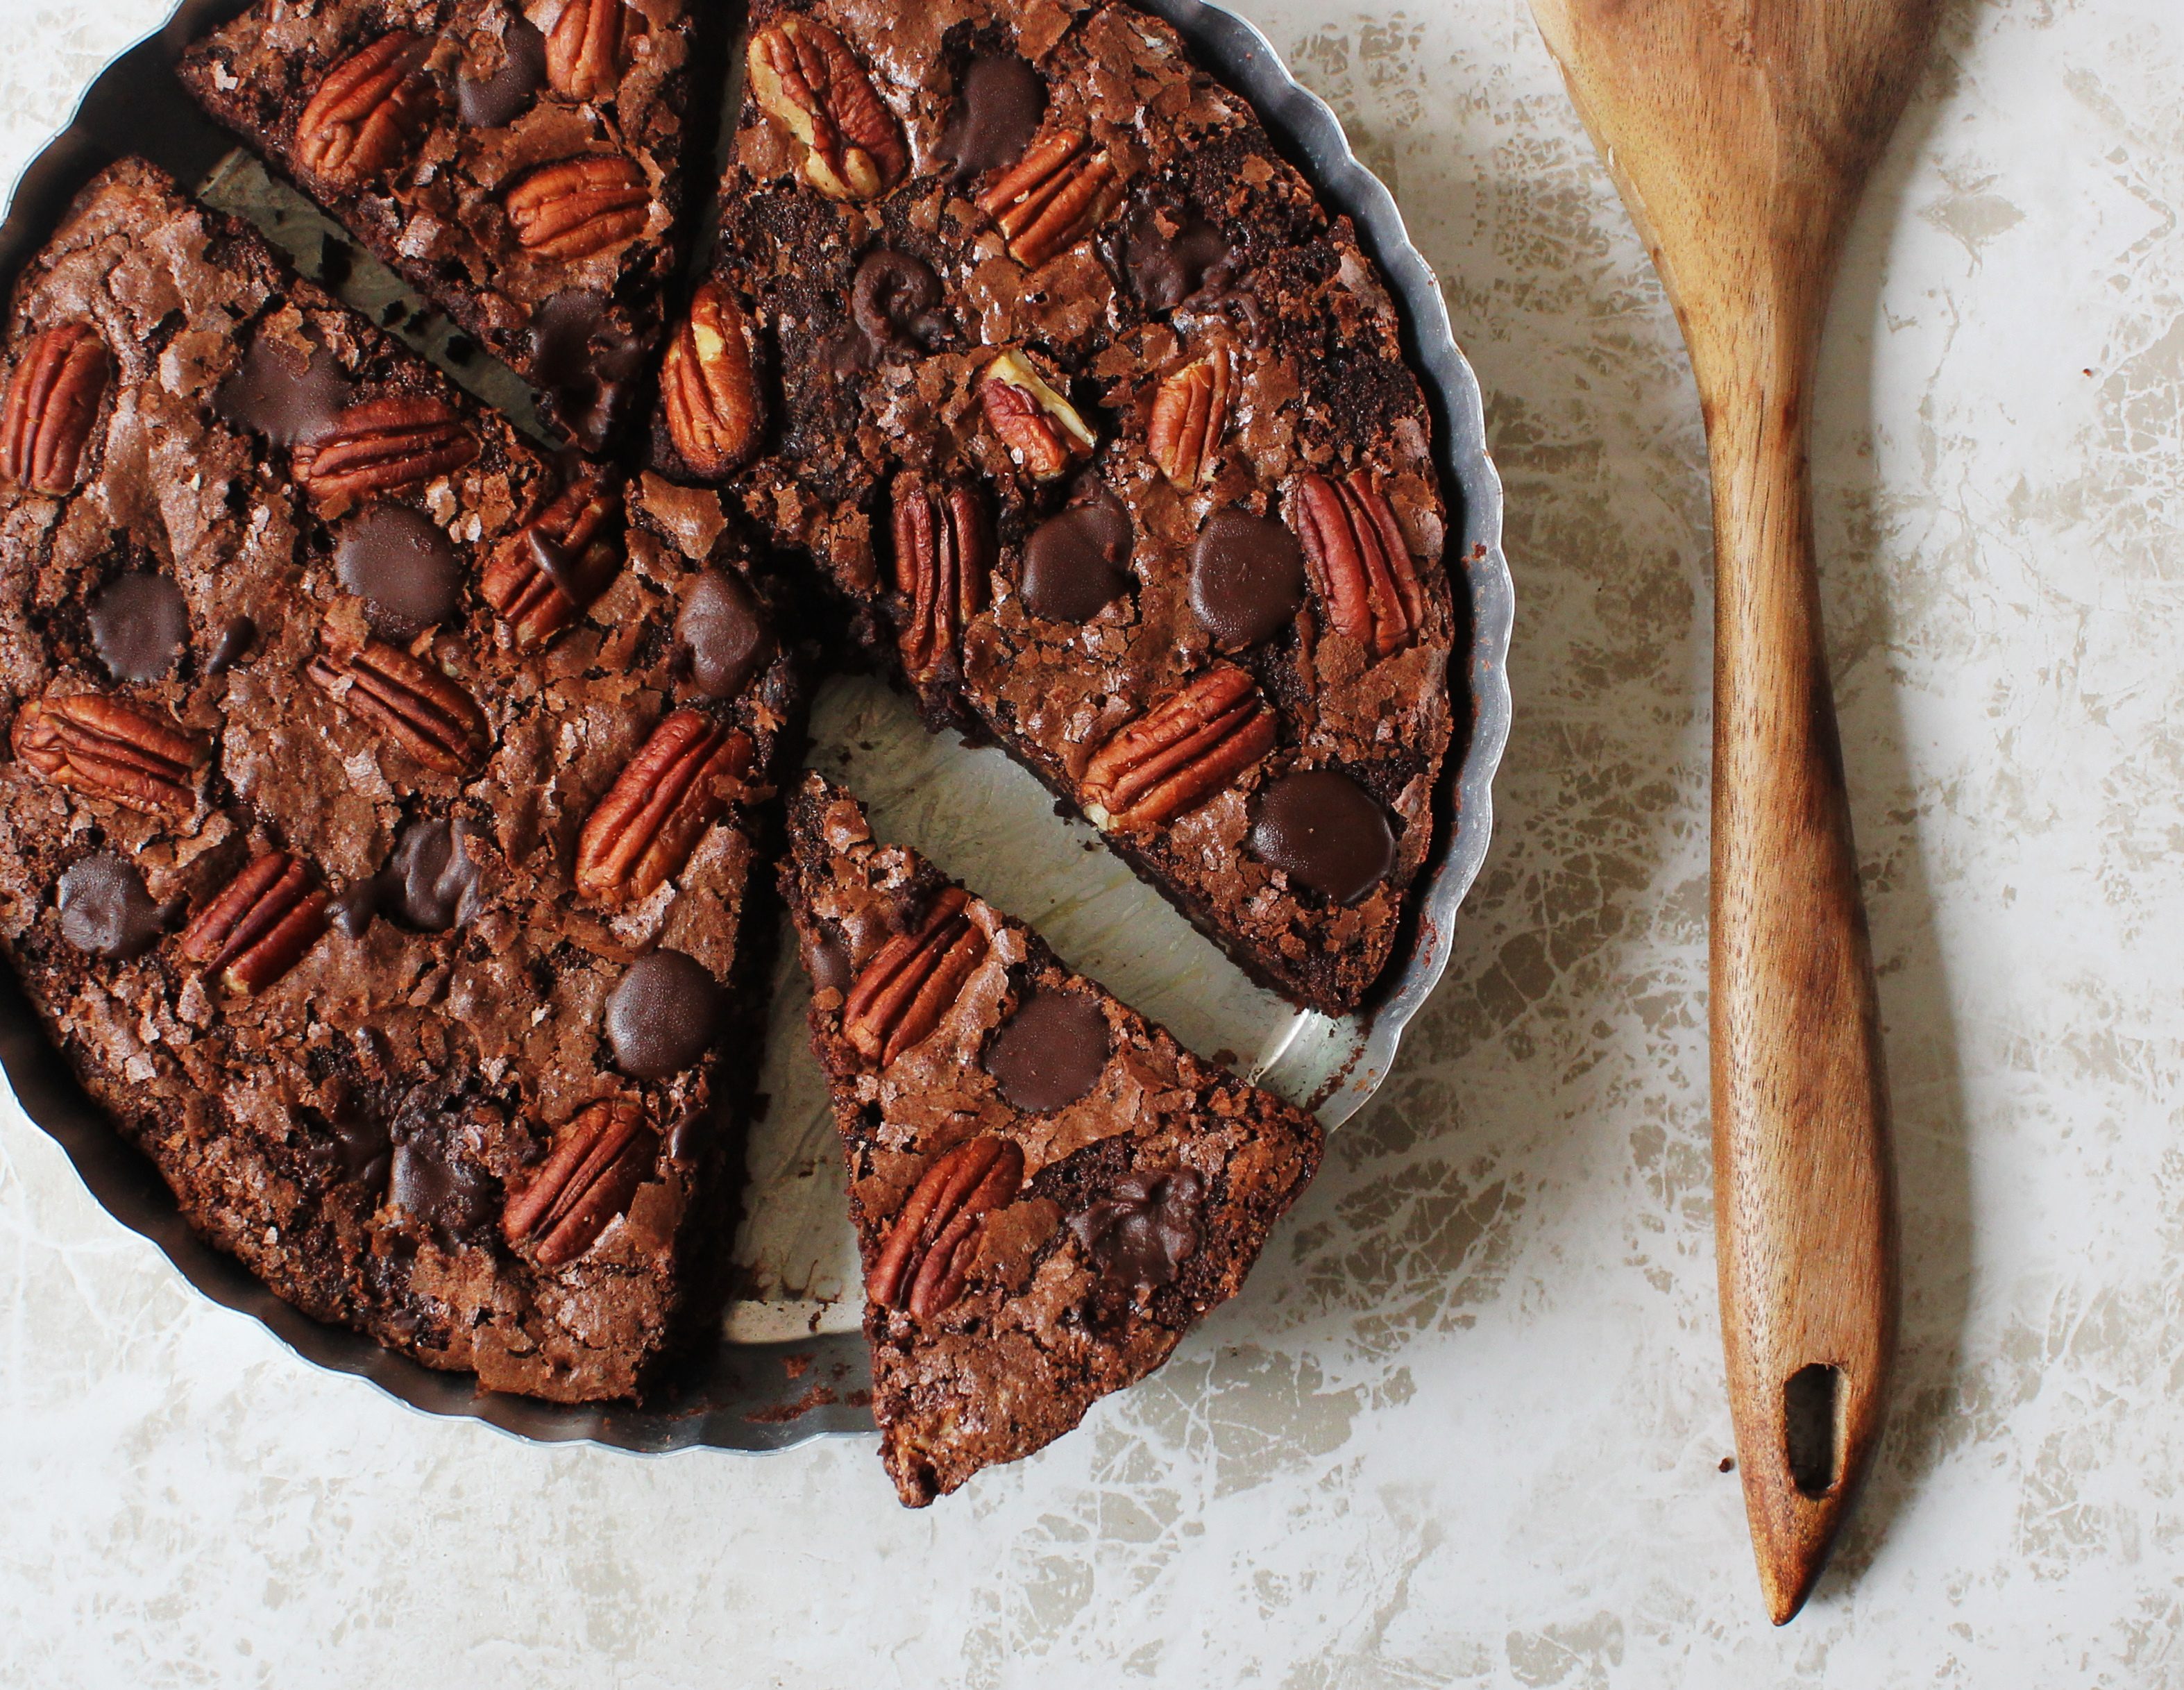
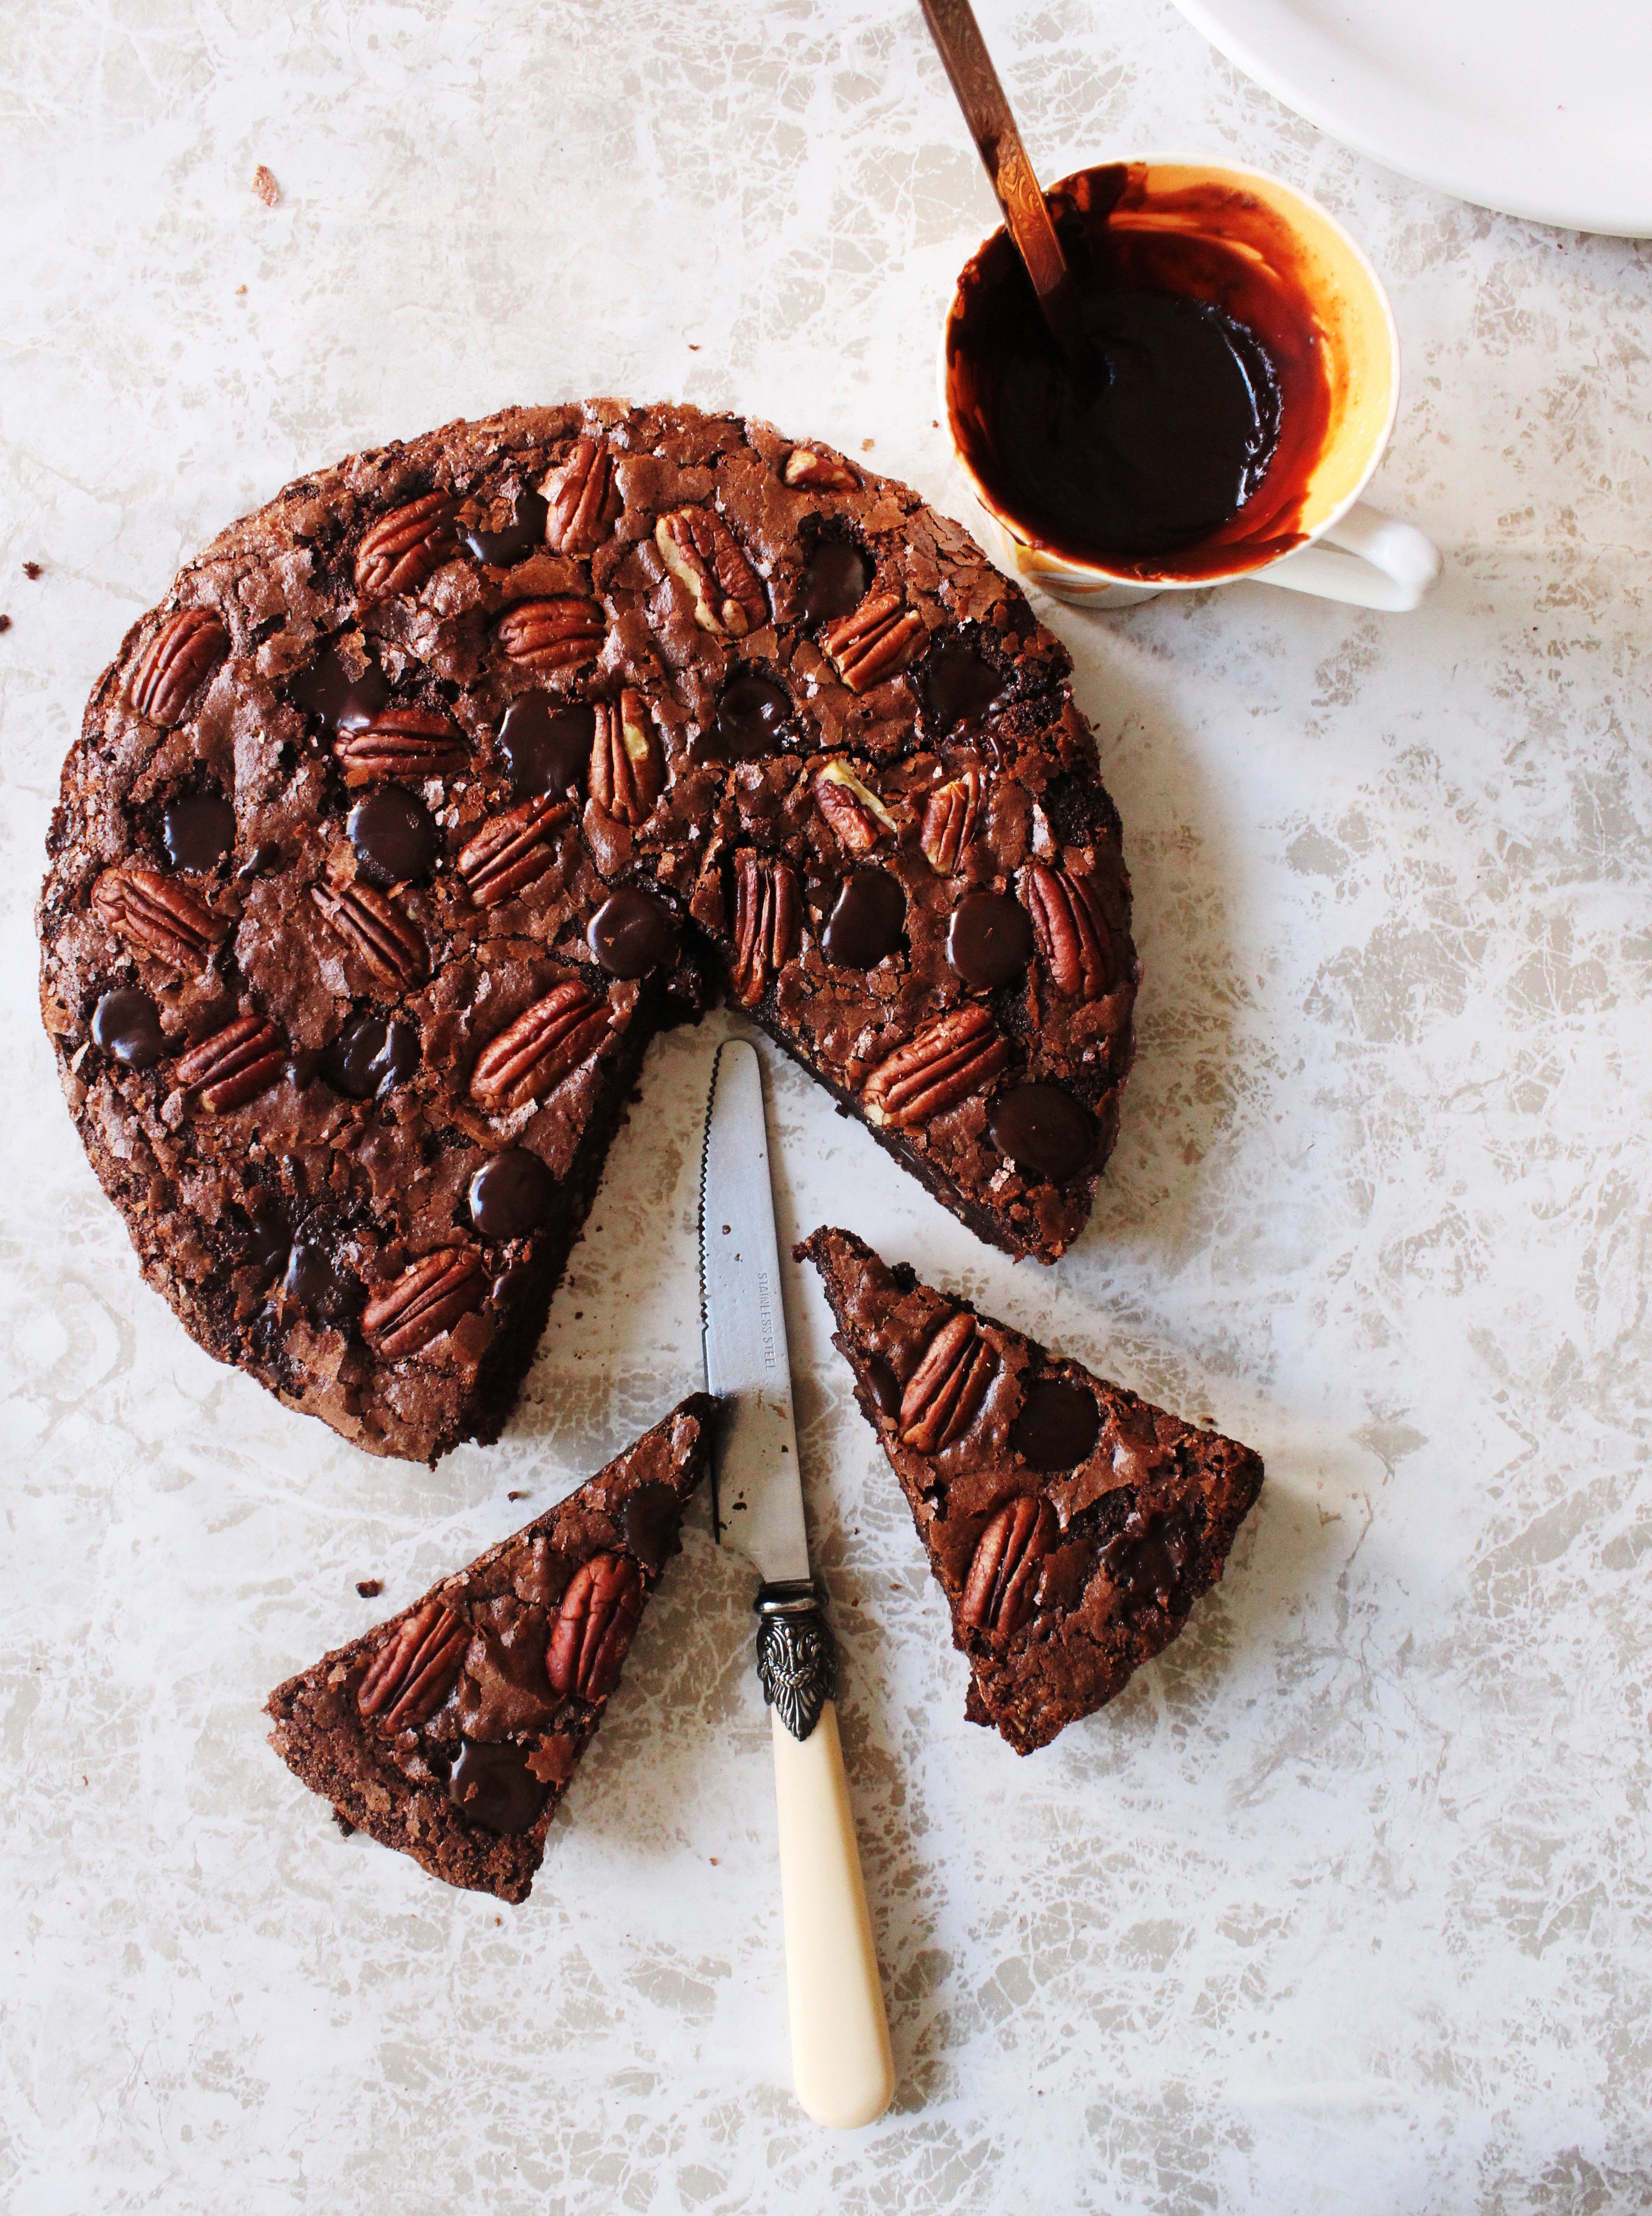
I am so in love with this brownie tart.  Let me explain why! Unlike a tart, there is no shortcrust pastry or any other pastry involved in this. It’s a brownie recipe that bakes beautifully inside a tart pan. The secret ingredient that makes it so luscious and fudgy is cream cheese. And the little polka dots you notice on the top are nothing but chocolate ganache. So basically after the brownie bakes, you make little pockets inside it with the back of a wooden spoon and fill it up with ganache. If that was not all, the brownie is studded with crunchy toasted pecans giving every mouthful a nutty sensation.

IMG_6347 (1)

Chocolate lovers, I highly recommend this recipe for you. Even though it looks fancy, the recipe is pretty much like any other brownie with the exception of the ganache. You can always leave that step and just make the brownie tart though I really wish you don’t. It makes the whole thing so much more delicious and a treat for the eyes…totally worth the effort!
The theme of our Chocolate Party this month is Pecans so my Chocolate Pecan Dessert is dedicated to this favourite party of mine. Do check out the other creations at the bottom of the post.

IMG_6322 (1)

I read this recently “Chocolate is cheaper than therapy and you don’t need an appointment.” ~ Catherine Aitken.
Well, in that case this is the Father of all therapies.
I already feel rejuvenated! But I’m still going for one more little bite..

IMG_6327 (1)


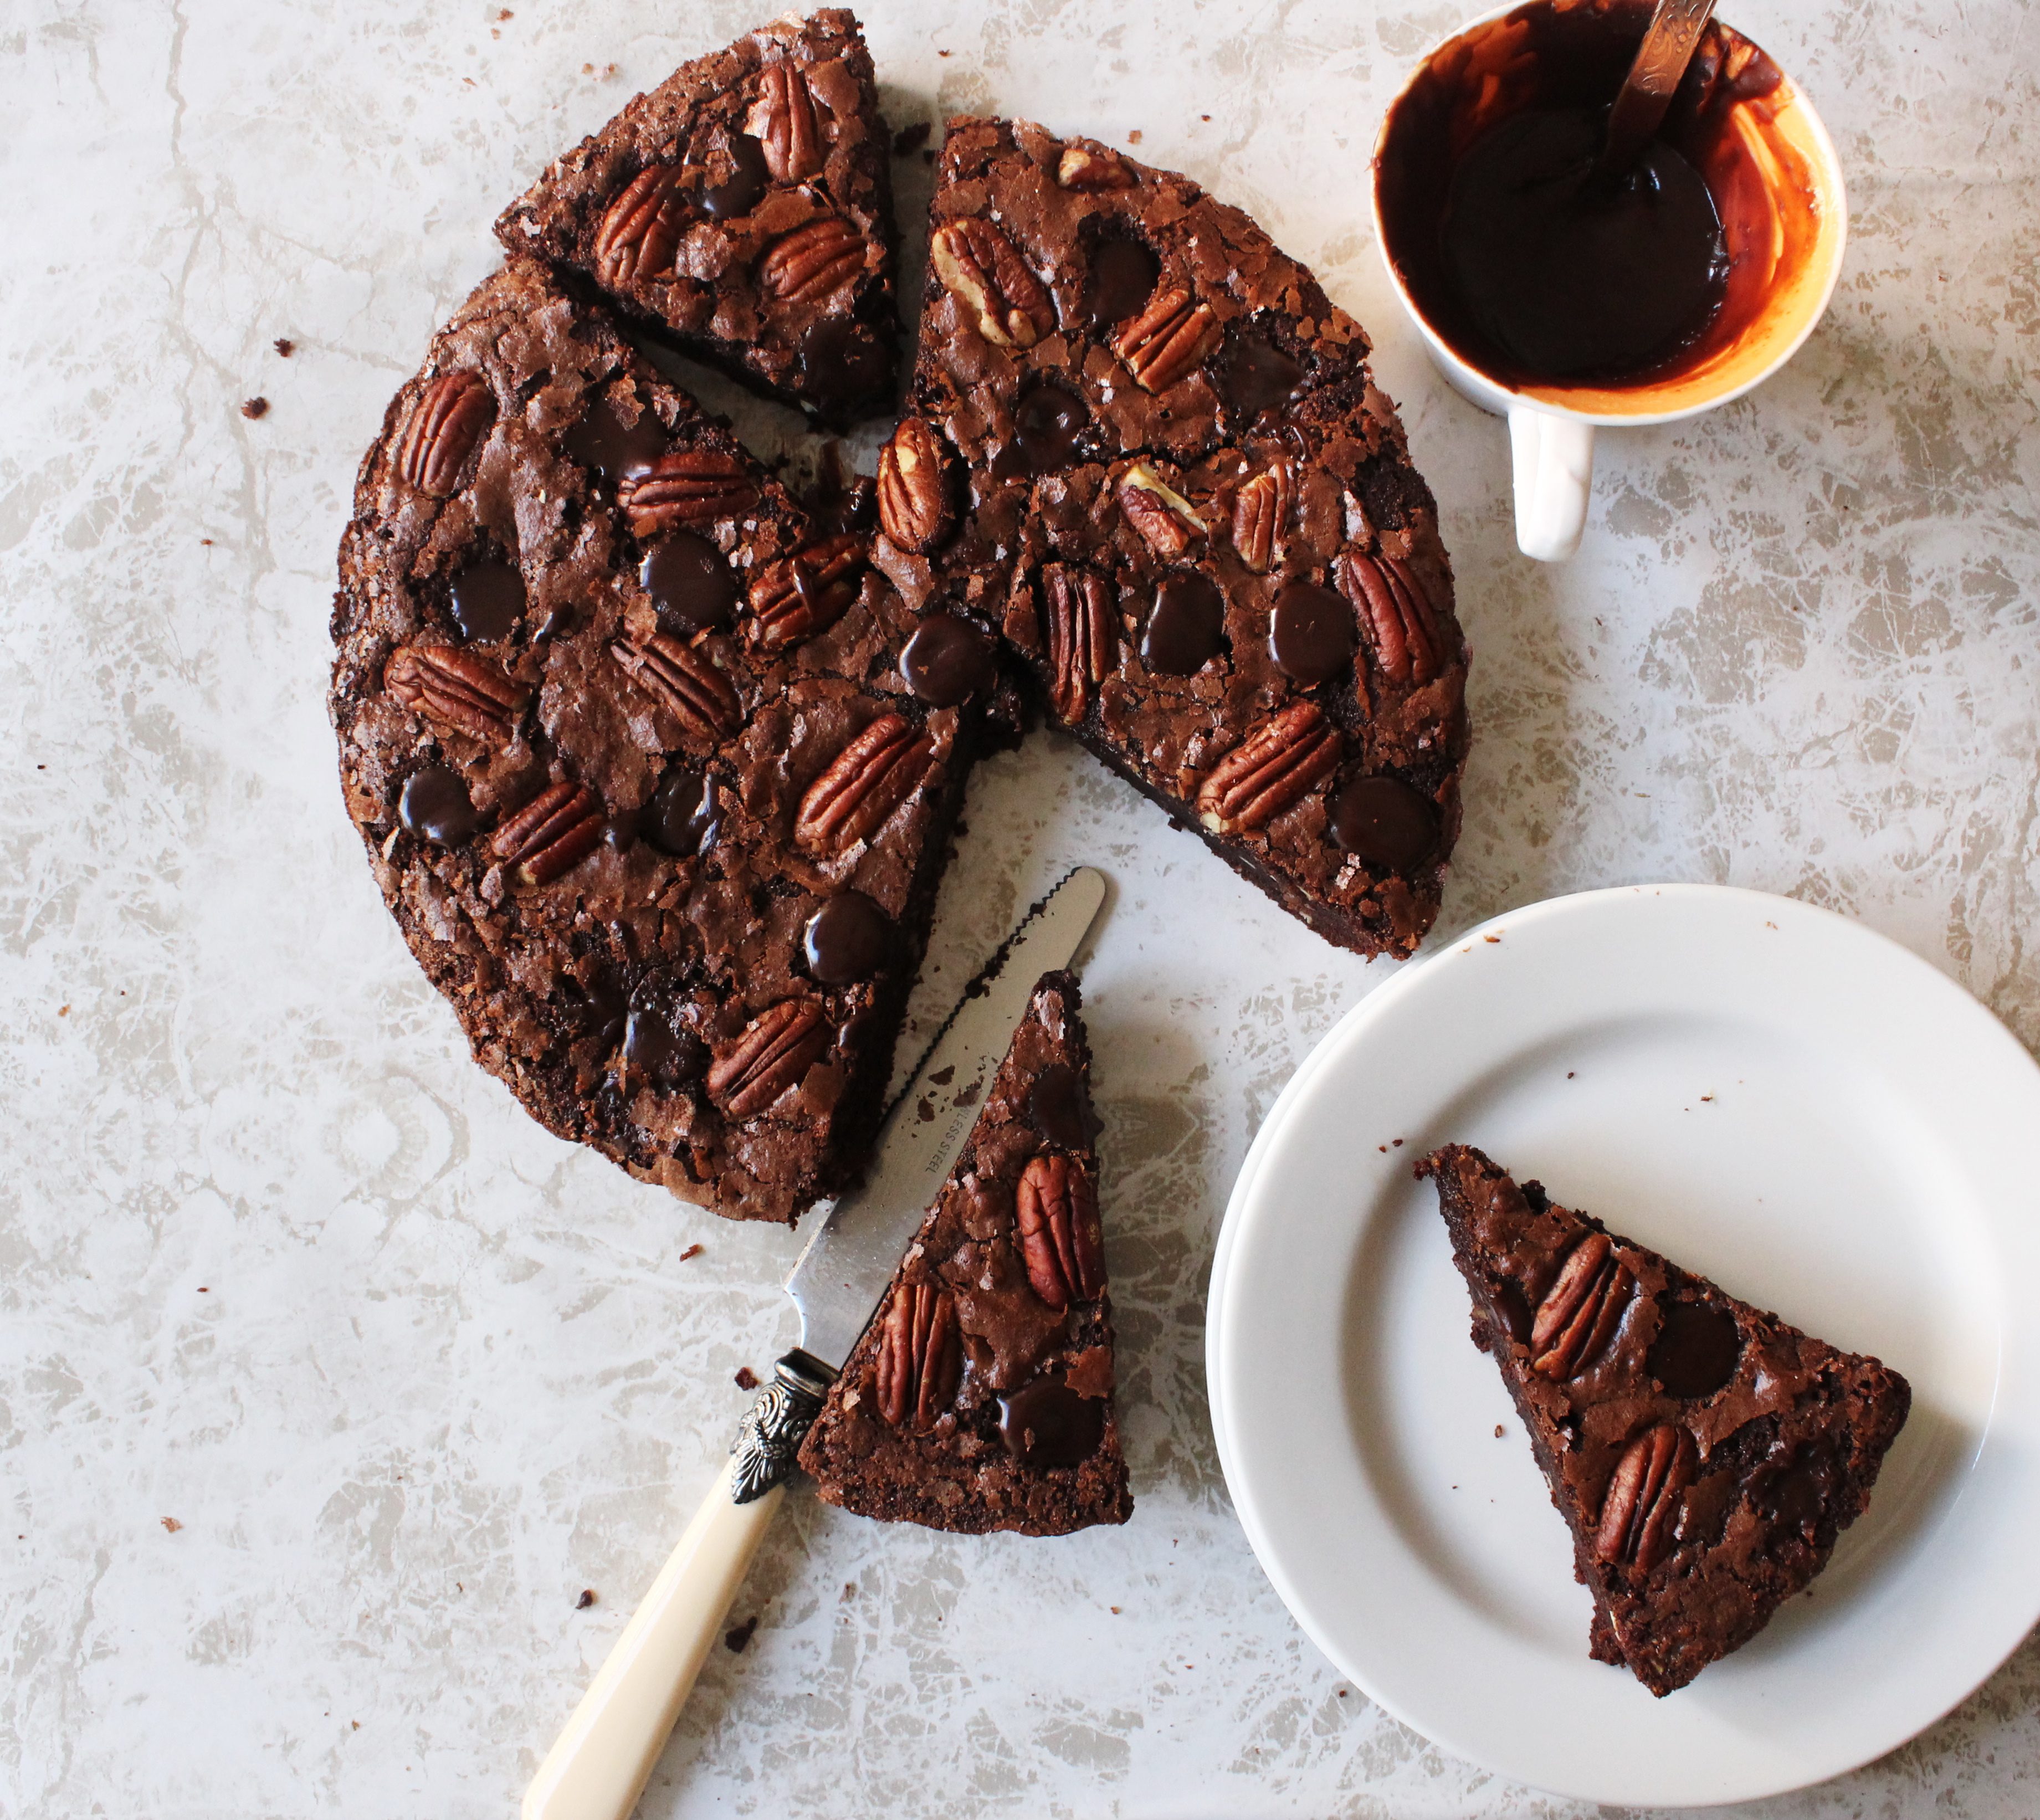
Polka Dotted Chocolate Pecan Brownie Tart with Chocolate Ganache (adapted with variation from Joy of Baking)
Serves 8-10

Chocolate Pecan Brownie Tart
1 cup Pecans toasted, (1/2 cup chopped and 1/2 cup whole)
200 g unsalted butter, roughly chopped
85 g semisweet or bittersweet chocolate, roughly chopped
45 g (about 1/2 cup) unsweetened cocoa powder
250 g (about 11/4 cup Castor Sugar
3 large eggs
1 tsp vanilla extract
85 g regular cream cheese (do not use low fat varieties)
65 g (about 1/2 cup) plain flour
1/4 tsp salt

Chocolate Ganache
60 g semisweet/dark chocolate, roughly chopped
80 ml (1/3 cup) heavy cream

Preheat the oven to 160 degrees C. Set the oven rack in the middle of the oven. Grease a 9 inch (23 cm fluted tart pan with a removable bottom and then line the bottom of the pan with baking paper.
In a large heatproof bowl, placed over a saucepan of simmering water, melt the butter and chopped chocolate. Remove from heat when the chocolate has melted. Beat in the cocoa and sugar into the chocolate mixture until incorporated. I used a hand mixer. If you are doing it by hand, use a whisk. Add the eggs, one at a time, beating well after each addition. Beat in the vanilla extract and then the cream cheese until small pieces remain. Add the flour, salt and chopped pecans.

Place the tart pan onto a large baking sheet to catch drips (if any). Pour the batter into the tart pan and spread it evenly with a spatula or the back of a spoon. Decorate with whole toasted pecans leaving space in between for the ganache filled holes that will be added later. Bake for about 30-35 minutes or until the batter has set and a tooth pick inserted into the centre comes out clean.

Remove the tart from the oven and let cool inside the tart pan for 15 minutes. While the tart is cooling, make the chocolate ganache. Place the chopped chocolate in a small heatproof bowl and set aside. In a small saucepan, over medium heat bring the cream to just a boil. Remove from heat and add to the chopped chocolate. Alernately, you can heat the cream in the microwave in a microwave safe cup and add the chopped chocolate to it. Allow to stand undisturbed for 5 minutes. Stir until smooth. Keep aside.

With the end of a lighly greased wooden spoon make holes onto the top of the brownie. Then with a small spoon fill the holes with the ganache (take little quantities at a time as the holes fill up quickly and might overflow onto the brownie tart). Let the tart cool completely and then cover and refrigerate. Refrigeration helps to set the ganache and blend the flavours so it is best to make the tart a day in advance.
The tart will keep in the refrigerator for about two to three weeks.


[inlinkz_linkup id=335256]

Easy and Healthy Pumpkin and Rosemary Bread

3|11|2013

We were so busy with our Diwali celebrations this weekend that despite visits to the bakery and supermarket, we forgot to stock up on a few of our essentials. One of them was bread. That was just the perfect excuse I needed to make this pumpkin bread.

IMG_6303 (2)
The pumpkin puree was ready sitting in my refrigerator thanks to all the work I did the last week. So all that was required of me was to throw in the ingredients into a mixing bowl, mix and bake. The smell of rosemary wafted in the air as the baking progressed reminding me of the winter that was. Before the children woke up and I could put together the rest of breakfast, the bread was ready! Yes, a great looking and smelling, delicious, healthy loaf of bread.
IMG_6287 (1)

The best thing about this bread is that there is no waiting…proofing etc. No added fat..no eggs either…and a handful of ingredients. Who doesn’t like a simple, one bowl recipe!. If you have been visiting this space regularly, you would know that I seldom replicate a recipe. I would always add my own personal touches and little twists to make it my own. But this time I haven’t changed a thing except reducing the quantity of salt. The original recipe is just perfect the way it is with a mellow pumpkin flavour in the bread, saltiness from the parmesan, earthy notes of rosemary and the crunchiness from the pumpkin seeds.

IMG_6301 (2)

Though we tried the bread with various dips and spreads, I thought the best accompaniment was pesto.

IMG_6280 (1)


Pumpkin and Rosemary Bread
Adapted from Taste.com

500g butternut pumpkin, peeled, chopped OR 11/3 cup unsweetened pumpkin puree
2 cups self-raising flour
2 tablespoons chopped fresh rosemary
1/4 cup polenta
2 tablespoons grated parmesan cheese
1 tsp salt
1 cup milk
2 tablespoons pumpkin seeds (pepitas)
Pesto, to serve

Cook pumpkin in a saucepan of boiling water for 10 to 12 minutes or until tender. Drain. Return to pan. Mash until smooth. Cool. Ignore this step if using ready pumpkin puree.

Preheat oven to 180°C/160°C fan-forced. Grease a 6cm-deep, 9cm x 19cm loaf pan. Sift flour into a large bowl. Stir in rosemary, polenta, parmesan and salt. Make a well in centre. Add pumpkin and milk. Stir until just combined. Spoon into prepared pan. Top with pepitas.

Bake for 45 to 50 minutes or until golden brown and hollow when tapped on top. Stand in pan for 5 minutes. Transfer to a wire rack to cool. Serve with Pesto.


Kaju Peda. Indian Cashew Nut Fudge

31|10|2013

The last quarter of the year is certainly my favourite. From one celebration or festival to another and all the excitement in between. And with celebrations come great food…get togethers…some nostalgia filled cooking and the most awaited traditional dishes of the year. I am also fortunate that our beautiful Spring is just so perfectly aligned with this time of the year. Celebration is in the air!
IMG_6248 (1)

Diwali, rightly called the Festival of Lights is moments away and I am in high spirits as I cook my way through the preparations for perhaps the most food-oriented Indian festival. I say that because, this is the time we splurge, we indulge, we over eat, we gorge on our favourite sweets. Could I be happier! That word you notice at the top of my blog title…yes, Sugar…I get to use it to my heart’s content! And there’s hardly a soul who would refuse at this time.
IMG_6254 (1)

Talking of sweets the most loved sweet during Diwali are cashew nut based. Nuts do form an integral part of Indian desserts and people spend a fortune buying boxes of cashew nut barfis and other sweets to gift or eat at home. This year, I had promised myself that I wouldn’t buy a single one and make all of them at home. These cashew nut sweets are very easy to make and ready under 30 minutes.

IMG_6268 (1)

There are hundreds of recipes for the Kaju barfi on the Internet so I wanted to do mine differently. My recipe is pretty simple and forgiving..there is little scope to go wrong. Rather than cutting it into diamonds, (which can be difficult if you don’t get the right consistency of the dough), I rolled out little rounds  with my palm (Pedas) and inserted an almond in the centre.
The highlight of a celebratory Indian sweet is also the silver foil on top that gives it a shiny appearance. I have not been able to find it in Sydney so I have dusted it with icing sugar and decorated it with chopped pistachios and silver cachous pearls which is available in any bakeware store. Also, if you do not have access to cardamom powder, it can be made at home by running the seeds of 4-5 cardamom pods through a grinder.

IMG_6246 (1)

IMG_6270 (1)

Wish you all a happy, safe and prosperous Diwali!

Kaju Peda. Indian Cashew Nut Fudge
Makes 22-25 medium Pedas

250 g cashew nuts (plain)
1 cup icing sugar/powdered sugar
1 tbsp ghee/clarified butter
1/2 tsp cardamom powder
1/4 cup milk

To serve/decorate
1/8 cup icing sugar
22-25 toasted whole almonds
a few stands saffron (optional)
a few chopped pistachios (optional)
silver cachous to decorate (optional)

Soak the cashew nuts in 1 cup water for 4 hours, preferably overnight. Drain three-fourths of the water and grind the cashew nuts with the remaining water to a smooth paste in the food processor. You can check at intervals by rubbing the paste between your fingers to find out if the desired consistency has been reached. It should not be grainy.

Heat the ghee on medium heat in a thick bottomed pan or wok. When the ghee melts, add the cashew paste, sugar, cardamom powder and milk to the pan and stir to mix. Keep stirring till all the sugar dissolves and the mixture starts to pull away from the sides of the pan. (It is important to keep stirring or the mixture can burn at the bottom). At this stage, the cashew nut mixture resembles a dough and is quite thick. To test, pinch off a portion of the dough and try to make a ball out of it by rolling it between your palms (like you would for a cookie). If you are able to do it with ease, then the dough is ready. If not, put it back on the heat and keep stirring to thicken up further. Also note, the dough thickens up slightly as it cools down.

Once you have the desired consistency, let the dough cool down for 5 minutes. Roll out portions (about 1 tbsp) of the dough between your palms to make rounds. Press the centre of the round slightly and insert an almond. Keep the cashew nut fudge rounds aside to cool completely. Once, cooled to room temperature, dust with icing sugar, garnish with chopped pistachios, silver cachous and saffron strands.

These will keep for 3-4 days at room temperature and up to 2 weeks in the refrigerator.

Ricotta and Pesto Stuffed Tomatoes

29|10|2013

Stuffed tomatoes with ricotta cheese and basil pesto. An easy, healthy and delicious dish that can be served as a side or an appetizer.

With a heavy heart I said goodbye to my favourite fruit and vegetable market last week. They closed down. When I moved into my current locality about 6 months ago, my liking for the neighbourhood went up by several notches when I discovered this store. Remember, I had shared this with you in this pumpkin post. I spent many mornings looking around, admiring the array of fresh herbs, fruits, vegetables and deli sections, googling up recipes and carrying back more than my hands or my refrigerator would permit.

stuffed tomatoes with ricotta cheese and pesto

To say that they inspired me to cook, will not be exaggeration. As bloggers dealing with food, we are constantly looking for inspiration whether it comes from the Internet, cookbooks, a delicious dish we ate at a restaurant or a fresh produce market. What do you think?

stuffed tomatoes with ricotta cheese and pesto

I couldn’t help notice these bright, plump truss tomatoes during one such visit…so I bought them home. There are of course a million things that could have been done with them but I wanted to keep their shape and structure intact. Hence the recipe for stuffed tomatoes.

stuffed tomatoes with ricotta cheese and pesto

I can hardly call this a recipe. Mix everything together and stuff inside tomatoes. If you love stuffed tomatoes or looking for something quick and tasty or like me love classic Italian flavours, then this will not disappoint. I love home-made pesto and I experiment with a different nut or herb each time. The one I used here is a basil cashew nut combination. I may post the recipe later if someone is interested. You can also use a store-bought one. To make a little sweet, tangy gravy along with the tomatoes, I have added passata to the tray with a little honey. It can be substituted with tomato puree or paste but you will have to increase the seasoning to get the same flavour as passata can be quite intense.

This dish will make a great side but you can also eat it on it’s own with some crusty bread.

stuffed tomatoes with ricotta cheese and pesto


Ricotta and Pesto Stuffed Tomatoes

4 (about 500g) medium truss tomatoes or regular tomatoes
150g fresh ricotta
2 tbsp finely grated parmesan
11/2 tbsp basil pesto
1 tsp grated lemon zest
salt and pepper to taste
1 cup (250 ml) passata or tomato puree
1 tbsp honey
a handful of fresh herbs (basil, parsley, chives)
Extra virgin olive oil to serve

Preheat the oven to 180 degrees C. Cut the tops of the tomatoes and reserve. Remove and discard the seeds.
Pour the passata, honey and seasoning in a baking dish and stir with a spoon.

Combine the ricotta, parmesan, pesto, lemon zest in a bowl. Season with salt and pepper. Divide the mixture between the tomatoes and place in the baking dish. Cover the tomatoes with the tomato tops. Drizzle with olive oil.
Bake for 20 minutes or until tender.

To serve, place tomatoes on a plate along with the gravy. Drizzle with extra virgin olive oil and garnish with fresh herbs. Sprinkle with cracked pepper.


  • « Previous Page
  • 1
  • …
  • 96
  • 97
  • 98
  • 99
  • 100
  • …
  • 111
  • Next Page »
Hey Sugar
Cake
Link to my Facebook Page
Link to my Instagram Page
Link to my Pinterest Page
Link to my Mail Page
Subscribe to this site
Fresh Awards
2019 Aus mumpreneur
2019 aus mumpreneur
Mumbrella

Copyright © 2025 · Sugar Et Al · Designed by Smitten Blog Designs · Log in