• Home
  • Recipe Index
    • Recipe Index
    • Breakfast/Brunch
    • Cakes and Puddings
    • Chocolate
    • Cookies and cupcakes
    • Custard and Mousse
    • Gluten Free
    • Ice Cream
    • Mains
    • Other Sweet Treats
    • Snack/Appetizers
    • Soups and Salads
    • Tarts and Pies
    • Vegetarian
  • About
  • Cookbook
  • Portfolio
  • Store
  • Press
  • Work with Me

Sugar et al

Because Life is a blend of flavours...

Baked Ricotta Cheesecake

19|08|2017

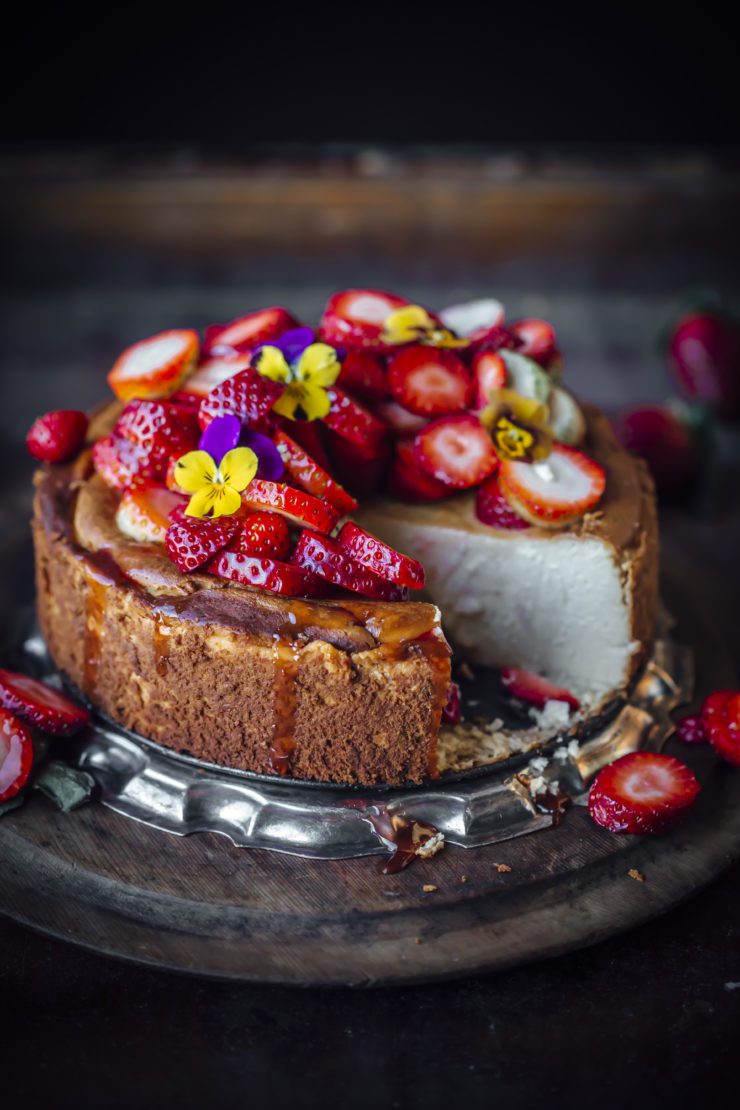
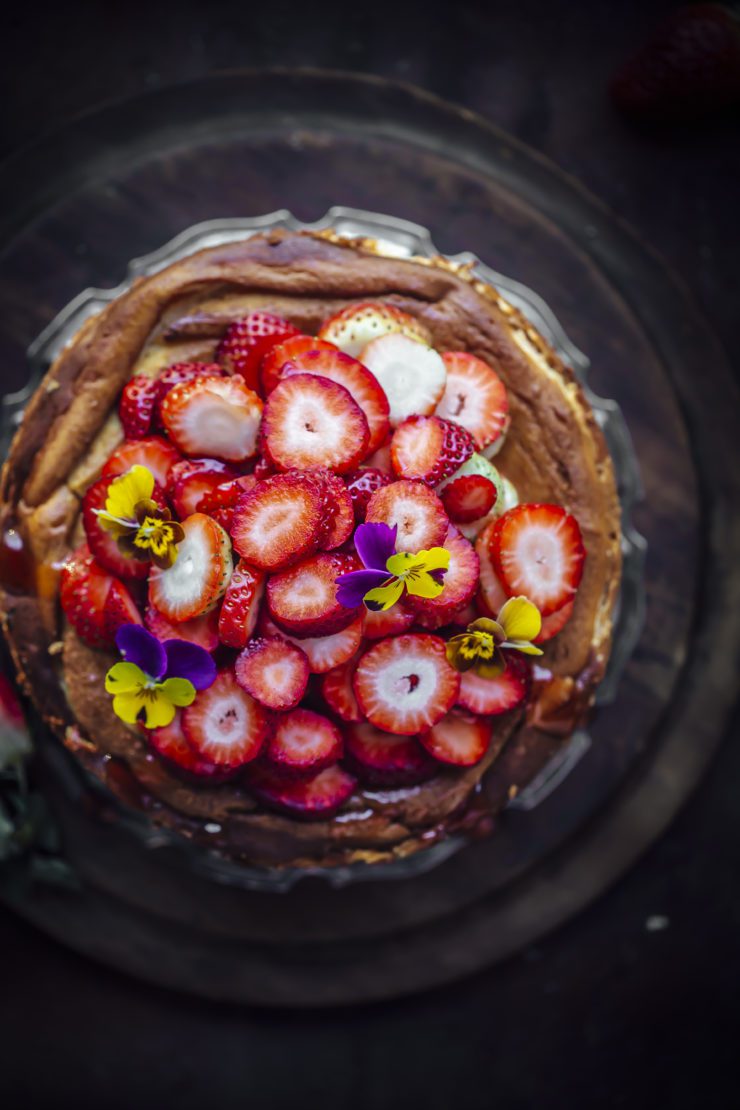
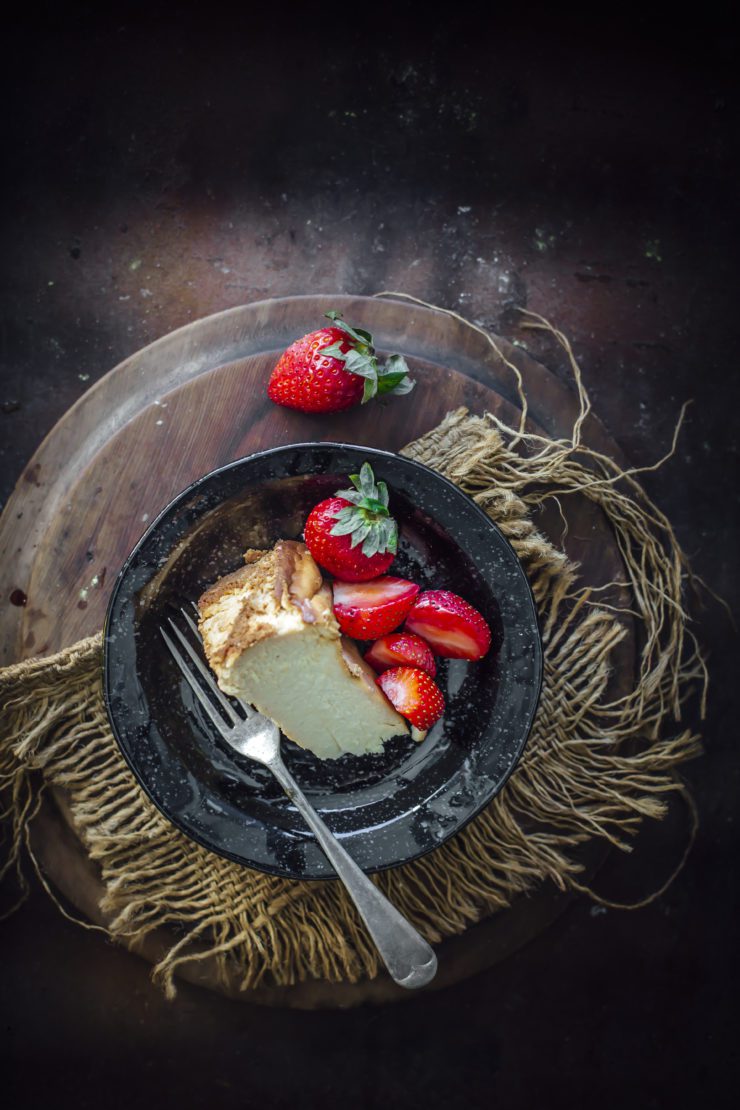
What do you do when you have left-over lemon curd and ricotta cheese at home? It happens, right? Especially the lemon curd. You throw them together, add in a few other ingredients (all of which are in your pantry) and voila…you have a cheesecake! It looks and tastes every bit like a lemon cheesecake but it’s lighter, healthier and a whole lot simpler. Notice the golden crust all around? It’s created by baking the ricotta. In other words, you completely skip the cookie crust or shortbread base and all the butter that goes with it and you still end up with a golden crust and a soft, creamy interior.

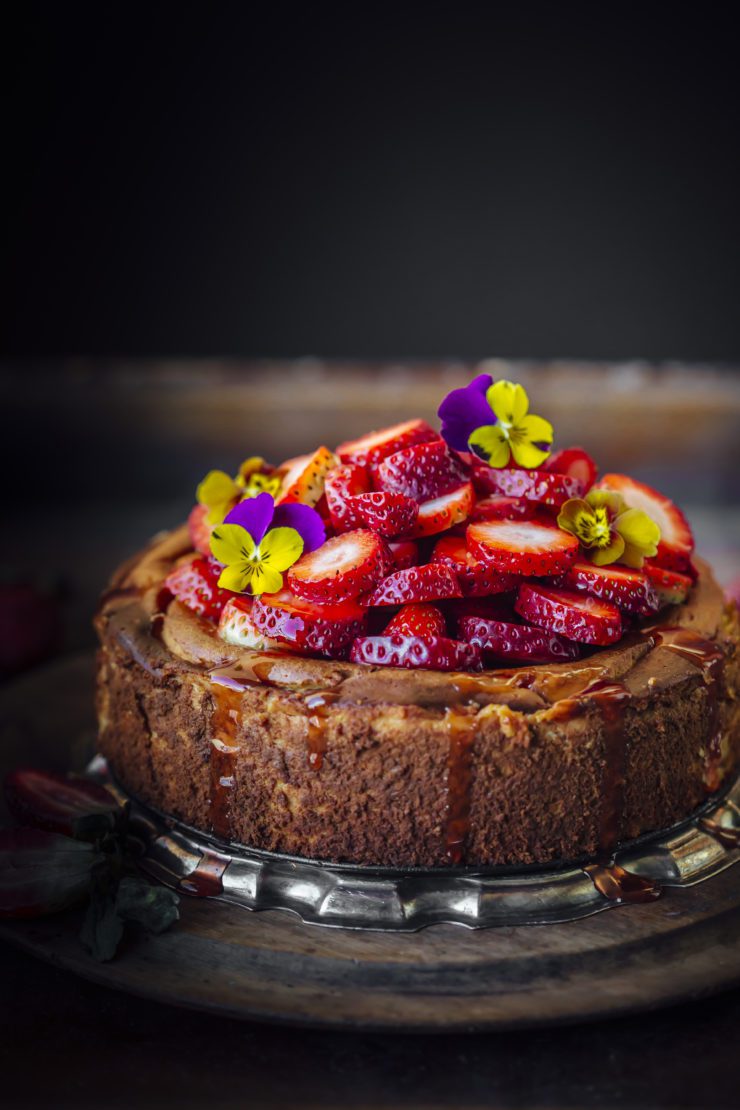
This Baked Ricotta Cheesecake is truely a delight to make and eat. If you’ve ever tasted baked ricotta otherwise, it’s a healthy breakfast or dessert option. However, it is a bit bland and does not really have any flavour by itself. By adding lemon curd to the recipe, not only does it taste lemony and delicious but it’s way more convenient than juicing and zesting lemons. I’ve used store bought lemon curd for mine to keep it quick and easy. You’ll be done with the mixing in 10 minutes but the cheesecake takes a bit of time to bake. I don’t remember last when I’ve opened my oven door to take a peek as many times I’ve done for this one to see the golden crust. And then you patiently wait for it cool and set which is such a torture I tell you. But hang in there for you will be rewarded soon. Top the cheesecake with fresh fruit, fruit coulis, nuts, chocolate shavings or anything you like.

I’ve noticed that the cheesecake hardens up a bit if kept in the refrigerator, so it’s best eaten at room temperature. If you are planning on making it ahead of any occasion, you could store in the fridge but let it sit at room temperature for 30 minutes before you serve.

Baked Ricotta Cheesecake
Makes an 8 inch round cheesecake

1 kg fresh ricotta (full cream or low fat)
1 cup lemon curd (home made or store bought)
1 cup castor sugar (or more if you like it sweeter)
1 tsp pure vanilla extract
4 eggs, lightly beaten
Fresh strawberries, to serve
Strawberry coulis/sauce to serve

Preheat oven to 170 degrees C (150 degrees C for fan forced ovens). Grease the base and sides an 8 inch  springform pan.
With an electric mixer or an hand mixer, beat the ricotta, lemon curd, sugar and vanilla together till smooth. Add the egg, a little at a time and continue to beat till fully blended.

Pour the mixture in to the prepared pan. Smooth the top and tap the pan gently a few times on the bench top to get rid of air bubbles. Bake in the oven for 50-60 minutes or until a crust starts to form all over the cheesecake (the top will become golden) and a skewer inserted into the centre comes out clean. Turn off oven, leave the door ajar and let cheesecake cool completely before releasing the sides.

Served best at room temperature with fresh strawberries. and strawberry coulis.


Blood Orange Polenta Cake

17|08|2017

So many ways of making a citrus cake! Because the citrus flavour is deliciously predominant in a recipe it is used in, it is interesting how you can play around the textures by using different ingredients. I’ve already told you how much I love nuts and oranges together. This time I’ve added in some polenta for a nice bite in the cake. The texture is quite similar to coconut cake and you get a nuttiness without using too much almond meal. Nut meals are expensive so this is a cost effective option.

Blood Oranges just taste sensational with mascarpone cheese so I decided to top the cake with whipped Mascarpone which is pretty easy to make. A drizzle of blood orange syrup bursting with tangy-sweet flavour takes the cake to a new level. And finally, fresh blood oranges gives the cake a pop of colour.

Can you believe it, it’s just 4 months until Christmas? The reality is hitting hard now that my work has gone up by 3 folds. I’m working on Holiday recipes for my clients and it feels festive already!
Stay tuned, I’ll be posting the Baked Ricotta Cake this Saturday. I know many of you are waiting but this one just had to go first as the Blood Orange season will end soon. See you soon!

Blood Orange Polenta Cake
Makes a 7 inch round cake

180 g unsalted butter, room temperature
1 cup castor sugar
2 tbsp finely zested blood oranges
1 tsp vanilla extract
3 eggs
1 cup polenta
1 cup self raising flour
100 g almond meal
3/4 cup blood orange juice

Mascarpone Frosting
110 g mascarpone cheese
1/2 cup whipping cream
2 tbsp icing sugar
1/2 tsp vanilla essence

Blood Orange Syrup
1 cup fresh blood orange juice
3/4 cup castor sugar

Preheat oven to 170 degrees C. Grease the base and sides of a 7 inch round pan and line the base with baking paper.

Beat the butter, sugar, orange zest and vanilla extract together until smooth and creamy. Add eggs one at a time, beating well after each addition.
Place polenta, flour and almond meal in a bowl. Add the polenta mixture to the butter mixture alternating with the blood orange juice.

Pour into the prepared pan. Smooth the top with the back of a spoon. Bake for 50-60 minutes or until a skewer inserted in the middle comes out clean. Remove from oven, Set aside for 1o minutes. Turn out onto a wire rack to cool completely. Once cooled, spread mascarpone frosting, drizzle with orange syrup and top with sliced blood oranges and fresh mint.

To make the Mascarpone frosting : Beat mascarpone cheese,whipping cream, icing sugar and vanilla together in a bowl until smooth and fluffy. Refrigerate until needed.

To make the Blood Orange Syrup : Place the orange juice and sugar in a small saucepan and bring to a boil over low heat. Simmer for 5-7 minutes until the syrup thickens. Please note that the syrup will thicken further upon cooling.

One Bowl Chocolate Cake with Chocolate Cream Cheese Frosting

27|07|2017


I baked this chocolate cake yesterday and I knew I had to share this recipe quickly with you. I always receive heaps of fantastic reviews on my Easy Chocolate Cake with Raspberries (yes, it is the most popular recipe on this blog) but I think I just found something even better, even more decadent and just oozing with choclatey deliciousness. The frosting is a bomb! It tastes like chocolate silk (haha! if there was a term like that) and doesn’t have the rich after-taste of the chocolate fudge frosting. And the best part? Its dead easy to make. Both the cake layers and frosting are one bowl, quick mix, simple to assemble and incredibly delicious.

I think the fun part is sticking chocolate sprinkles all around the cake. This is a great way of covering any imperfections (if any) in your cake and I did this a lot when I wasn’t confident about frosting a cake a few years ago. And it looks like it’s ready for a party, doesn’t it? If you can’t find chocolate sprinkles, just go with grated dark chocolate. It works the same way!


One Bowl Chocolate Cake with Chocolate Cream Cheese Frosting
Makes a 3-layered 6 inch round cake

250 g unsalted butter, room temperature
180 g dark chocolate, chopped
3/4 cup milk
1 cup castor sugar
1/2 cup brown sugar
11/2 cups self-raising flour
1 cup plain flour
1/4 cup cocoa powder
2 eggs, lightly beaten

Chocolate Cream Cheese Frosting
250 g (1 tub) cream cheese, room temperature
100 g unsalted butter, room temparature
2 cups icing sugar
1/4 cup Dutch processed cocoa powder
1 tsp vanilla extract

Preheat oven to 160 degrees C (140 degrees C for fan forced ovens). Lightly grease the base and sides of 3, 6-inch pans and line the bases with baking paper.

Place butter, chocolate, 1 cup of water, milk and sugars in a large saucepan over low heat. Stir occasionally. Once chocolate has melted and mixture is smooth, remove from heat and let cool for 30 minutes.
Sift flours and cocoa directly onto the chocolate mixture. Mix. Whisk in the eggs. Mix until smooth and mixture is well blended. Divide mixture uniformly between prepared pans.
Bake for 25-30 minutes or until a skewer inserted into the middle of each cake layer, comes out clean.

Remove from oven, run a blunt knife gently around the sides (to loosen slightly) and let the layers cool in their pans. Once cooled, turn out on to a wire rack.  Frost with Chocolate Cream Cheese Frosting.

To make the frosting: With a hand mixer or electric mixer, beat the cream cheese and butter together until smooth and creamy. Add the sugar, 1 cup at a time, beating after each addition until smooth. Add the cocoa powder and vanilla essence and whip till well blended. Divide frosting for applying around and between the cake layers and for piping on top.

To assemble : Place a layer of the mud cake on a plate or cake stand. Dollop 1/2 cup of the frosting and spread with an offset spatula.
Place the second layer and repeat the same process.
Cover with the third layer. Frost the outside (top and sides) with chocolate cream cheese frosting. Refrigerate for 20 minutes. Using your hands stick the sprinkles all around sides and top of the cake. Pipe remaining frosting on top of the cake.
The cake is best served at room temperature.


Raspberry and Pumpkin Mini Cakes

13|07|2017

Autumn came and turned into winter and winter is half-way through. I realized that I haven’t made any pumpkin desserts this year. Last Autumn, I discovered the deliciousness called pumpkin in sweeter recipes and had begun to acknowledge its hype around colder months in the Northern Hemisphere. I really wish we had access to pumpkin puree in Australia. Perhaps that is one of the reasons pumpkin cakes are not so popular here. Making the puree took me longer than creating a dessert with it. Well, I am sorted for now, having made a big batch of butternut squash puree yesterday. Gives me a solid reason to take out some every other day and make a pumpkin something.

pumpkin mini cakes with raspberries

These easy peasy pumpkin mini cakes have nothing complicated or extravagant about them. Just mix and bake. The raspberries were a last minute addition since I was slightly unsure how the pumpkin alone would taste. (Oh goodness, it’s been a year since I tasted pumpkin). Logically speaking, chocolate can save any disaster but berries come a close second. So instead of chocolate chips, I threw in a few raspberries.
The next few days hopefully you will see a bit more of me on the blog. I have a huge pending list of recipes to share that I can easily turn into a cookbook:-) School holidays will be over and I am planning to spend more time documenting my kitchen experiments rather than posting photos on Instagram which has become quite the bad habit for me. Anyone else, doing the same thing?

Have a great week everyone and catch you soon!

pumpkin mini cakes with raspberries


Raspberry and Pumpkin Mini Cakes
Yields 12 mini cakes

11/2 cups plain flour
3/4 tsp baking soda
1/2 tsp ground ginger
1/2 tsp powdered cinnamon
1/2 tsp powdered nutmeg
90 g unsalted butter, softened
1 cup brown sugar
2 eggs
1 tsp vanilla
3/4 cup pumpkin puree
1 tbsp vegetable oil
2/3 cup warm milk
1/2 cup raspberries (fresh or frozen, slightly crushed with a spoon.

Preheat oven to 180 degrees C. Grease a mini bundt pan well (I use cooking spray instead of butter for bundt pans).

In a mixing bowl mix the dry ingredients together (flour, baking soda and spices.) In a different mixing bowl, cream the butter and sugar together till light and fluffy. Add the eggs and vanilla and mix well. Stir in the pumpkin puree, vegetable oil and milk. Add the flour mixture and mix till just combined. Fold in the raspberries.

Spoon into prepared pan till hall full. Bake in the preheated oven for 15-20 minutes or until a skewer inserted in the middle comes out clean. Remove from oven. Leave aside for 5 minutes. Loosen gently with a blunt knife and turn onto a wire rack to cool. Dust with icing sugar. Serve warm or at room temperature.


  • « Previous Page
  • 1
  • …
  • 18
  • 19
  • 20
  • 21
  • 22
  • …
  • 46
  • Next Page »
Hey Sugar
Cake
Link to my Facebook Page
Link to my Instagram Page
Link to my Pinterest Page
Link to my Mail Page
Subscribe to this site
Fresh Awards
2019 Aus mumpreneur
2019 aus mumpreneur
Mumbrella

Copyright © 2025 · Sugar Et Al · Designed by Smitten Blog Designs · Log in