• Home
  • Recipe Index
    • Recipe Index
    • Breakfast/Brunch
    • Cakes and Puddings
    • Chocolate
    • Cookies and cupcakes
    • Custard and Mousse
    • Gluten Free
    • Ice Cream
    • Mains
    • Other Sweet Treats
    • Snack/Appetizers
    • Soups and Salads
    • Tarts and Pies
    • Vegetarian
  • About
  • Cookbook
  • Portfolio
  • Store
  • Press
  • Work with Me

Sugar et al

Because Life is a blend of flavours...

Spiced Apple Cake

21|05|2017

Our lives are full of choices and we are so lucky to have them. Whether it is the way we lead our lives or the food we eat, our options are abundant. When I was little, I knew the apple as a favourite fruit at home. As I grew older I learnt about a few different varieties and today we have apples that are nothing short of a marvel. An apple that is grown to suit our modern day, busy lifestyles.

Spiced Apple Cake

I had the pleasure of tasting the new Envy™ apple at the their launch recently and they were everything one could wish for in a fruit. Sweet with the perfect crunch and a tender flesh that remains white for a really long time. As a Mum to two young school going children this was a great find and as a huge lover of apples (I eat apples almost every single day) I wanted to experiment immediately. They tasted great but how would they respond to baking, is what I kept thinking. As it turned out, they held their texture and shape even after being baked which is exactly what you want when baking a cake like this one.

Spiced Apple Cake

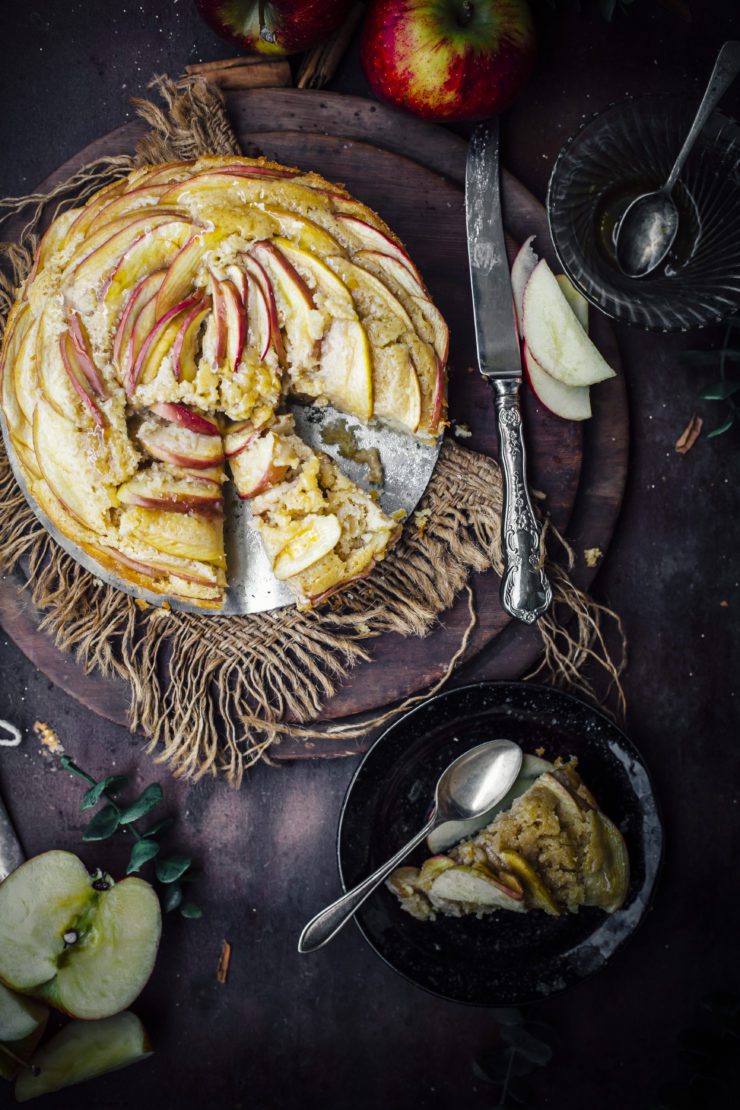
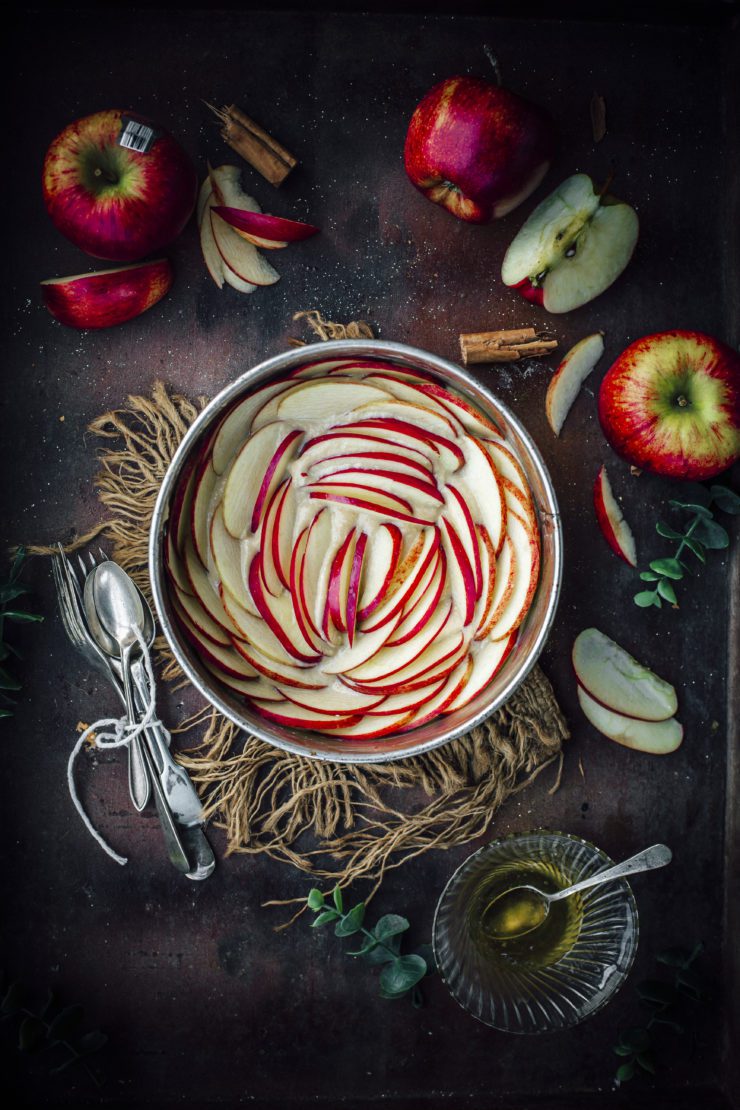
I’ve been meaning to create apple roses and apple art on my cakes all along Autumn. Finally I got my chance when I got my hands on these gorgeous apples. The cake is quite simple to put together with a mix of sweet and spice, so perfect for the cold season. It tasted really good when warm with a scoop of vanilla ice cream on the side. The apple pattern is honestly not difficult at all. All it requires is a bit of patience and a great apple that wont break down in the oven.

Spiced Apple Cake

Spiced Apple Cake

Have a great week guys! What’s your favourite apple recipe?

Spiced Apple Cake

Spiced Apple Cake
Makes a 7 inch round cake

125 g unsalted butter, softened
1/2 cup brown sugar
1 tsp vanilla extract
1 tsp powdered cinnamon
1 tsp crystallized ginger, finely chopped
2 eggs
1 cup self-raising flour
1/2 cup plain flour
3/4 cup milk
2 large apples
2 tbsp orange marmalade

Preheat oven to 180 degrees C (160 degrees C for fan forced ovens). Lightly grease the base and sides of a 7 inch round baking pan and line the base with non-stick baking paper.

Place butter, sugar and vanilla in a bowl. Using an electric mixer, beat for 5 to 6 minutes or until light and creamy. Add eggs, 1 at a time, beating after each addition. Mix self-raising flour, plain flour, powdered cinnamon and crystallized ginger in a separate bowl.

Add half the flour mixture to butter mixture. Add half the milk. Fold through. Repeat with the rest of the flour and milk. Fold until just combined. Pour into prepared pan. Core and quarter apples. Thinly slice. Arrange apples in 3-4 circles on batter, starting from the edges moving to the middle, pressing down gently.

Bake for 35 to 40 minutes or until a skewer inserted in the centre comes out clean. Stand in pan for 10 minutes. Remove side from pan. Slide cake onto a wire rack to cool.

Place marmalade in a microwave-safe bowl. Microwave on high (100%) for 30 seconds to 1 minute or until runny. Brush cake top with jam. Serve with whipped cream or ice cream..

Hazelnut Cake with Baileys Buttercream for Mother’s day

11|05|2017

Layers of Hazelnut Cake with a delicious Baileys Original Irish Cream Buttercream, White Chocolate Glaze, topped with Baileys Truffles. A dream cake for Mother’s Day.

Hazelnut cake with Baileys buttercream

I am a firm believer in hand made presents for my loved ones. A gift made with love is more meaningful than something purchased. When the occasion is Mother’s Day, the motivation to get into action is ten folds. Mum gives us the world while growing up. Isn’t it fair that we try and give back a little bit to the most special, most irreplaceable person in our life? A painting, handmade candles or a pretty cake. Mums adore these sentiments. If you ask me, baking a cake is one of the sweetest gestures because it shows that you have spent time in creating something. To make that cake unique this year, I’ve added something I know is loved by the entire world. Baileys Irish Cream.

Hazelnut cake with Baileys buttercream

The Heavenly combination of hazelnuts in the cake layers and Baileys in the buttercream makes it a treat for the taste buds. And of course, it’s Mother’s Day so flowers are a must. Don’t you just love the idea of a cake as a vehicle for pretty flowers?

Hazelnut cake with Baileys buttercream

Baileys liqueurs are a dream to work with. They blend well in frostings or glazes whilst retaining their presence in a subtle, delicious way. Like all my cakes, the layers can be made ahead and are quite simple to put together. Naked cakes have a level of intrigue and rustic charm that appeals to many. They are also lighter as we forgo quite a bit of frosting which is perfect for Mummy-s. Lastly, I highly recommend the Baileys truffles. They are irresistible and something you could present on top of the cake as well as wrapped in a small box with cute ribbons around it.  Anything to impress Mummy, right?

Hazelnut cake with Baileys buttercream

Hazelnut cake with Baileys buttercream

Happy Mother’s Day to all you beautiful Mums, GrandMums and soon to be Mums out there. I hope your day is filled with unlimited love and joy.

Hazelnut cake with Baileys buttercream

Disclaimer: This post is brought to you by Baileys. As always, all opinions expressed in this post are entirely mine.

Hazelnut Cake with Baileys Buttercream
Makes a 6 inch, 3-layered round cake

Hazelnut Cake

250 g unsalted butter, softened
11/4 cup castor sugar
4 eggs
1 tsp vanilla essence
21/2 cups self-raising flour
1 cup hazelnut meal (ground hazelnuts)
1 cup milk

Preheat oven to 160 degrees c (140 degrees C). Grease and line the base of 3, 6 inch pans with baking paper.

Using an electric mixer whisk together butter and sugar till fluffy and combined. Add the eggs, one at a time and beating after each addition. Add the vanilla, flour, hazelnut meal and milk and beat till mixture is smooth.

Divide uniformly between prepared pans and bake for 25-30 minutes or until a skewer inserted into the centre comes out clean. Remove pans from oven. Leave aside for 10 minutes. Gently turn out cakes on to a wire rack. Cool completely to room temperature.

Baileys Buttercream

125 g unsalted butter, softened
11/2 cups icing sugar
1/3 cup Baileys Original Irish Cream

Beat the butter in a bowl using an electric mixer until light and fluffy. Gradually add icing sugar and beat till combined. Add Baileys Irish Cream and beat for another 2-3 minutes till mixture is smooth and blended.

White Chocolate Glaze

100 g white chocolate, roughly chopped
3 tbsp heavy cream
1-2 drops pink food colour

Heat the white chocolate and heavy cream over low heat in a small saucepan. When cream just reaches boiling point, remove from heat and leave aside. Stir with a spoon to make a smooth mix. Add the food colour and stir to blend.

Baileys Truffles

½ cup thickened cream
140 g white chocolate, roughly chopped
2 tbsp Baileys Original Irish Cream
½ cup shredded coconut

Place chocolate in a heat proof bowl. Heat cream over low heat until it just reaches to a boil (do not boil).  Pour the hot cream over the chocolate and leave aside for 5 minutes. Stir mixture with a spoon until smooth. Add Baileys Irish Cream and mix till blended. Chill for 6 hours or until firm enough to roll into truffles. Using hands, roll into balls, then roll into plate of coconut. Keep chilled until needed.

 To assemble: On a cake plate or stand, spread a little buttercream and place the first cake layer (so the cake does not move about while frosting). Spread a little Baileys Buttercream (about 1/3 cup). Place the second layer. Repeat. Place the last layer upside down (so you get a flat top to work with). Spread buttercream on top and sides. If you are after a naked look, a thin layer of frosting is good enough.
Stick the cake into the refrigerator for 10 minutes.

Make the white chocolate glaze 5 minutes before you take the cake out from the fridge. Once the glaze is cool but still flowing freely when you lift it with a spoon, spoon it onto the cake very gently. This will create the drippy effect. Let the glaze set for 30 minutes.
Decorate with Baileys truffles and fresh flowers. Make sure the stems of the flowers are wrapped in baking paper or foil so they don’t touch the cake directly.


Honey and Poppy Seed cake

1|05|2017

Layers of Honey and Poppy seed cake with Rosewater Swiss Meringue Frosting, sprinkled with finely chopped pistachios and dried edible rose petals.

Mother’s day is around the corner and my excitement goes up by several notches at the thought of all the pink and floral creations that I will find an excuse to make. If only I could have them delivered to my own Mummy who lives in an entirely different continent. My children come up with all kinds of cute surprises with the help of their of school. Daddy of course plays a big role in all the hush hush exchanges that go on between them in that week and a customary ‘breakfast in bed’. You know, I am not at all a breakfast in bed kinda person. Yikes! I need to brush my teeth and sit down to a proper breakfast which I’ve already communicated to them in so many ways.Hopefully someone will get the message:-)

honey and poppy seed cake

Coming to this cake, I had intended to post the recipe during Valentine’s Day but later on felt that it might be more suited to a Mother’s Day kind of occasion. Something light, aromatic, delicate and very delicious. The rosewater-pistachio-honey combination are a bomb together. Poppy seeds add an extra bit of crunch. If you are not comfortable with piping, feel free to spread the frosting between the layers.

honey and poppy seed cake

In other news, my Collection with VIDA is up and ready. If you remember I had mentioned to you that I would be designing fashion products for this company using my own art. They are based in USA and have an amazing team of experts bringing these designs to life. I can’t even explain my excitement to you when I received my shipment. Being able to wear my work in the form of a scarf is something I had never imagined. You can check them out here. https://www.shopvida.com/collections/sonali-ghosh. It is quite basic at the moment and I will be updating more food-related designs as I go. They ship globally too which is really a great thing.

honey and poppy seed cake

Have a great week, all of you. I have quite a few Mother’s Day recipes coming up.

honey and poppy seed cake


Honey And Poppy Seed Cake
Makes a 3 layered 6 inch round cake

260 g unsalted butter, softened
3/4 cup castor sugar
125 g clear honey
4 large eggs
12/3 cups self raising flour
31/2 tbsp corn flour
3 tbsp poppy seeds
Finely chopped pistachios, to decorate
edible rose petals (slightly crushed), to decorate

Rosewater Buttercream
4 egg whites
1 cup castor sugar
300 g unsalted butter, room temperature, cubed
1 tbsp rosewater

Preheat oven to 160 degrees C (140 degrees C for fan forced ovens). Grease the sides and bases of 3, 6 inch pans and line with baking paper.

Beat butter, sugar and honey with a hand mixer (or an electric mixer) until pale and fluffy. Add the eggs, one at a time beating well after each addition. In a separate bowl mix together the self-raising flour, corn flour and poppy seeds. Add the dry mixture to the honey mixture and fold in gently.

Divide the batter uniformly between the 3 cake pans. Bake for 25-30 minutes or until surface is firm to touch and a skewer inserted in the middle of each layer comes out clean and dry. Remove from oven. Leave aside for 10 minutes to cool in the pans, then carefully remove, easing the sides with a palette knife. Turn cakes onto a wire rack to cool completely.

To make the Rosewater Swiss Meringue Buttercream:  Place the egg whites and sugar in a large bowl that is placed over a saucepan of simmering water (over low heat), and whisk continuously, until the sugar has completely dissolved and the bottom of the bowl is warm to touch

Remove the bowl from the heat and whip on high speed until meringue holds stiff peaks and looks glossy. The bowl should have completely cooled by now.
Add the butter, 2 tablespoon at a time, until thick and fluffy. If it begins to look curdled, continue to whip until it comes back together, before adding in remaining butter.
When the buttercream is smooth and has come together, add the rosewater and whip gently again to blend.

To assemble:  On a cake plate or stand, spread a little buttercream in the centre and place one layer of the cake (so that the cake does not move about while frosting). Using a start nozzle tip and a piping bag, pipe frosting to cover the entire layer. Sprinkle with pistachios and dried rose petals. Place the second layer. Repeat till you reach the final layer. Decorate with fresh roses. Ensure that the roses are free of pesticides or as a precaution vover the stems with baking paper (so they don’t come in contact with the buttercream).

Coconut And Raspberry cake

22|03|2017

Layers of Coconut and Raspberry Cake with a sweet-tangy, delicious cream cheese frosting and fresh raspberries. It’s easy to make and looks impressive.

This Autumn hasn’t been anything like I expected. Can I call it Monsoon because it has rained pretty much every single day since the last one month? Back in the tropics where I grew up, there would be a whole season dedicated to the rains called Monsoon. Rugby and Soccer matches have been cancelled for the boys for weeks and that means we have been indoors every evening. While it was a huge relief to escape the 40 degree plus temperatures of summer, I’m still waiting for the perfect picnic weather. The great news however is that we’ve still got beautiful summer produce at amazing prices and that means no dearth of inspiration. I know! I just can’t get past Summer and it’s bounty. Amidst my busy workload of new recipes for clients my heart has been craving Cake. I think this Coconut and Raspberry Cake is the first layer cake for the year. Quite shocking really for a person who loves making them. Now I don’t want to stop. It’s quite like therapy..helps me unwind and takes my mind off the stress of work and home.

Coconut And Raspberry cake

Coconut And Raspberry cake

Coconut And Raspberry cake

I am personally not a big fan of coconut cakes but readers and my friends seem to love them. For me they are great when you want to bite into a bit of texture but you don’t want a nut cake. They are also pretty amazing when you pair them with other flavours. I have a few frosted coconut cakes on my blog already so I wanted this one to be really simple and more like a Victoria Sponge cake. But instead of cream we have a sweet-tangy cream cheese frosting, fresh raspberries and layers of coconut cake that are light like sponge. It is a great marriage of freshness and flavour.

Coconut And Raspberry cake

Coconut And Raspberry cake

Coconut And Raspberry cake

Coconut and Raspberry Cake
Makes a 6 inch layered cake

180 g unsalted butter, softened
1 cup castor sugar
4 eggs
2 tsp vanilla essence
11/3 cup self raising flour
1/4 cup plain flour
1/2 cup desiccated coconut
1/2 cup milk

Cream Cheese Frosting
225 g full fat, cream cheese
50 g unsalted butter, room temperature
2 cups icing/powdered sugar
1 tsp vanilla essence

Preheat oven to 180 degrees C (160 degrees for fan-forced ovens). Lightly grease the base and sides of 3, 6 inch pans and line the bases with baking paper. Beat the butter and sugar together using a electric mixer (or an hand mixer) till light and fluffy. Add the eggs, one at a time, beating well after each addition. Mix in the vanilla essence. In a separate bowl mix together the self-raising flour, plain flour and desiccated coconut. Fold in the flour mixture and milk slowly into the egg mixture and mix till blended.

Divide uniformly between the prepared cake pans. Bake for 25-30 minutes or until a skewer inserted into the middle of the cake comes out clean.Remove pans from oven. Leave aside for 5 mins, then turn cakes carefully onto a wire rack. Cool to room temperature. Once cool, frost with cream cheese frosting and top with fresh raspberries.

To make the Cream Cheese frosting :place the cream cheese and butter in a bowl and whip until smooth and blended. Add the icing sugar and vanilla essence and beat until light and creamy. Add more sugar, if needed.


  • « Previous Page
  • 1
  • …
  • 19
  • 20
  • 21
  • 22
  • 23
  • …
  • 46
  • Next Page »
Hey Sugar
Cake
Link to my Facebook Page
Link to my Instagram Page
Link to my Pinterest Page
Link to my Mail Page
Subscribe to this site
Fresh Awards
2019 Aus mumpreneur
2019 aus mumpreneur
Mumbrella

Copyright © 2025 · Sugar Et Al · Designed by Smitten Blog Designs · Log in