• Home
  • Recipe Index
    • Recipe Index
    • Breakfast/Brunch
    • Cakes and Puddings
    • Chocolate
    • Cookies and cupcakes
    • Custard and Mousse
    • Gluten Free
    • Ice Cream
    • Mains
    • Other Sweet Treats
    • Snack/Appetizers
    • Soups and Salads
    • Tarts and Pies
    • Vegetarian
  • About
  • Cookbook
  • Portfolio
  • Store
  • Press
  • Work with Me

Sugar et al

Because Life is a blend of flavours...

Layered Strawberry Cake

18|11|2016

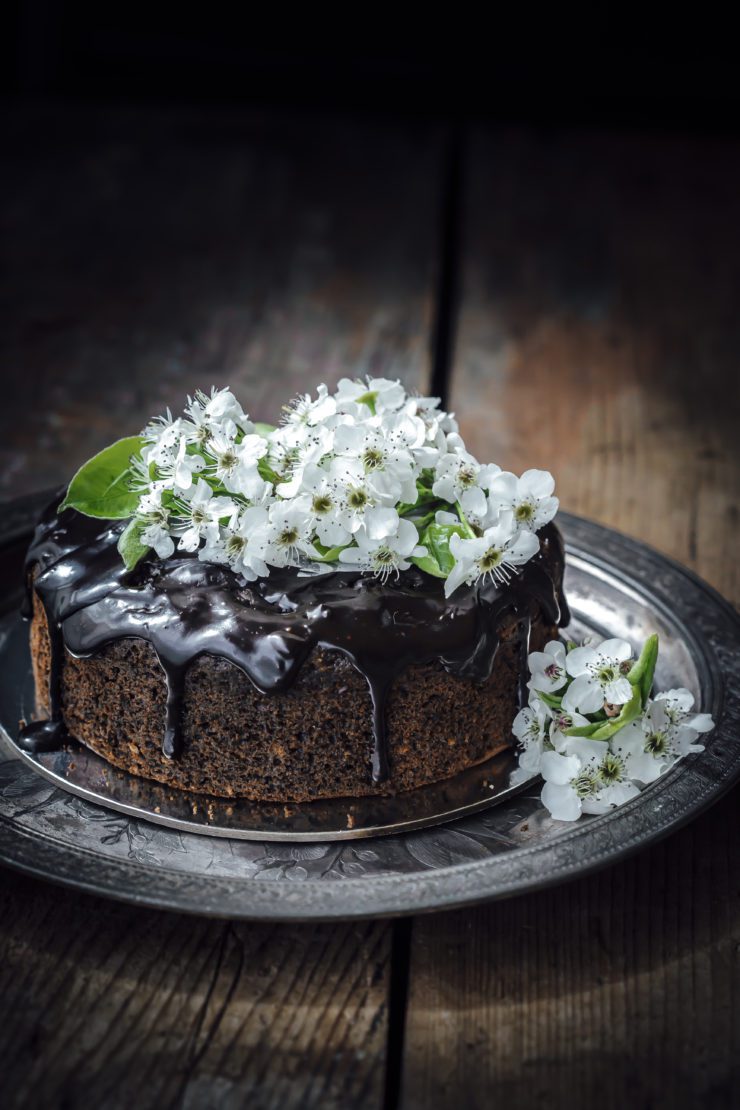
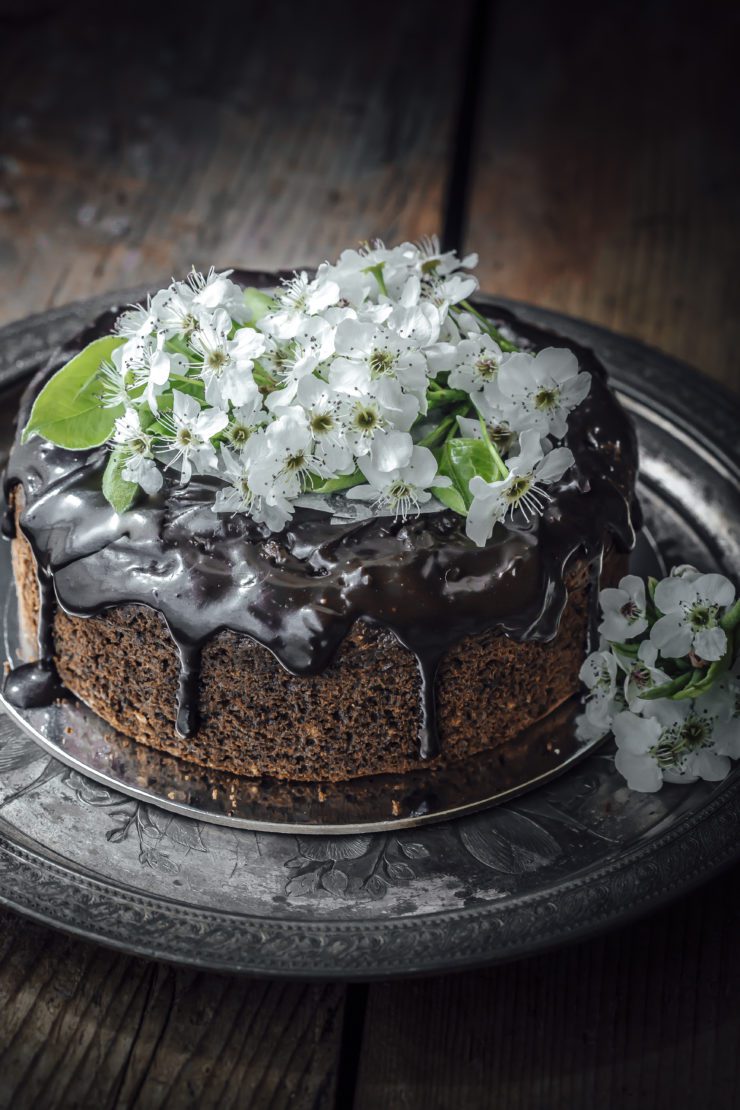
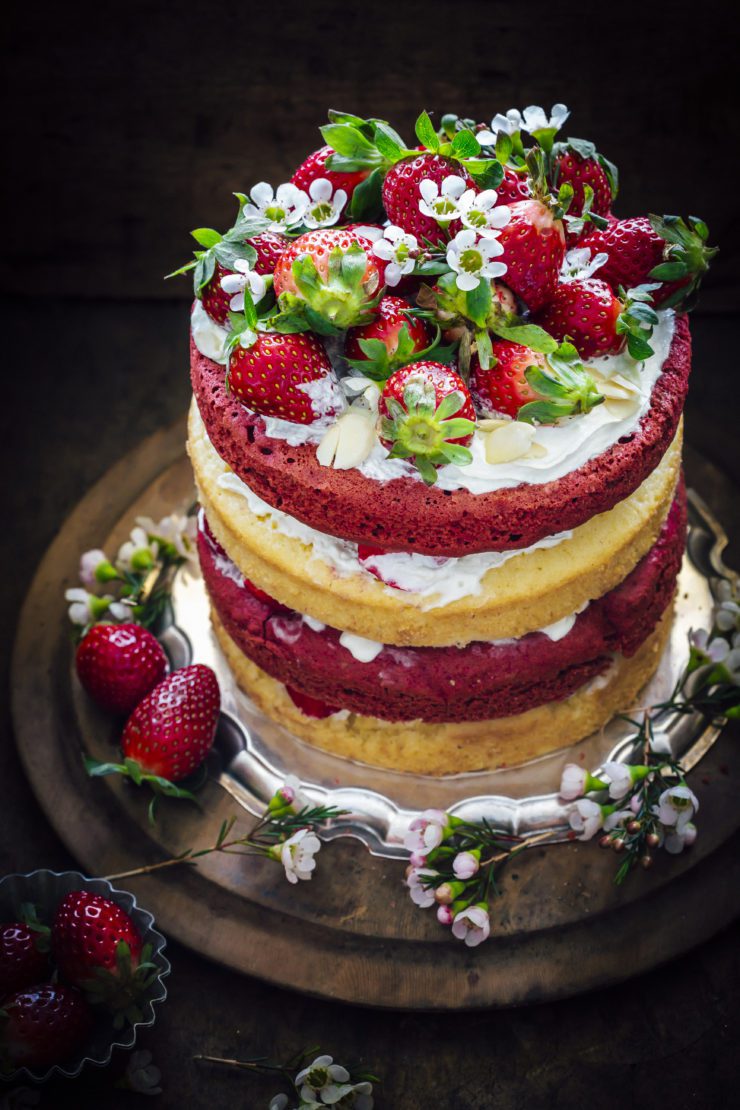
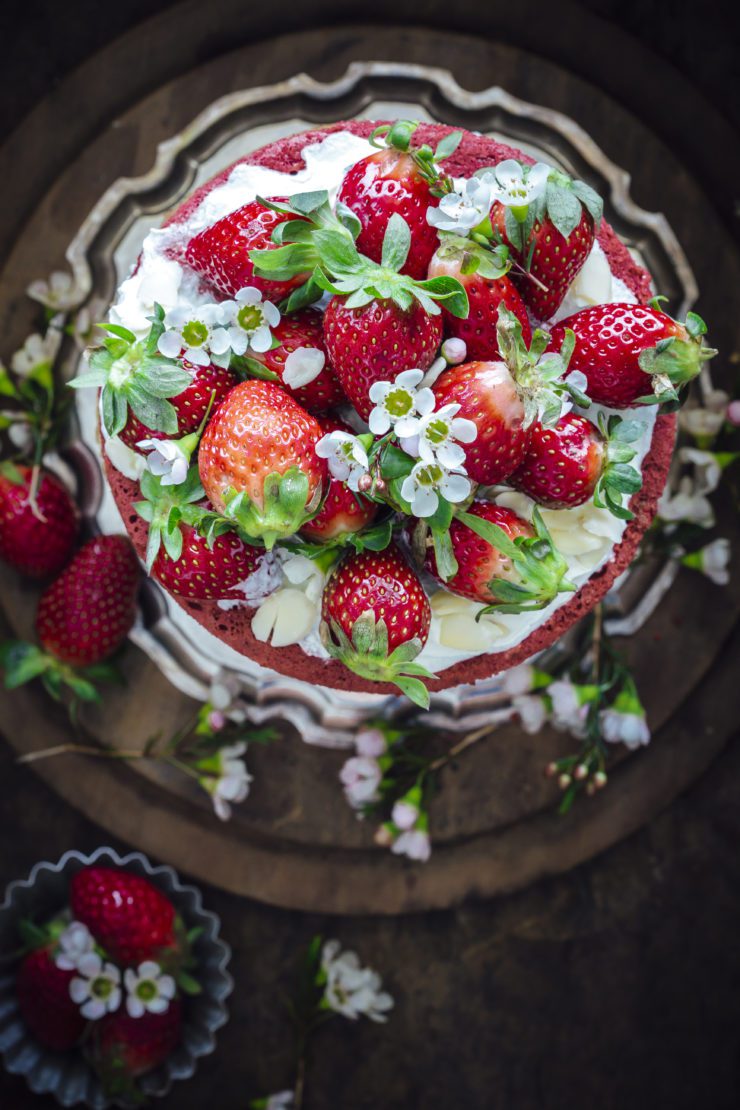
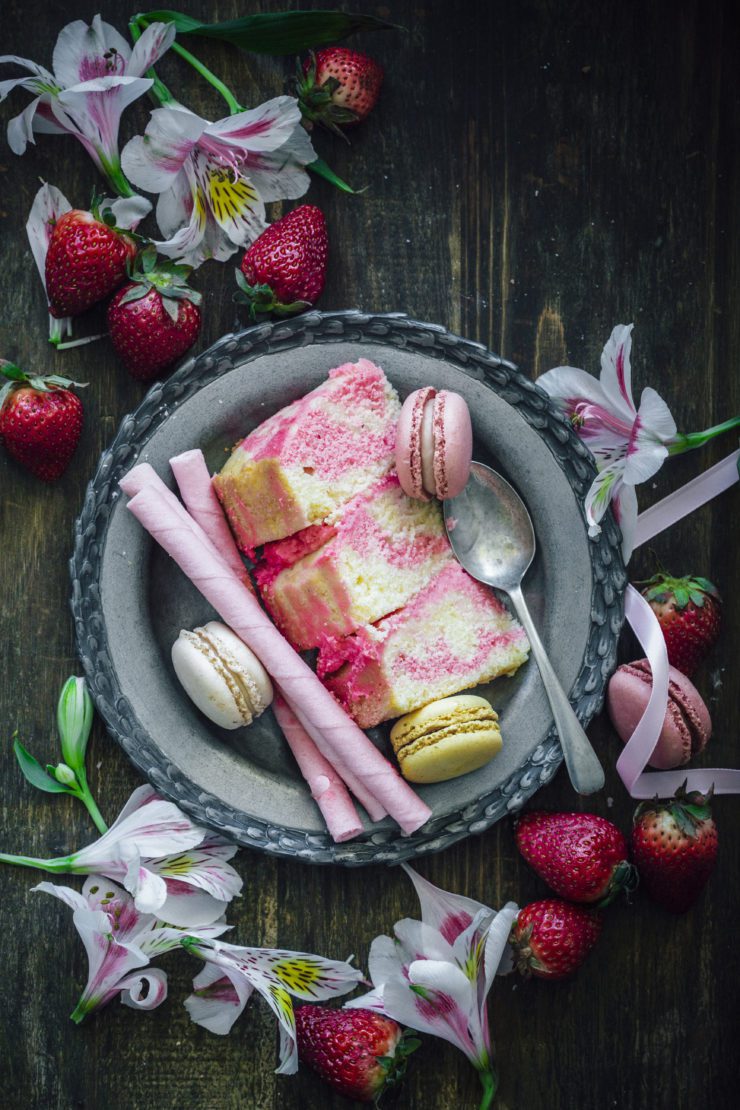
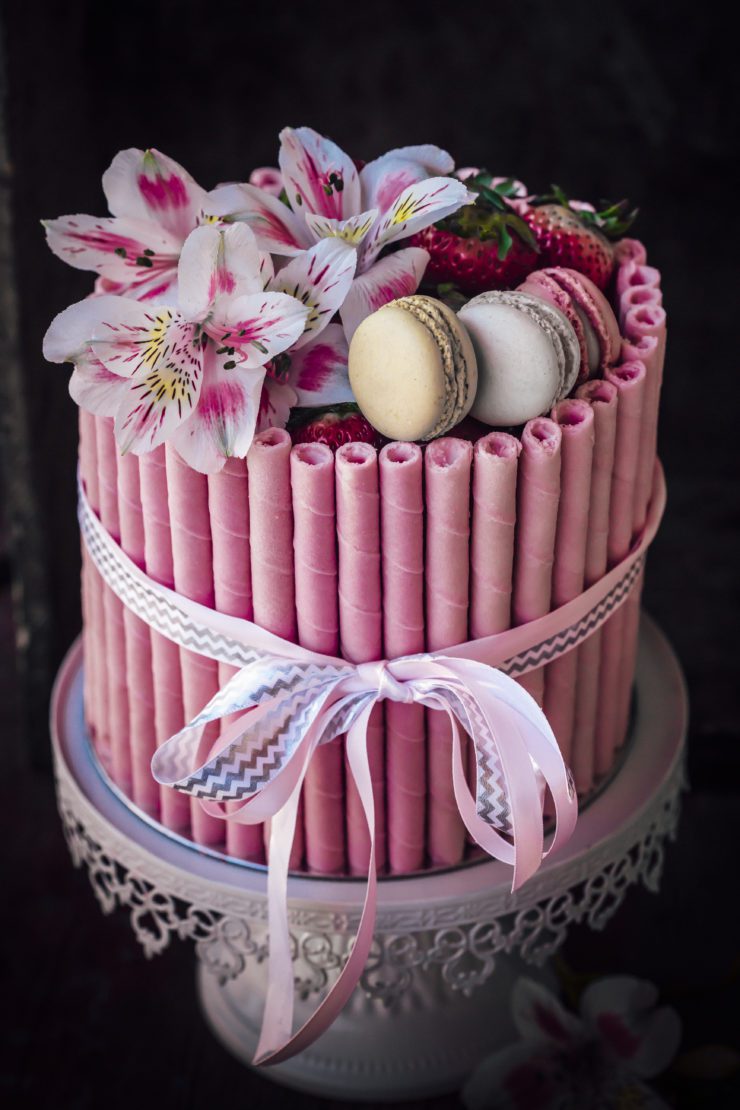
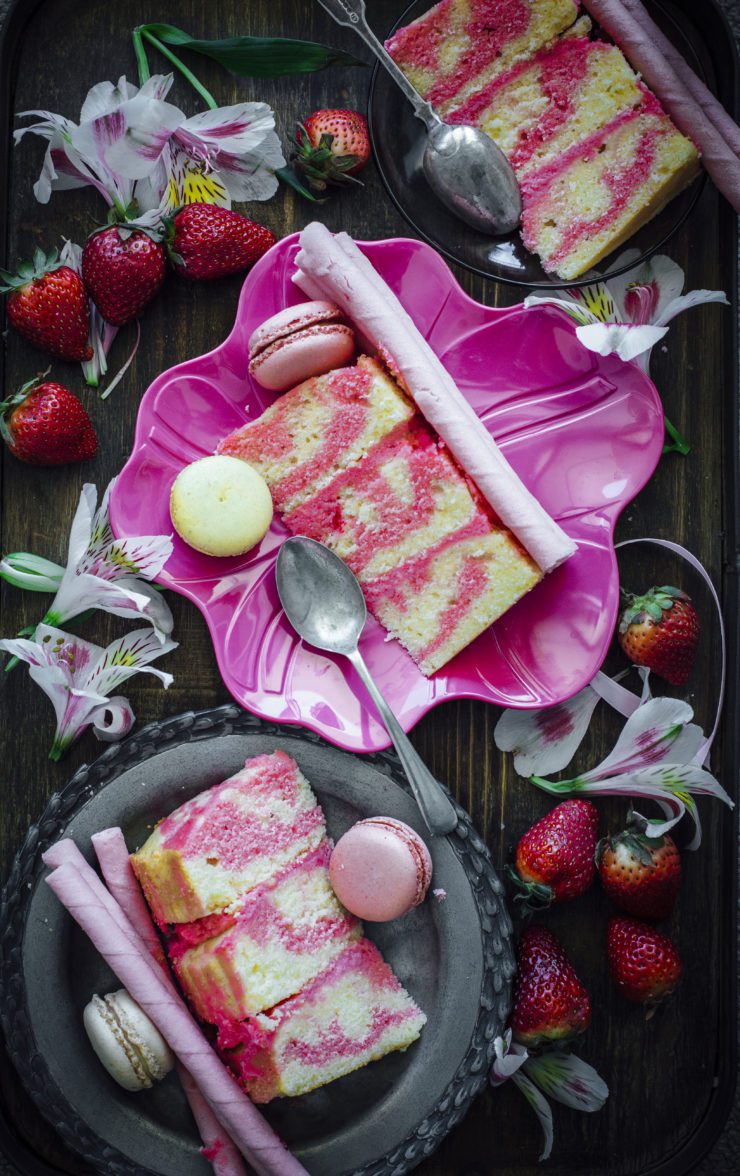
Sydney is so hot at the moment! Even as I write this, I can’t bear to look at the window facing me which is ablaze with the bright sun rays literally blinding my eyes. It’s still Spring technically but every bit like summer. I am still waiting for the stone fruits to arrive, meanwhile there are strawberries. There are always strawberries, whatever the season in Australia which makes life easier for me. Because, who does not love strawberries? Healthy or indulgent..there are a zillion ways of eating them. So this Layered Strawberry Cake aka Strawberry Lovers Cake (because it has all things strawberry in it) is made of a layered strawberry-vanilla marble cake, strawberry mousse, fresh strawberries and strawberry wafers. Besides tasting delicious, it smells so amazing!

Layered Strawberry cake

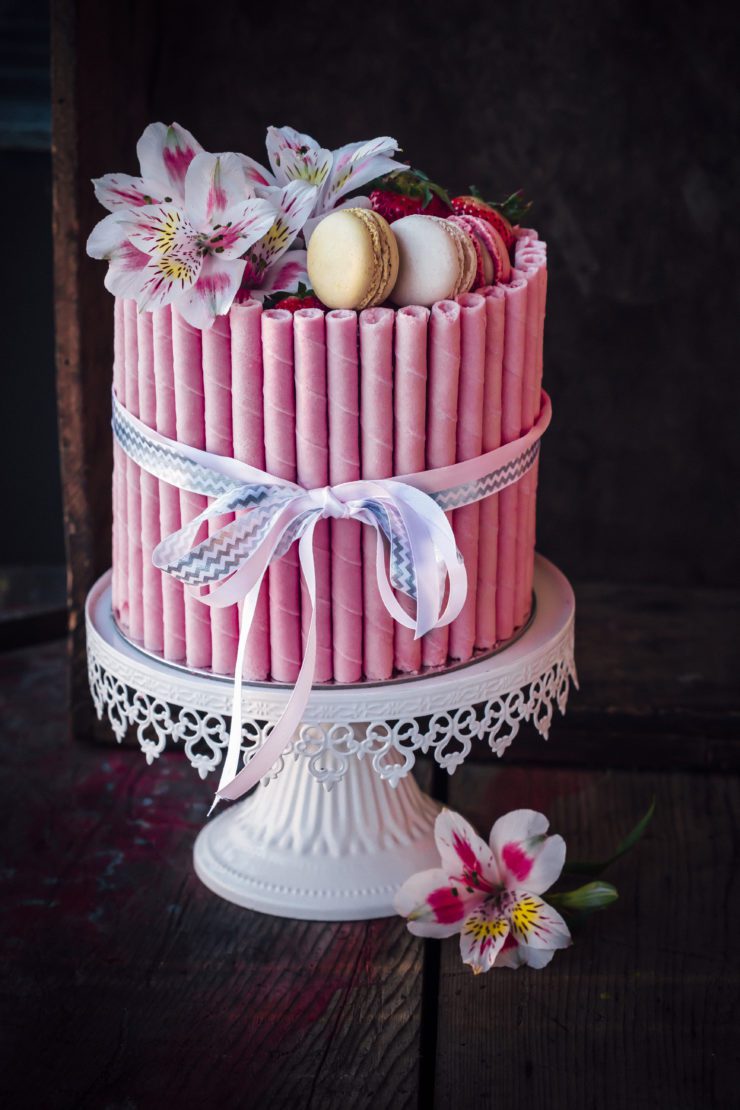
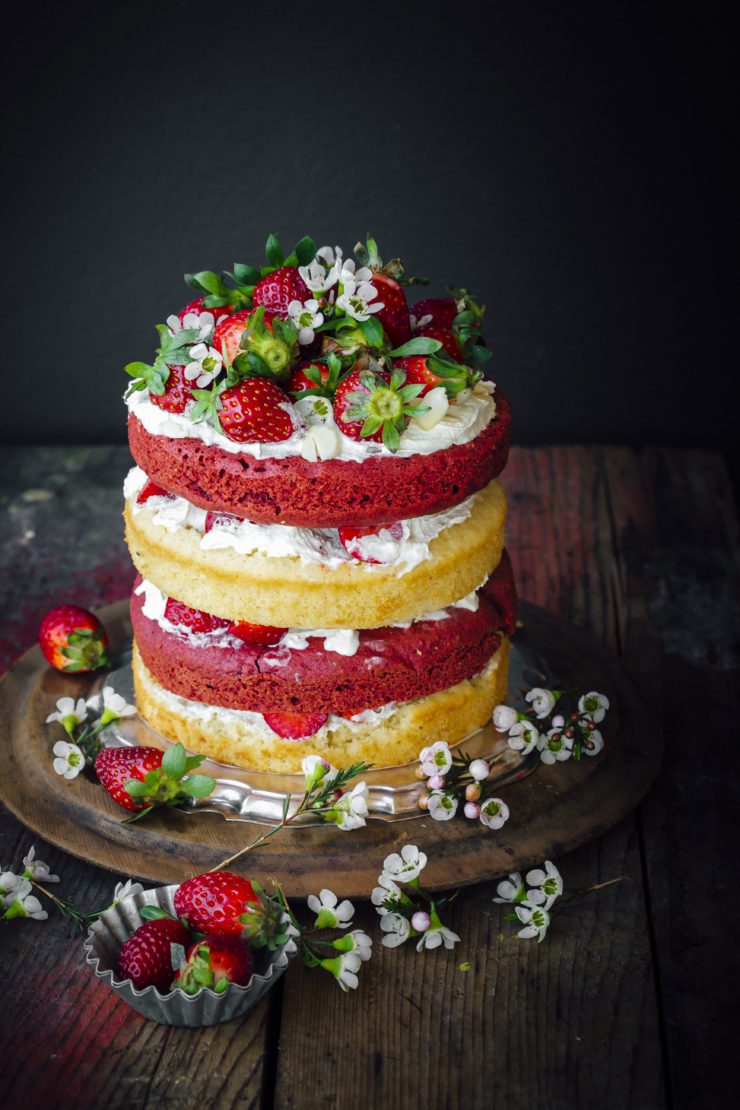
For a long time I was intending to make a Charlotte. There is something very delicate about the way different layers of cream/custard, sponge and fruit are encased between a circle of ladyfinger biscuits. Yes, that was the initial intention but as always I got swayed and so much that it just turned out to be another cake with a different kind of filling. These long, thin strawberry wafers  usually arrive during Christmas every year along with all the colourful candies. They were a tad bit too tall for the height of my cakes but filling the top with fresh strawberries made them just the right size for a cake like this. If you are planning on making the Layered Strawberry cake and can’t find the exact wafers, you could use regular wafers as well, but a two-tiered cake would be more suitable.

Layered Strawberry cake

Layered Strawberry cake

It is best that the layers are made ahead and assembled on the day of serving the cake. The mousse will hold up at room temperature for a couple of hours only. The other option is to refrigerate the assembled cake but in that case, it’s best to sprinkle the cake layers with some strawberry infused simple syrup to prevent them from drying out. Simple syrup is made by heating equal parts of water and sugar till sugar dissolves completely. The cooled syrup is great for sponge cakes and such when you want them to remain moist for days, especially while refrigerating.

Layered Strawberry cake

Layered Strawberry cake

Layered Strawberry Cake
Makes a 3 layered 6 inch round cake

Strawberry-Vanilla Marble Cake (adapted with slight variation from this recipe)

250 unsalted butter, softened, plus extra for greasing
250 g caster sugar
5 large egg , lightly whisked
2/3 cups (approx 85 g) plain flour
100 g full-fat Greek yogurt
2 cups (approx 250 g) self-raising flour
1/4 cup milk
1 tsp pure vanilla extract
1 tsp strawberry extract
few drops pink food colour

Pre-heat oven to 160 degrees C (140 degrees C for fan forced ovens). Grease 3  round, 6 inch cake tins and line the bases with non-stick baking paper.

Using electric beaters or a tabletop mixer, beat the butter, sugar and ¼ tsp salt together until pale and fluffy, then pour in the eggs, one at a time, giving the mix a really good beating before adding the next. Add 1 tbsp of the plain flour if the mix starts to look slimy rather than fluffy. Beat in the yogurt.

Mix the flours; then, using a large metal spoon, fold them into the batter, followed by the milk. Remove half the mixture into a different bowl. To the existing bowl of batter add the vanilla extract. To the second bowl add the pink food coloring and strawberry extract and mix till blended. Spoon and divide the mixtures equally among the three tins and swirl with a long wooden skewer to create the marble effect. Bake the batter for 30-40 mins or until well risen and golden – a skewer inserted into the middle should come out clean.

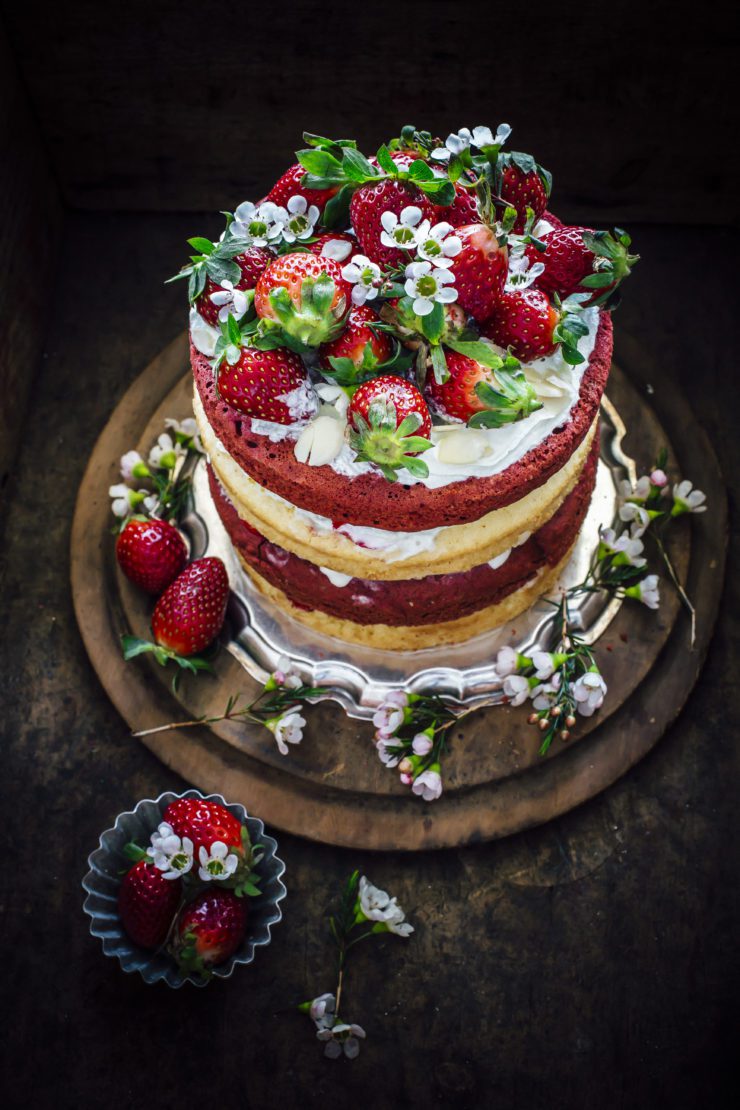
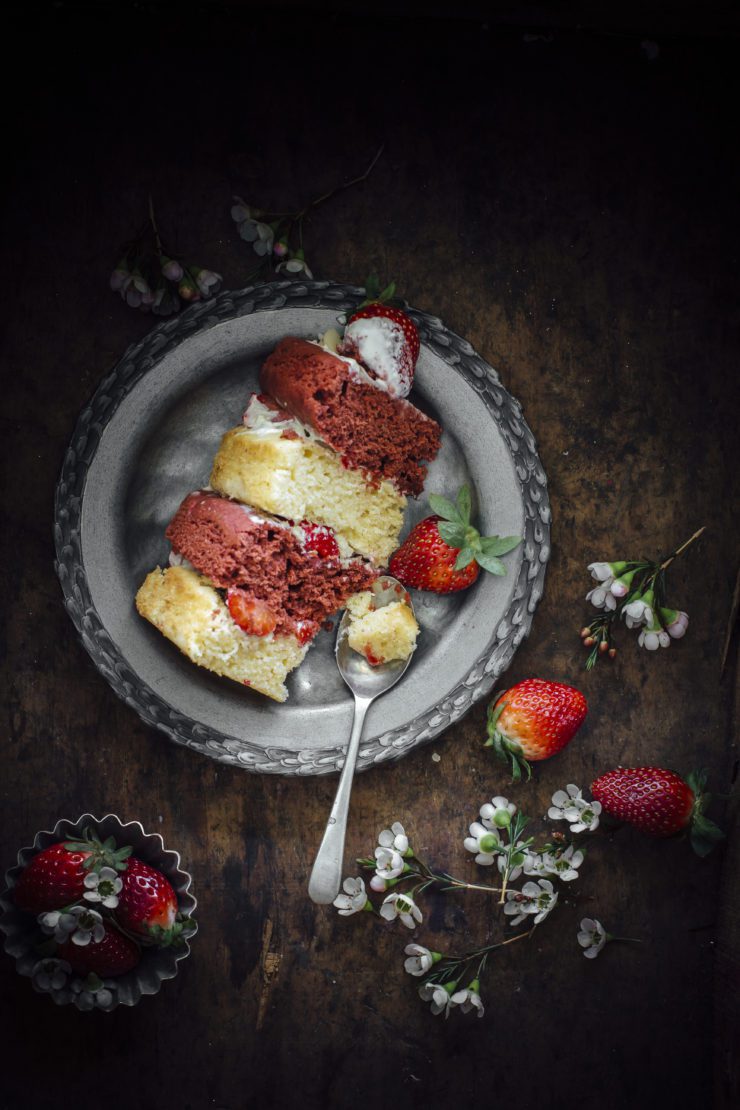
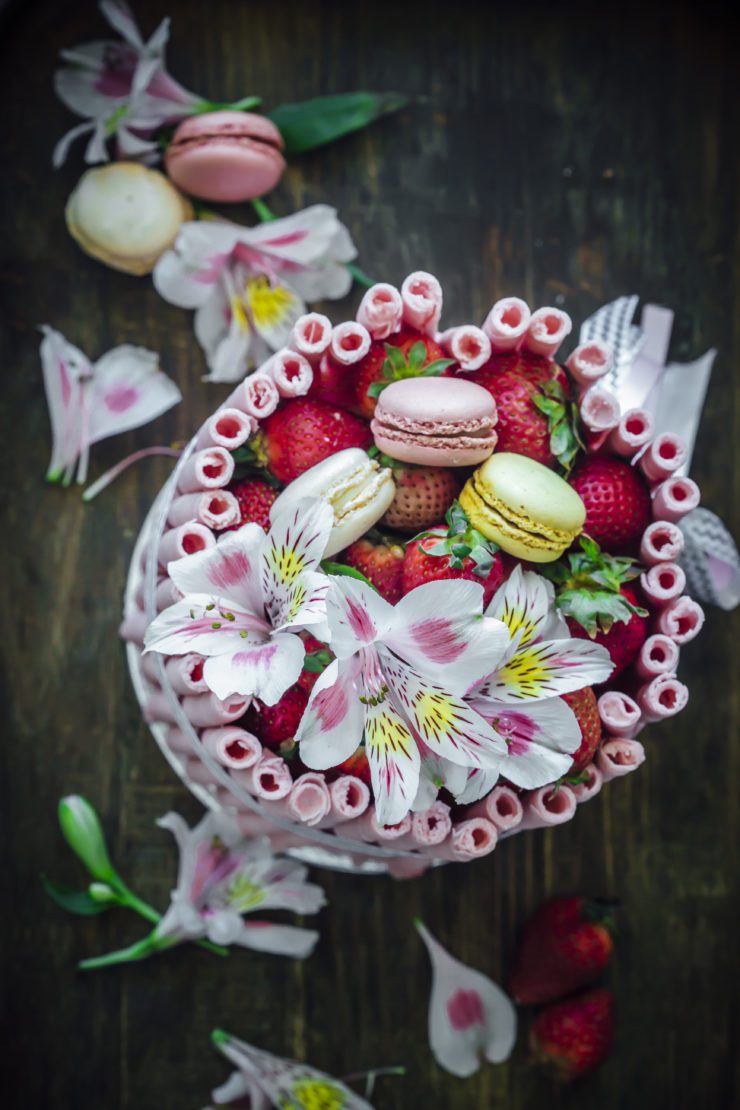
Cool the cakes for 15 minutes in the tin. Then turn onto a wire rack to cool completely. Spread a think layer of mousse between the cake layers. Lightly frost the outside of the cake with the mousse and quickly place the wafers around it for them to stick to the cake. Top with fresh strawberries. Decorate with flowers and macarons.

Strawberry Mousse (adapted from here)
1 sachet (7 g) unflavored gelatin
2 cups fresh strawberries, sliced
1/4 cup castor sugar
1 cup whipping cream

Sprinkle gelatin over 1/4 cup water in a small bowl; let stand 5 minutes. Process 2 cups sliced strawberries and 1/4 cup granulated sugar in a blender or food processor until smooth, stopping to scrape down sides as needed. Transfer strawberry mixture to a small saucepan; bring to a boil over medium-high heat. Remove from heat. Add gelatin to strawberry mixture, stirring constantly until gelatin dissolves. Cover and chill until consistency of unbeaten egg whites, stirring occasionally (about 30 minutes).

Beat cream at low speed until foamy; increase speed to medium-high, and beat until soft peaks form. Fold whipped cream into strawberry mixture until well blended. Cover and chill 30 minutes or just until mixture is thick enough to hold its shape when mounded.

Chocolate Zucchini Cake

27|10|2016

I have taken pride in being an ardent lover of fruits and vegetables all my life. Even when I was little girl and saw my cousins removing bits of cooked beans and beetroot from their stir fries and stews, I was never the one to complain or follow suit. I have a similar or maybe slighter greater love for Chocolate and though I enjoy both in different ways, I seldom like to mix the two loves. Because, why would you mess with Chocolate? Unless you really need to. I have been contemplating this Chocolate Zucchini combination for years but never really found myself convinced enough to try it. But the other day when I was having coffee with a friend and we were taking about veggies in cakes, she said to me ‘Have you ever made a Pumpkin cake? Is it just as gorgeous as a zucchini cake?’ I was surprised. This year I did try a pumpkin cake for the first time and I was truely impressed. ‘Does a Zucchini cake not taste weird?’ I asked her. ‘Oh no! Try a Chocolate Zucchini cake. You won’t taste the zucchini ‘ was her reply. I looked up a few recipes and found this one which looked quite easy. It had brown sugar and cocoa powder so it wouldn’t be inedible even in the worst case scenario, I told myself.

589a3349

As it turned out, it is a delicious cake! A really moist, textural cake. The addition of chocolate ganache made it a true treat. Whether the cake had any indication of having zucchini in it was hard for me to say. I had added the zucchini myself so obviously I knew it is there and was looking for it. So I figured out the best person to judge would be my nearly 7 year old sweet loving son who does know a thing or two about flavours. I didn’t tell him about the zucchini and just served it to him stating that it was a healthy chocolate cake. After eating it he asked me ‘If it’s a healthy chocolate cake, can I take it to school tomorrow please?’ Well, that says it all:-)

589a3347-2


589a3431


Chocolate Zucchini Cake (adapted with slight variation from Good Food)
Makes a 6 inch cake.

1/2 cup caster sugar
1/2 cup firmly packed brown sugar
1/2 cup sunflower oil
1 tsp vanilla extract
2 eggs
a pinch salt
1/2 tsp cinnamon
1/2 cup cocoa powder
1 cup plain flour
1/2 tsp baking powder
1 tsp baking soda
1 1/2 cups firmly packed grated zucchini (about 4 small or 3 large zucchini)

Preheat oven to 180°C. Grease and line a the base of a 6 inch round cake tin with baking paper. Place the sugars, oil, vanilla, eggs, salt and cinnamon in a mixing bowl.

Whisk together until combined. Sift in the cocoa powder, flour, baking powder and baking soda.

Using a rubber spatula, fold the dry mixture into the wet mixture until just combined. Add the grated zucchini and stir through.

Pour the mixture into the prepared cake tin and bake for 50-60 minutes, or until a skewer inserted into the centre comes out clean. Leave aside for 5 minutes, then turn cake onto a wire rack and cool to room temperature. Once cooled, spoon or drizzle chocolate ganache over the top.

Chocolate Ganache

150 g dark chocolate, roughly chopped
1/4 cup heavy/thickened cream

Microwave method : Place chocolate and cream in a glass or ceramic microwave-safe bowl. Microwave on medium (50%) for 2 to 3 minutes, stirring every 30 seconds with a metal spoon, or until smooth. Stand at room temperature until thickened.

If cooking on the gas, heat the cream over low heat until it just begins to boil. Remove from heat, add the chopped dark chocolate and leave aside. After 10 minutes, mix to blend. Stand at room temperature until thickened.


Red Velvet And Almond Cake

27|08|2016

A couple of weeks ago, I baked a ‘brain’ cake for a friend’s birthday. It was meant to be a surprise zombie party cake from her husband. Her husband sent me a photograph of what he was looking for and to be honest, at first it freaked me out to think of creating something so ghastly. Since it had to be red with an oozing blood effect, red velvet was the obvious choice. I used raspberry jelly to add to the drama and finally created something that I almost hated. There were no pretty swirls or flowers or anything that would resemble my kind of cakes. I tried dressing up like a zombie to the best of my ability. Knowing that I couldn’t leave the house looking like a zombie on a Saturday evening for fear of scaring the hell out of two little boys I carried black face paint with me in the car and randomly applied it on my face. Upon reaching my friends’s place I realized I was under-dressed. Oh goodness! The girls would have given the real zombies a run for their money. They were too good…I mean so ugly!

589A2564

Needless to say, I didn’t even eat that cake. It was a fun evening with a terrific setup and ambience but I didn’t miss eating the cake even one bit. Later on, I found myself wanting to make another red velvet cake that was not ghastly, not zombie like and rather elegant and crave-worthy. While making the batter, I thought about alternating layers of different cakes. I had a blueberry almond friand that morning so an almond cake was on the top of my mind. I felt they would make a great combo together.

589A2566

589A2558

A red velvet cake actually is a soft, chocolate cake so pairing it with a more intense, fudgy almond cake made it all the more delicious. I love ricotta cheese and often find myself wondering why it is not used to replace whipped cream in recipes as it is quite refreshing and so much lighter than cream. This is a great cake for all occasions. Layers can be made ahead and assembled before serving.

589A2568

589A2574

Red Velvet and Almond Cake with Whipped Ricotta Frosting and Strawberries
Makes a 6 inch 4 layered round cake

To make the red velvet cake : Preheat oven to 180 degrees C. Grease and line the bases of two 6 inch round (base measurement) cake pans with baking paper.

Use an electric mixer to beat the butter, sugar and vanilla in a large bowl until pale and creamy. Add the eggs, 1 at a time, beating well after each addition. Add the flour, cocoa powder and buttermilk, in batches, until well combined. Add the vinegar, bicarbonate of soda and food colouring and stir to combine.

Spoon mixture evenly among the prepared pans. Use the back of a spoon to smooth the surface. Bake in preheated oven for 25-30 minutes or until a skewer inserted into the centre of the cakes comes out clean. Remove from oven. Set aside for 5 minutes before turning onto a wire rack to cool completely.

Almond Cake 

120 g unsalted butter, melted and cooled
1 cup plain flour
1/2 cup ground almonds
1 tsp baking powder
1/4 tsp salt
2 eggs
3/4 cup castor sugar
1 tsp vanilla extract
1/3 cup milk (80 ml)

Preheat oven to 200 degrees C. Grease and line the base of 2, 6 inch round cake pans with baking paper.
In a large bowl, whisk together the flour, almond meal, baking powder and salt.

Using an electric mixer (or by hand) beat the eggs and sugar until thick and pale. Add the vanilla essence. Fold in the butter and milk until just incorporated. Next fold in the flour gently until just moistened. Divide the batter among the two prepared pans. Smooth the tops with the back of a spoon.

Bake for 20-25 minutes until lightly browned or until a skewer inserted in the middle comes out clean. Remove from oven, sit in pan for 10 minutes, then turn onto a wire rack to cool completely.

Whipped Ricotta Frosting
250 g fresh ricotta (do not use the light version)
2 tbsp heavy cream
1 tbsp icing sugar (or more if you like it sweeter)
1 tsp vanilla essence

Fresh strawberries,roughly chopped
Fresh strawberries (whole), to serve
flaked almond, to serve

Place ricotta, cream, icing sugar and vanilla in bowl of food processor and process until smooth. Transfer mixture to a bowl, cover and place in fridge until required.

To assemble : Place a layer of almond cake on a cake plate or stand. Spread a quarter of the frosting and top with chopped strawberries. Place a layer of the red velvet cake  and repeat with ricotta frosting and strawberries. Repeat with all the layers and frosting. Decorate with fresh strawberries and flaked almonds.

Ginger Cake With Salted Caramel Poached Pears

18|08|2016

Ginger Cake with salted caramel poached pears

I spotted the first cherry blossoms today and the weather felt warmer than usual. It’s coming! Spring is coming. I felt like doing a happy dance. Meanwhile it occurred to me that I have this huge list of winter recipes to share and winter will be gone in a wink. This winter I tested out recipes to my heart’s content. It is such a delight when the outcome is delicious. My messy kitchen seems so worth it! I have a soft spot for ginger cakes. In fact my very first post was a ginger cupcake recipe that I make over and over again. It’s nice to have tried and tested recipes at hand but I also like to experiment with varieties of the same cakes or desserts in pursuit of perfection.

589A2364


589A2367

I can remember at least 10 times being asked for substitutes for treacle and molasses that are so classic to ginger and gingerbread cakes. Honestly, they are hard to substitute as the sticky, deep, rich flavour is what brings out the spicy taste of ginger. However, if you must make a great ginger cake without the syrups, this is it. It has a strong taste of ginger whilst being moist and light. I find that powdered ginger is quite subtle whereas freshly grated ginger is too overpowering. Bits of raw ginger in the mouth is not the most pleasant thing to taste. Crystallised ginger or glace ginger is the solution for me. It is intense, sweet and kind of gets lost in the batter. To compensate for the absence of molasses, I’ve topped the cake with salted caramel poached pears. It is a match made in heaven is all I can say. Crunchy chocolate coated honeycomb completes the balance.

With or without the poached pears, the cake is must make when all you do is throw a handful of ingredients together. It’s a three line recipe only which is what I love.

589A2373

589A2370

Ginger Cake
Makes a 6 inch round cake that serves 6-8 people.

Preheat oven to 180 degrees C (160 degrees C for fan-forced ovens). Grease and line the base a round 6 inch (base measurement) cake pan with non-stick baking paper.

Combine the flour, brown sugar, powdered ginger, glace ginger and powdered cinnamon in a bowl. Whisk in butter, egg and milk. Pour into pan.

Bake for 35-45 minutes or until a skewer inserted into the center comes out clean. Set aside for 5 minutes to cool before turning onto a serving plate. Serve with salted caramel poached pears (recipe below) and honeycomb.

Salted Caramel Poached Pears

4-5 cups of water
1/2 cup light brown sugar
6 firm, ripe pears, peeled and bottoms sliced off to make them stand
1 tbsp lemon juice

For the caramel sauce

3/4 cup packed light brown sugar
1/2 cup water
1/2 cup heavy cream
a pinch of sea salt

To poach the pears: In a large pot, combine the water and sugar over medium-high heat. Add the lemon juice. Bring the mixture to a boil, stirring to dissolve the sugar, then reduce the heat to maintain a gentle simmer. Submerge pears in the simmering liquid, adding more water, if necessary, to just cover the pears. Cut a piece of parchment paper into a circle just large enough to cover the pot. Ease the paper down into the pot until it is touching the surface of the liquid. Simmer the pears until a knife inserted directly into a pear meets little resistance, about 30 minutes. Remove the pot from the heat and cool the pears completely in the poaching liquid.

To make the sauce: In a saucepan, over high heat, combine the brown sugar and water and bring it to a boil. Reduce heat to medium and simmer until the sauce is reduced, thicker and takes on a dark golden brown color, about 8 to 10 minutes. Carefully stir in cream, reduce the heat to medium-low and simmer until very thick, 2 to 3 minutes more. Add salt.

To assemble/serve : Just before serving top the cooled cake with the pears and drizzle generously with salted caramel sauce. Add the crushed chocolate coated honeycomb (if using).


  • « Previous Page
  • 1
  • …
  • 22
  • 23
  • 24
  • 25
  • 26
  • …
  • 46
  • Next Page »
Hey Sugar
Cake
Link to my Facebook Page
Link to my Instagram Page
Link to my Pinterest Page
Link to my Mail Page
Subscribe to this site
Fresh Awards
2019 Aus mumpreneur
2019 aus mumpreneur
Mumbrella

Copyright © 2025 · Sugar Et Al · Designed by Smitten Blog Designs · Log in