• Home
  • Recipe Index
    • Recipe Index
    • Breakfast/Brunch
    • Cakes and Puddings
    • Chocolate
    • Cookies and cupcakes
    • Custard and Mousse
    • Gluten Free
    • Ice Cream
    • Mains
    • Other Sweet Treats
    • Snack/Appetizers
    • Soups and Salads
    • Tarts and Pies
    • Vegetarian
  • About
  • Cookbook
  • Portfolio
  • Store
  • Press
  • Work with Me

Sugar et al

Because Life is a blend of flavours...

Rosewater And Poppy Seed Cake

2|05|2016

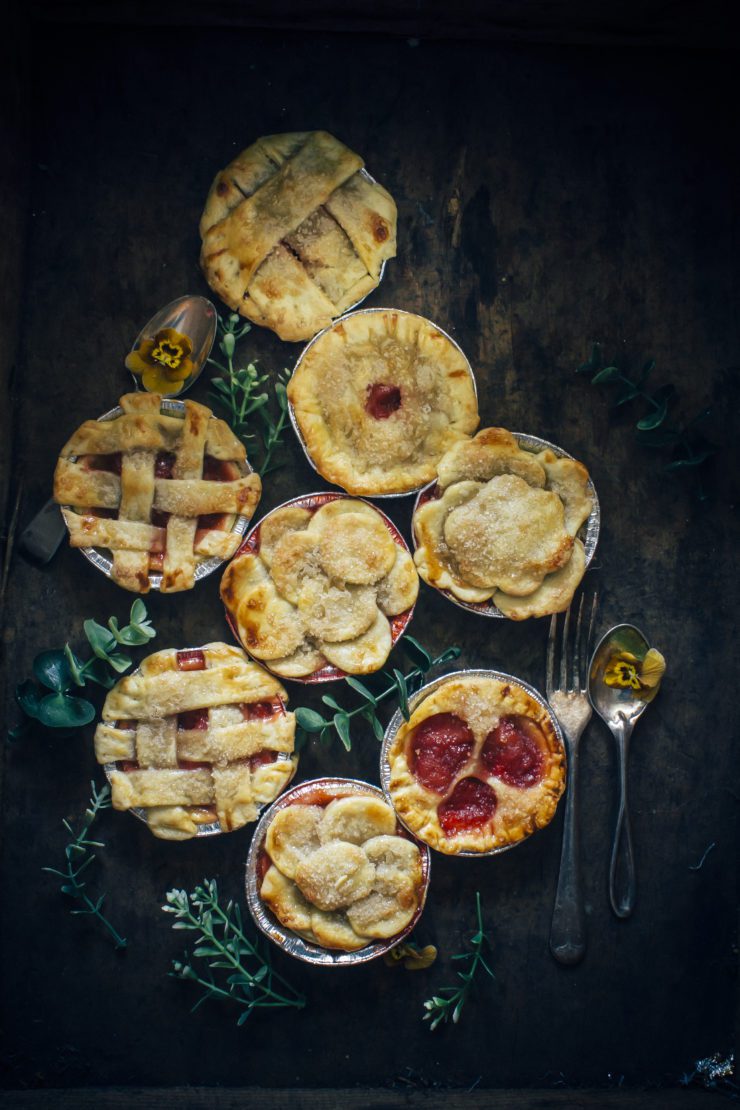
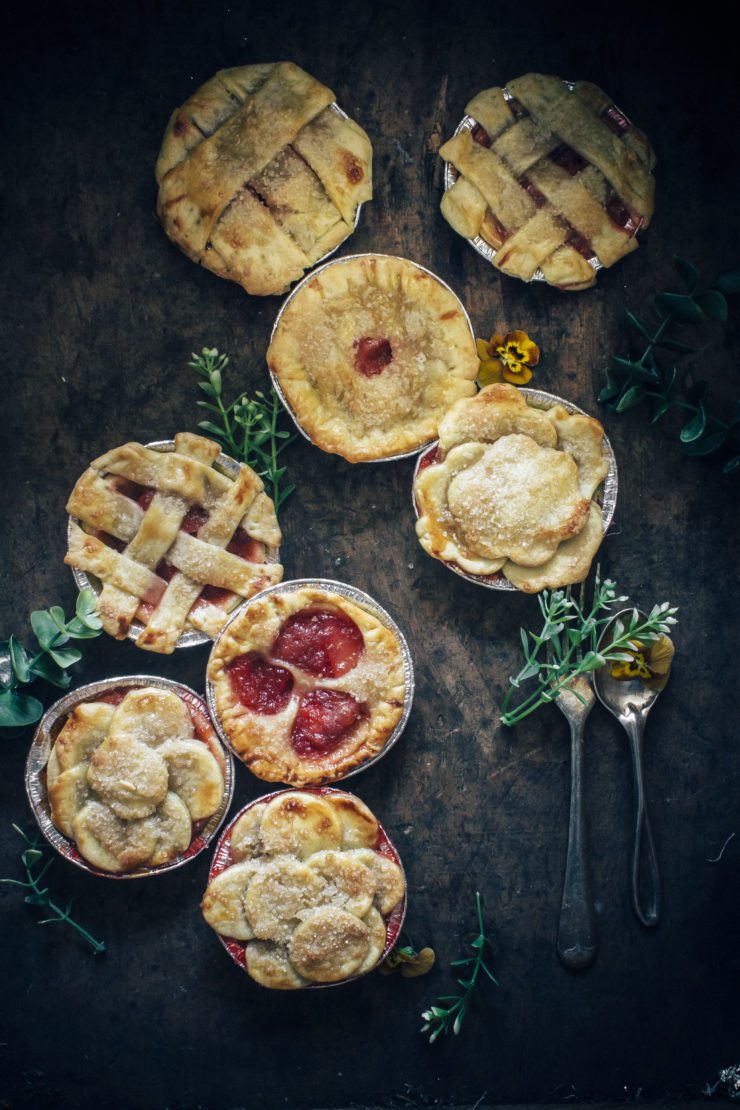
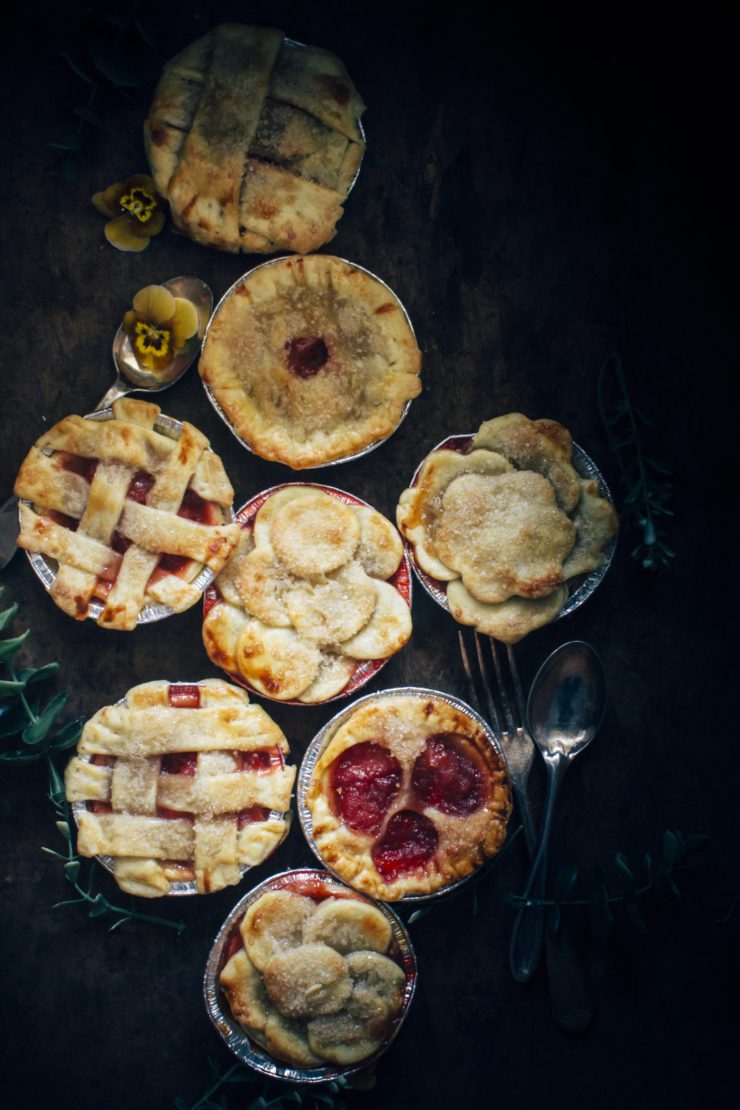
You guys! I never thought you would love my experiments so much. When I make something I picture how much me, my family and friends would love to eat it. There are no other benchmarks for me. I barely look at trends, I don’t care a hoot for what my traffic stats should look like or what makes a post do well. I read about these things everywhere but honestly, I don’t understand much. It’s just me and my craft. And on the other side it is you, my dear readers. I like to do things that make you happy or things that will enable you to make someone else happy. So many of you have asked for the recipe of this rosewater and poppy seed cake. It came as a surprise to me. So I’ll keep it short and sweet and jump straight to the cake.

IMG_1608-4

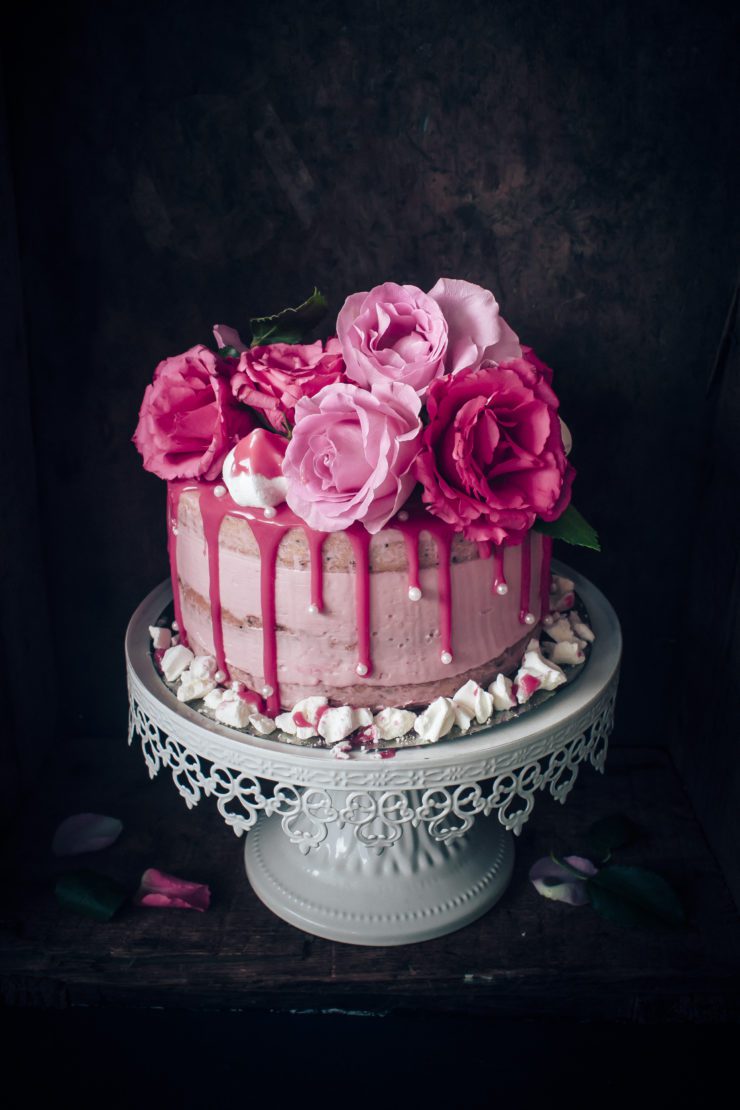
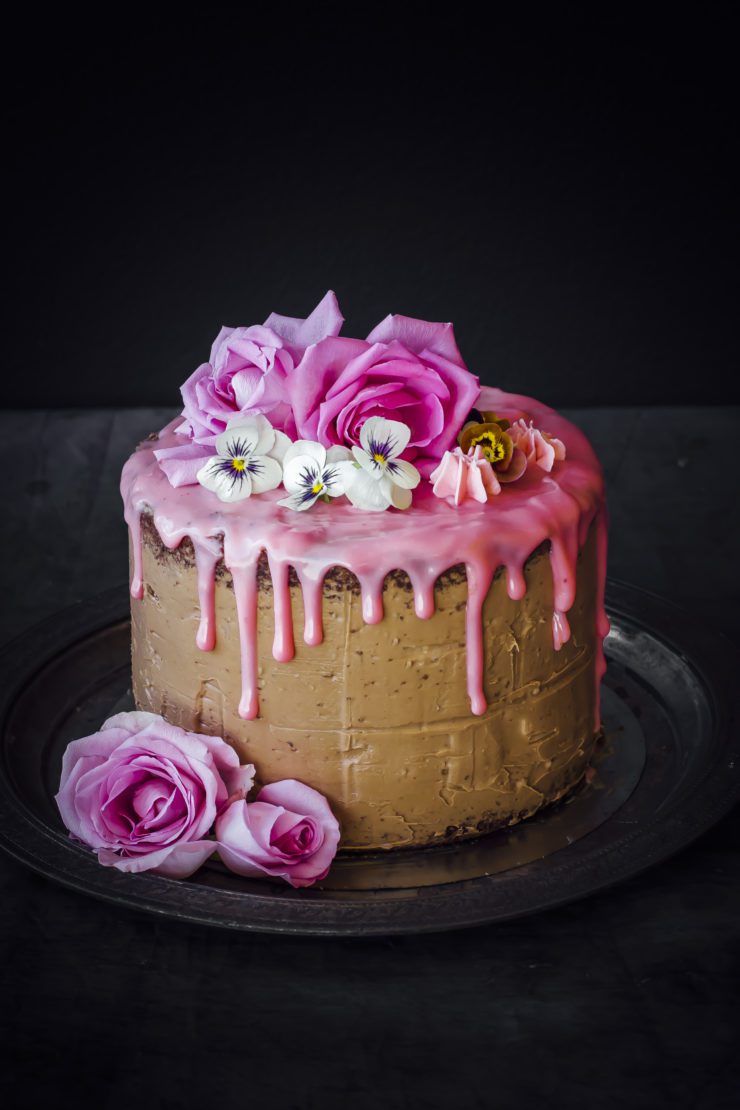
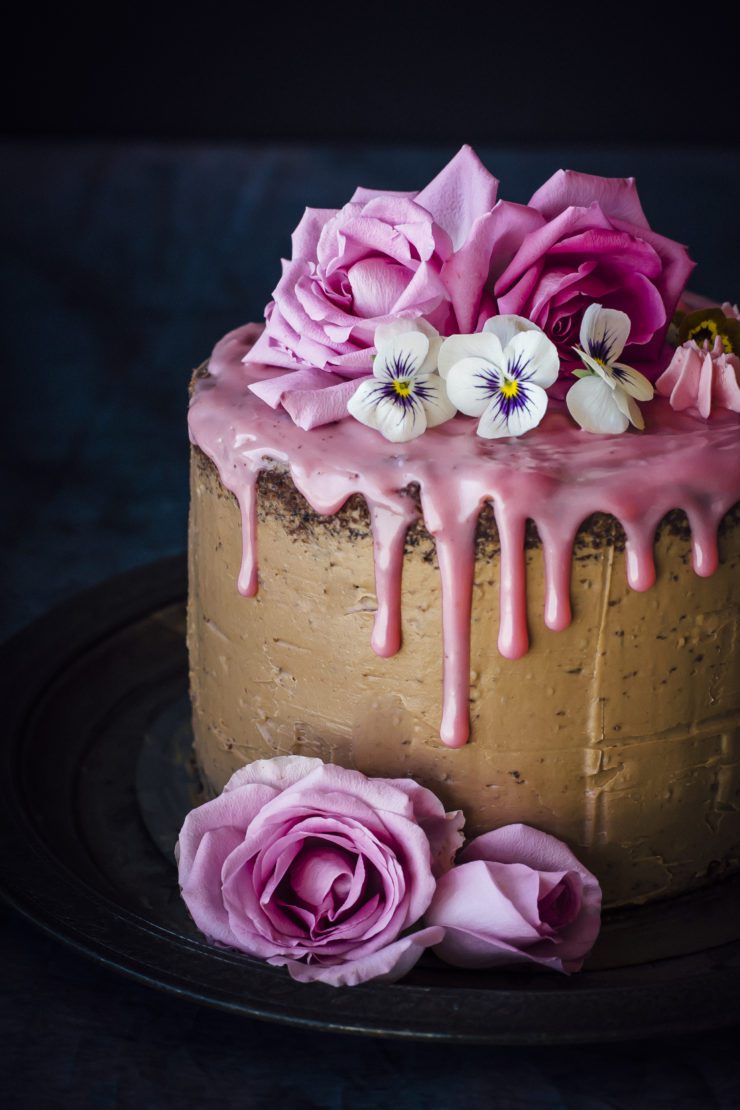
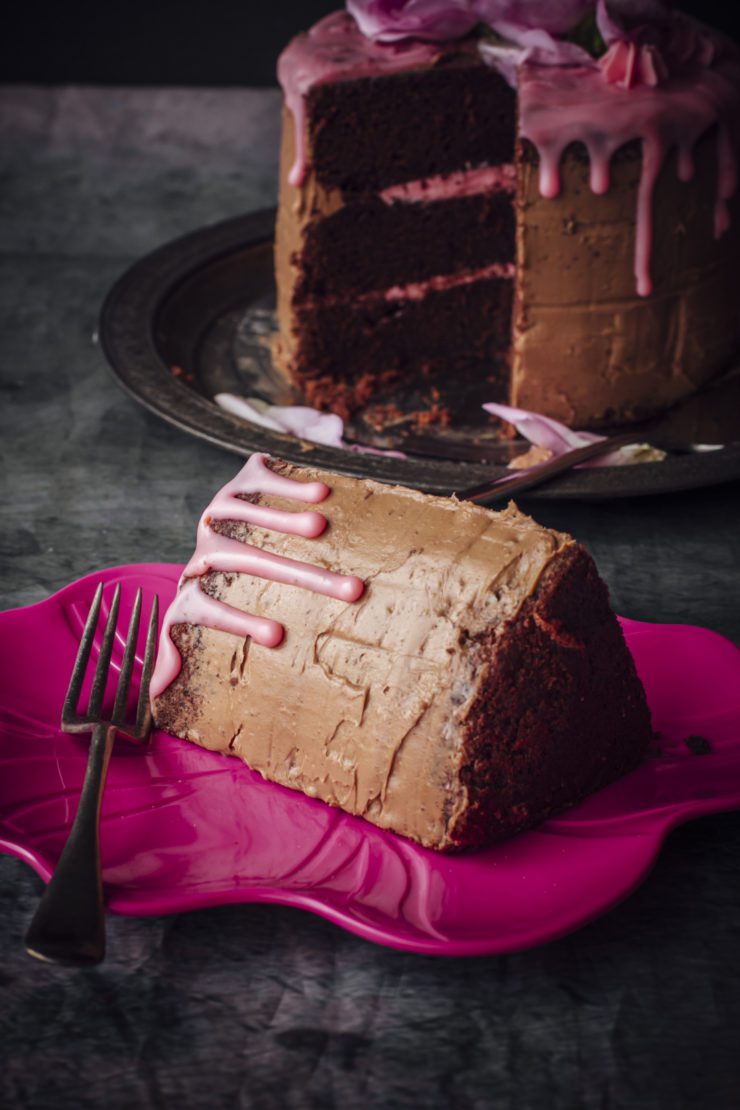
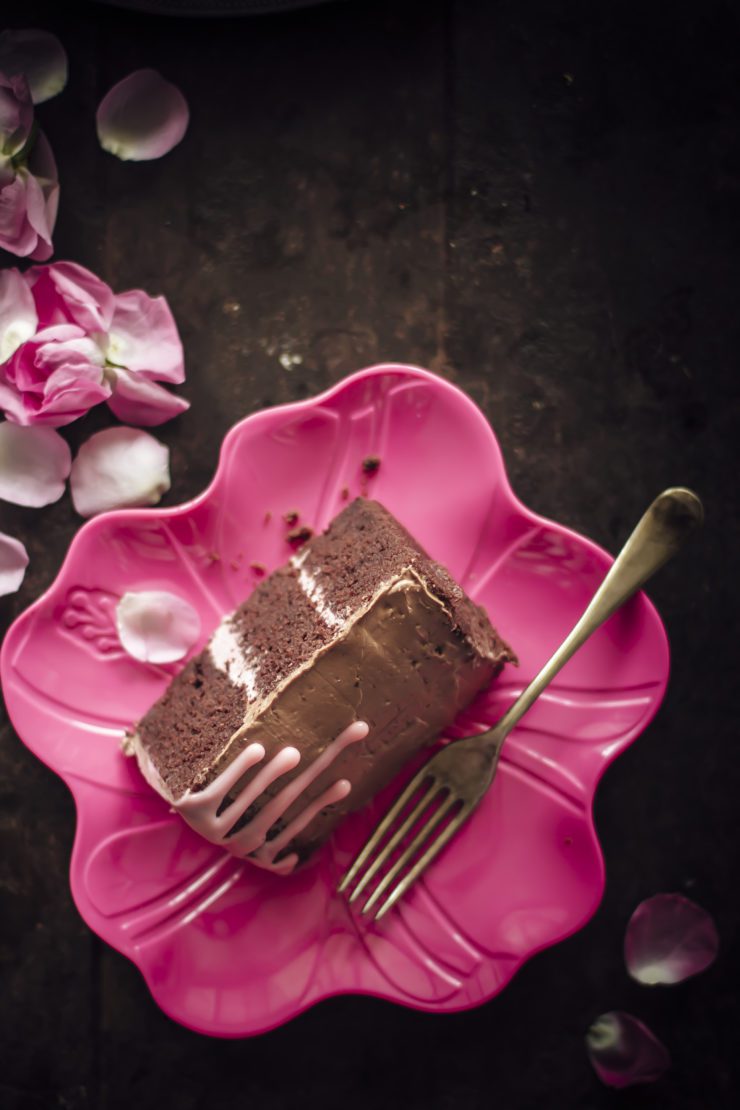
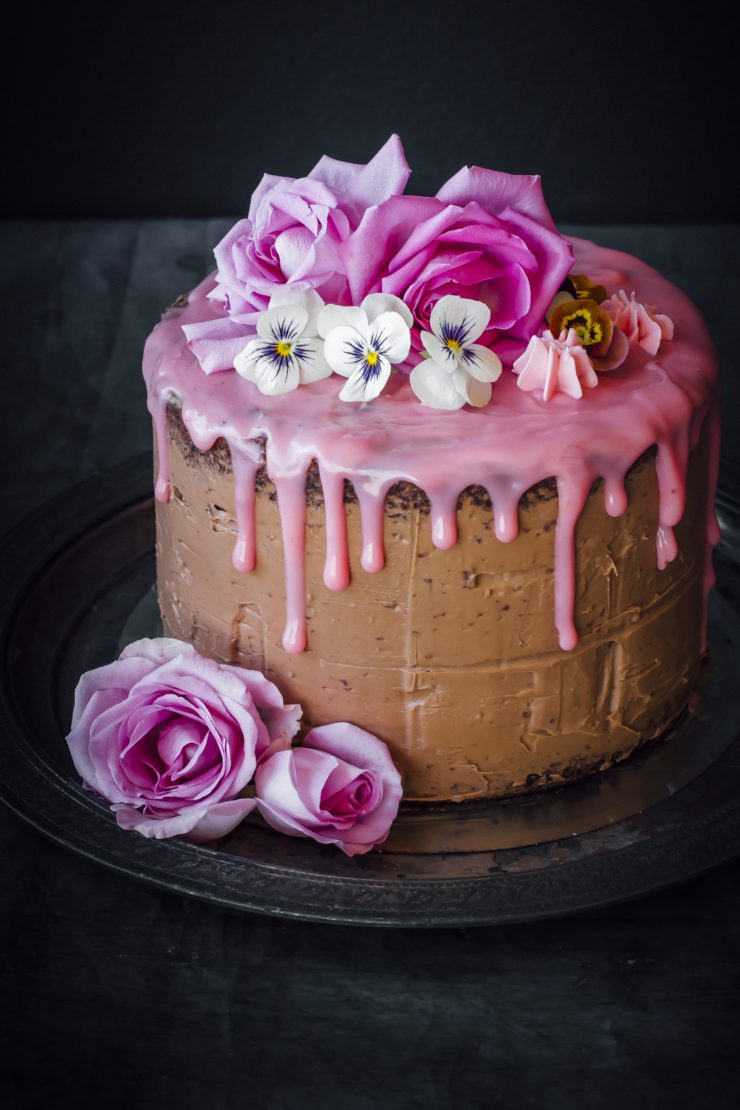
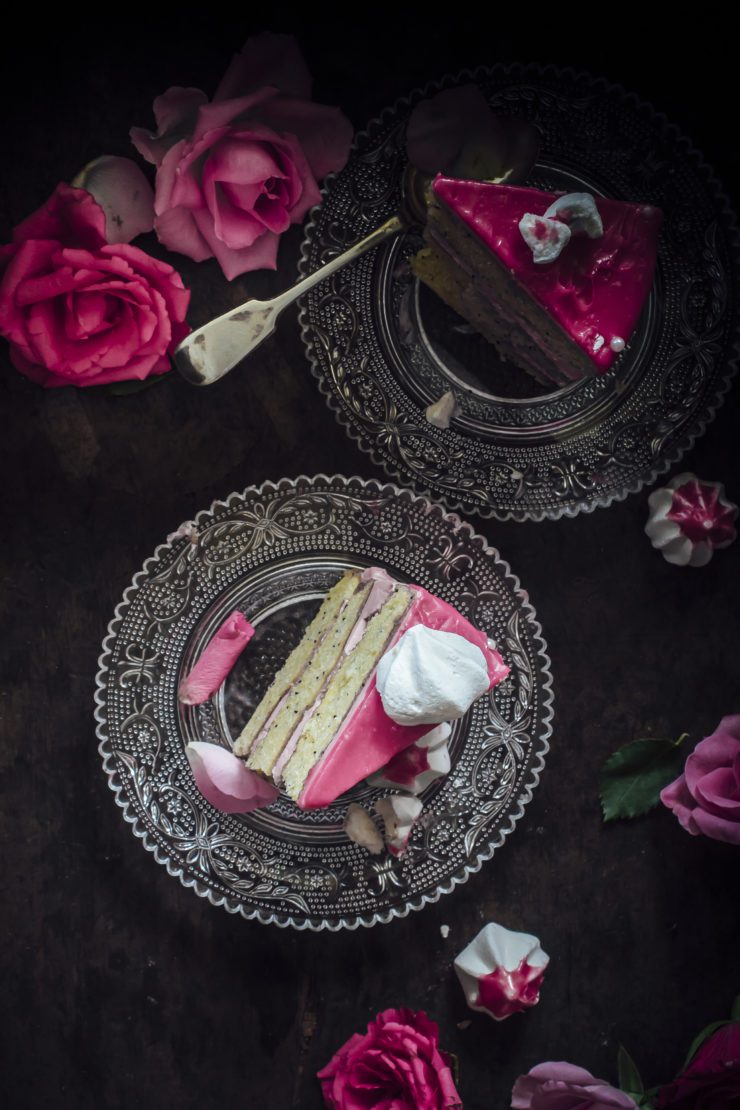
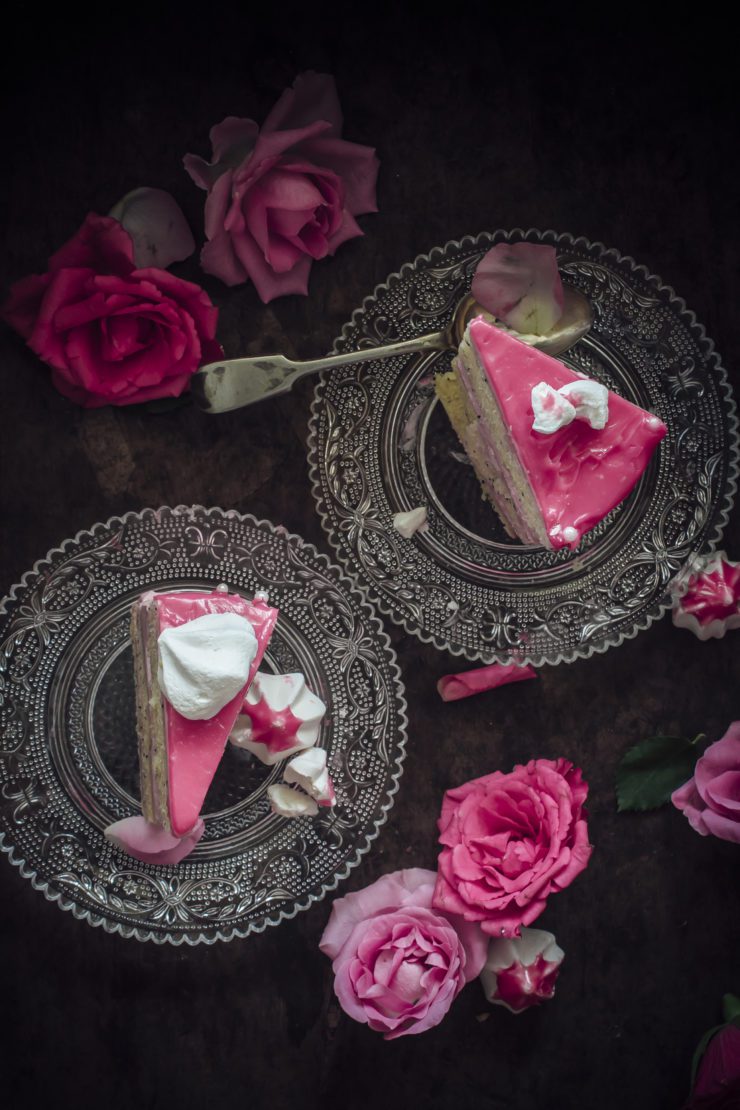
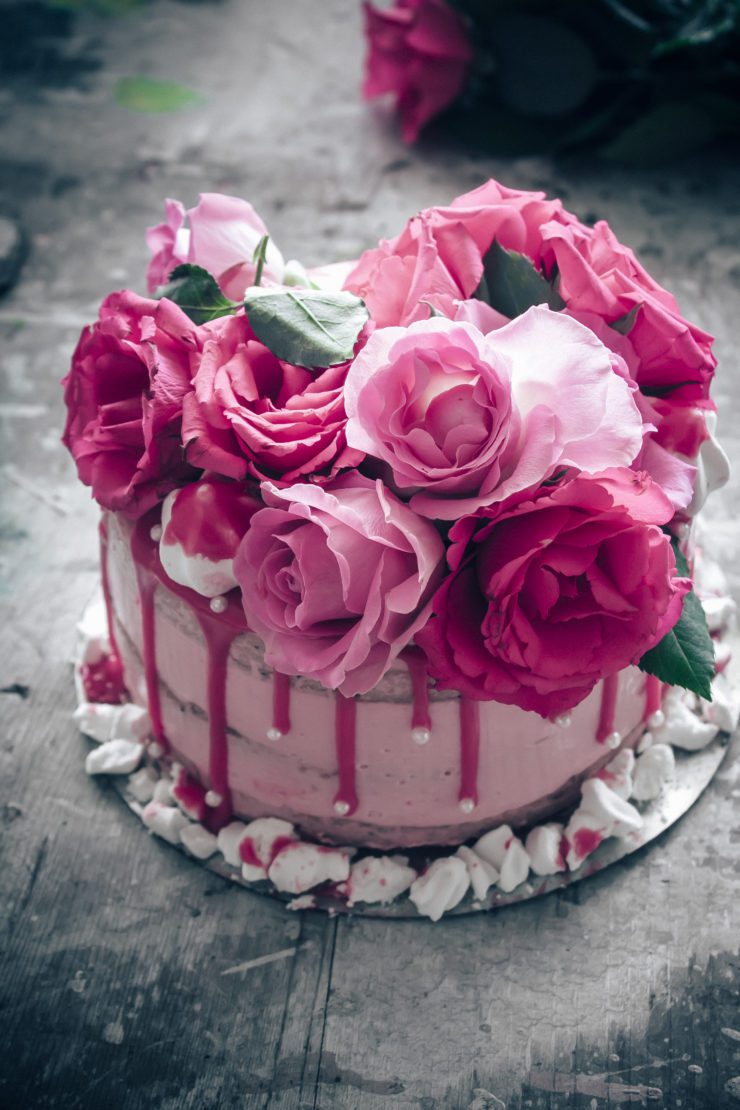
The cake has a great texture just as you would expect from a poppy seed cake. The rosewater is what you taste. I’ve used a little syrup to moisten the cake and make the cake more fragrant.In between the layers and outside is a lemon infused buttercream. Lastly, on the top is a white chocolate ganache in that shocking pink colour. So much happening in the cake but it tastes beautiful.

IMG_1610

IMG_1636

IMG_1637

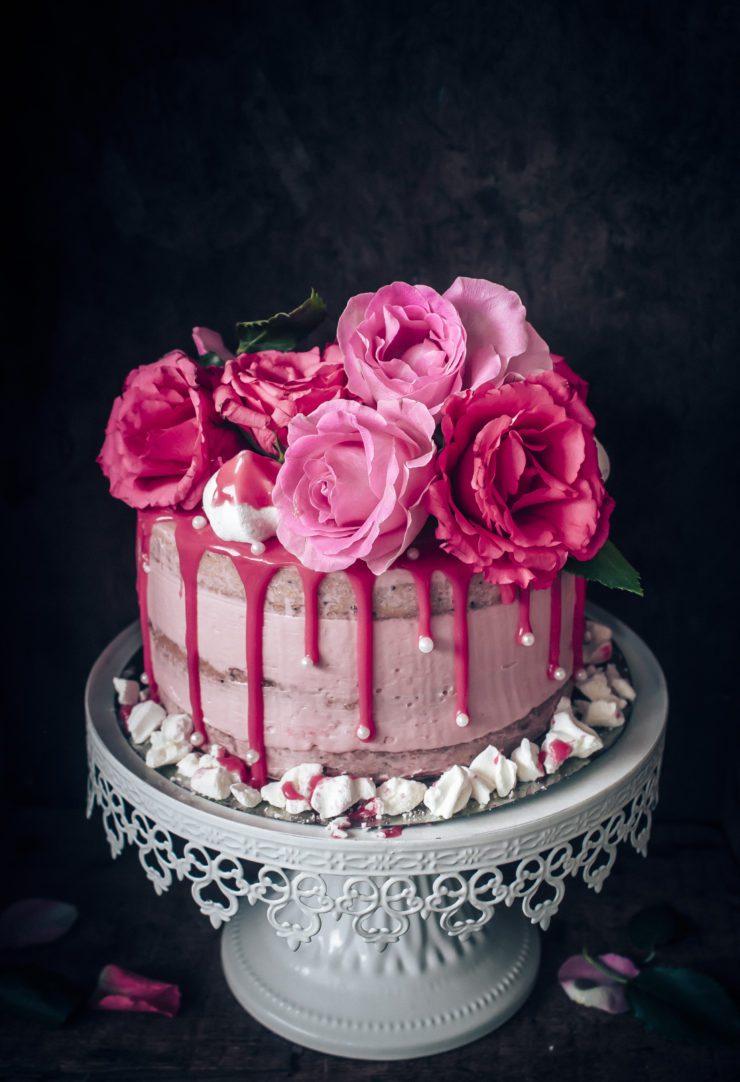
It’s meant to be a Mother’s day cake so please go ahead and decorate it with the prettiest roses you can find. Try and use flowers that have not been sprayed with insecticides or fungicides. If you can’t find any, make sure to read this post on decorating with flowers.

IMG_1617

Rosewater And Poppy Seed Cake
Makes a 3-layered 6 inch round cake

4 tbsp poppy seed
200 g unsalted butter, melted, plus a little extra for greasing
225 g plain flour
1 tsp baking powder
4 large eggs, at room temperature
225 g castor sugar
1 tbsp rosewater

For the rosewater syrup
1/2 cup water
4 tbsp castor sugar
1 tbsp rosewater

For the Lemon Swiss Meringue Buttercream
4 egg whites
1 cup castor sugar
300 g unsalted butter, room temperature, cubed
1 tsp lemon zest
1/4 cup freshly squeezed lemon juice
1-2 drops, pink food coloring (optional)

For the white chocolate ganache
100 g white chocolate, roughly chopped
3 tbsp heavy cream
3-4 drops pink food colour

To make the cake layers: Preheat oven to 180 degrees C ( 160 degrees C for fan forced ovens). Roast the poppy seed on a pan over low heat for 2 mins. Grease and line the base of 3 round (6 inch) pans with baking paper.

Mix together the flour and baking powder, then set aside. Put the eggs and sugar in a large mixing bowl. Using electric beaters, whisk until thick, pale and foamy. Pour in the cooled butter and rosewater and briefly whisk again. Sift in the flour mix, add poppy seeds then, using a large metal spoon, carefully fold into the cake mixture until even. Pour the mixture into the tins and bake for 15 mins or until golden and springy to the touch. Cool in the tins for 10 mins, then transfer to a wire rack.

To make the rose syrup : Add sugar to a small saucepan. Pour in water and stir.
With the heat on medium, bring the sugar and water to a rolling boil, stirring constantly. The sugar will dissolve while the water boils.
Turn off the heat and let cool. When sugar syrup has cooled, add the rosewater.

To make the Lemon Swiss Meringue Buttercream:  Place the egg whites and sugar in a large bowl that is placed over a saucepan of simmering water (over low heat), and whisk continuously, until the sugar has completely dissolved and the bottom of the bowl is warm to touch

Remove the bowl from the heat and whip on high speed until meringue holds stiff peaks and looks glossy. The bowl should have completely cooled by now.
Add the butter, 2 tablespoon at a time, until thick and fluffy. If it begins to look curdled, continue to whip until it comes back together, before adding in remaining butter.
When the buttercream is smooth and has come together, add the lemon zest and juice and whip gently again to blend.

To make the pink white chocolate ganache: Heat the white chocolate and heavy cream over low heat in a small saucepan. When cream just reaches boiling point, remove from heat and leave aside. Stir with a spoon to make a smooth mix. Add the food colour and stir to blend.

To assemble: Once the cake layers are slightly cool, brush each layer generously with rosewater syrup.
On a cake plate or stand, spread a little buttercream in the centre and place one layer of the cake (so that the cake does not move about while frosting). Spread about 1/2 a cup of lemon swiss meringue buttercream. Place the second layer. Repeat. Place the last layer upside down (so you get a flat top). Spread buttercream on the top and sides. If you want to make it look like a naked cake, a thin layer of frosting is good enough.
Stick the cake into the refrigerator for 15-20 mins.
Make the white chocolate ganache 5 minutes before you take the cake out from the fridge.Once the ganche is cool, but still flowing freely when you lift it with a spoon, spoon it onto the cake slowly. Be gentle on the edges to create the drippy effect.
Decorate with crushed meringues, silver cashous and flowers.


Layered Chocolate Mud Cake for Mother’s Day

30|04|2016

Layered chocolate mud cake

I started April with a bang but somehow things turned out otherwise. I had many plans for the school holidays mostly being able to balance out family time and blogging and not compromising on either. This is something I have been striving to achieve in the last 3 years and have still not perfected. The first week went great! Pies, picnics and play dates. Come second week and I was nursing a sore tooth that went from bad to worse. It became so painful that I couldn’t sleep at night, my face swelled up on the right side and I couldn’t even open my mouth to eat. I have never felt so frustrated. With two young hyper active kids at home and impending deadlines, the least you want to do is become immobile. Mother’s day is my favourite holiday and I had a list of recipes to test out. This year I haven’t made many layer cakes so I had reserved them for April to post before Mother’s day. To make things worse, my laptop started warning me every now and them of low disc space. I rearranged files with no avail. In my crazy state of mind, I must have done something and the next day I was unable to locate hundreds of files. So much chaos! Though I did manage to get back many of them, the rest had just vanished into thin air. Those of you who follow me on Instagram would have seen the Rosewater and Poppy Seed Cake. I couldn’t find the edited images so I’ll have to work on them again. Meanwhile I thought I’ll share this Chocolate Mud Layer Cake with you.

Layered chocolate mud cake

This is a truely impressive cake! It tastes so amazing because it is a dark chocolate mud cake which is dense and rich (not heavy though) and is one of the simplest layer cakes to make. Why? Because mud cakes rise evenly and don’t crumb a lot, they are easy to frost.I frosted the layers in between with a raspberry butercream and the outside with a milk chocolate fudge frosting. The fudge frosting is a big favourite of mine! It never dissapoints. Because the layers are rich, I put a very thin coating of the milk chocolate buttercream, almost like a naked cake. The drippy ganache is white chocolate tinted pink and I’ve decorated it with home grown edible flowers. Oh yes, these flowers have been Autumn’s best gift to me. I bought 15 pots of them in different shades and sizes and they are such a happy sight when I look outside. I did some research before I bought them and travelled 2 hours to get them. But they are a joy to have. especially when you don’t have to depend on the ready punnets at the farmers’ markets.

Layered chocolate mud cake

Let me warn you right away that you will probably be bombarded with cake posts this week. I have so much to share with you!

Layered chocolate mud cake

Layered chocolate mud cake

Layered Chocolate Mud Cake
Makes a 3 layered 6 inch round cake


For the raspberry buttercream
120 g unsalted butter, softened
3 cups, icing sugar
1/4 cup raspberry jam
milk (optional)
1-2 drops pink food colouring, if desired

For the milk chocolate fudge frosting
120 gms unsweetened chocolate, coarsely chopped
2/3 cup (150 gms) unsalted butter, room temperature
1 cup icing sugar, sifted
11/2 tsp pure vanilla extract

For the white chocolate ganache
100 g white chocolate, roughly chopped
3 tbsp heavy cream
1-2 drops pink food colour

To make the chocolate Mud Layer cake: Preheat oven to 160 degrees C. Grease and line 3, 6 inch pans with baking paper.

Place the chocolate, butter, coffee and milk in a heatproof bowl set over a pan of barely simmering water (don’t let the bowl touch the water) and stir until smooth and melted. Remove from the heat and set aside to cool completely.

Sift flour and cocoa powder into a bowl, then add sugar. Fold into the chocolate mixture with eggs, vanilla extract and sour cream.

Divide the batter in between the cake pan and bake in the oven for 40-45 minutes 0r until a skewer inserted into the centre comes out with some moist crumbs sticking to it but no raw cake batter. Set aside to cool completely in the pan. Once cooled completely, turn them onto a wire rack.

To make the raspberry buttercream: Place butter and jam in a mixing bowl of an electric mixer fitted with a paddle attachment. Cream butter and jam until well incorporated, about 2 minutes.
Add powdered sugar, one cup at a time until you reach desired consistency. If frosting gets too thick you can add a little milk to thin it out. Add food colouring if desired.

To make the milk chocolate frosting : Melt the chocolate in a heatproof bowl over a pot of simmering water. Remove from heat and let cool to room temperature.
In the bowl of your electric mixer, or with a hand mixer, beat the butter until smooth and creamy(about 1 min). Add the sugar and beat until it is light and fluffy(about 2 min). Beat in the vanilla extract. Add the chocolate and beat on low speed until incorporated. Increase the speed to medium-high and beat until frosting is smooth and glossy (about 2-3 min).

To make the white chocolate ganache : Heat the white chocolate and heavy cream over low heat in a small saucepan. When cream just reaches boiling point, remove from heat and leave aside. Stir with a spoon to make a smooth mix. Add the food colour and stir to blend.

To assemble: Place a layer of chocolate mud cake on a plate or cake stand. Dollop 1/2 cup of raspberry buttercream and spread out with an offset spatula. Try to stay 1/2 inch away from the edges as the buttercream would spread once covered with another layer. We don’t want it to stick out from the sides.
Place the second layer and repeat the same process.
Cover with the third layer. Frost the outside (top and sides) with milk chocolate buttercream. Stick the cake into the fridge for 15 minutes.
Make the white chocolate ganache 5 minutes before you take the cake out from the fridge.Once the ganche is cool, but still flowing freely when you lift it with a spoon, spoon it onto the cake slowly. Be gentle on the edges to create the drippy effect.
Let the ganache set properly before decorating with flowers.

Fancy-Pants Nutella Pie Pops

14|04|2016

Instagram is one place where I find lots of creative inspiration. Not only beautiful images and works of talented bloggers, photographers and artists but also like minded people who share similar goals, thoughts and ideas. There are so many friendships I have made over the last few months that I have an ever increasing list of countries and people I would like to meet if I visit their part of the world. The other day I had an interaction with a lovely fellow Instagram-er who also happens to be a Stylist and we agreed that pies are incredible little things but there needs to be wedding pies (just like wedding cakes). Something a bit fancy and decorated that’ll look great on a wedding dessert table. It’s not that I don’t like the rustic appearance of pies. In fact I like it too much. But imagine putting them alongside dolled up, colorful desserts. It wouldn’t hurt to make them a bit fancy schmancy. So I set about creating these that turned out to be easier than regular pies. (Yes, pies again!!)

Nutella Pie Pops

Nutella Pie Pops

I used store-bought short crust pastry, a round and a heart shaped cookie cutter, a jar of nutella, some silver and golden cashous and sprinkles. To make the cashous stick to the pies, I piped a thin line of melted chocolate around the circumference. You could use a brush as well. I just love how simple yet elegant they look. Using ribbons and sprinkles of different colours, one can create pie pops in line with the theme of a get-together or wedding. With Mother’s Day coming up, these would be lovely home-made presents for Mum as well.

Nutella Pie Pops

Nutella Pie Pops

Instead of Nutella, flavored ganache like orange, mocha, ginger, cardamom, rose and even white chocolate would make great fillings. Fruit fillings are fine too but I find they ooze out a little bit. Because these are smaller and on a stick, they are convenient to eat. So what do you think about pies served at weddings? Would you go the classic way or try out new, creative ways of serving them?

Nutella Pie Pops

Nutella Pie Pops

Nutella Pie Pops

Nutella Pie Pops
Makes 10

1 sheet ready rolled short crust pastry
1/2 cup Nutella
1 egg, for eggwash
Melted chocolate, to serve as glue for the sprinkles/cashous
Cashous and Sprinkles, for decorating
Preheat oven to 180 degrees. Line a large baking tray with baking paper. Prepare the eggwash by lightly beating the egg with a tbsp of water. Cut out circles and heart shapes (or whichever shape you desire). I used a 2.5 inch cookie cutter. You will need 2 cut-outs each for the tops and bottoms.

Place the bottom half on the baking tray. Place a small wooden skewer/sticks in the middle and press gently to secure in place. Spoon 1 tsp Nutella on the pastry. Close with the top half and bring the edges together to close any open areas. Brush tops with egg wash.

Bake in preheated oven for 12-15 minutes. Once golden brown, remove from oven and leave aside to cool.
Brush or pipe a thin border of melted dark chocolate around the circumference of the pies. Carefully place cashous or sprinkles around the border. I found it easier to sprinkle with fingers rather than dipping he sides in sprinkles (something I would do with cupcakes generally) as the pies are delicate.

Leave to dry out. The wooden sticks can be decorated by wrapping colored ribbons on them.


Plum And Pear Mini Pies

8|04|2016

So I did give you a heads up on the amount of dough I have handled this month. Well, I just cannot stop! We are not even into proper cold months and I am on a baking overdrive. Mini pies are the order of the day. I think the real reason are the beautiful combination of fruits that are available at the moment. The last of the summer stone fruits and the fresh Autumn produce together make for the most delicious pie filling possibilities. There are plums and peaches. And there are apples and pears. And there is the beautiful Sydney autumn with bright sunny afternoons and a slight chill in the air. The best of both worlds in seasons and food.

plum and pear mini pies

School holidays have started today and my basket is loaded with mini pies as I prepare for a little picnic with the boys. Nothing fancy or far away. I’ve been eyeing an open stretch of greenery near my house for days with the hope of great weather and a holiday when we can just lie down on the grass and enjoy our moment together. That day is today!

plum and pear mini pies

These pies are wonderful. Sweet with an hint of cinnamon and you can obviously see how passionate I’ve been about the tops. I tell you, that’s a great way of having fun in the kitchen with the kids. There were all kinds of designs and cut outs. The best ones were the ones I didn’t photograph:-)

plum and pear mini pies


plum and pear mini pies

Plum And Pear Mini Pies
Makes 12-14

For the pastry (or you could use store bought shortcrust pastry)
21/2 cups plain flour
1/4 cup castor sugar
1/4 tsp salt
240 g unsalted butter, cold, cut into cubes
1/2 cup cold water
1 egg, for eggwash
raw sugar, for sprinkling

For The Filling
3-4 pears, peeled, cored and roughly chopped
4 plums, stone removed, roughly chopped
1/2 cup castor sugar (or as per taste)
1/2 tsp powdered cinnamon
1/2 tsp powdered ginger

In a large bowl combine flour, sugar and salt. You could do this in the processor or by hand. Add the butter and blend quickly so that the mixture resembles coarse breadcrumbs. Stir in the water, 1 tbsp at a time, until dough comes together. On a floured surface, knead the dough gently and shape it into a ball. Wrap in plastic and refrigerate (at least 30 minutes). Meanwhile make the filling.

Heat the pears and plums along with a tbsp of water in a heavy bottomed saucepan over medium heat. Keep stirring occasionally until fruits are soft. Add the sugar and cinnamon. allow the mixture to simmer until you get a thick consistency along with chunks of fruit. Cool slightly (about 20 minutes). I usually make the filling the previous night.

Preheat oven to 200 degrees C. Make the egg wash by lightly beating the egg in a small bowl with 1 tbsp of water. Take the dough out of the refrigerator. On a well floured surface, roll out the dough into a large circle and cut out circles using a cookie cutter for the bottom and tops. I used a 3.5 inch round cookie cutter. Place the bottoms on individual aluminium foil trays or muffin pans that has been greased well. Spoon 1 tbsp of the filling into the center of the pastry bottom. Lay the top pieces of pastry over the filling, bringing the edges together and sealing them. You can do so with your fingers or with a fork to form a pattern. Refrigerate. Reuse the balance dough to roll out and form more pastry tops and bottoms. You could cut out small flowers and shapes using cookie cutters to decorate your pies. For the lattice tops here is a tutorial. Brush the tops all over with egg-wash.  Sprinkle with raw sugar.
Bake for 15-20 minutes or until golden brown and crispy.


  • « Previous Page
  • 1
  • …
  • 24
  • 25
  • 26
  • 27
  • 28
  • …
  • 57
  • Next Page »
Hey Sugar
Cake
Link to my Facebook Page
Link to my Instagram Page
Link to my Pinterest Page
Link to my Mail Page
Subscribe to this site
Fresh Awards
2019 Aus mumpreneur
2019 aus mumpreneur
Mumbrella

Copyright © 2025 · Sugar Et Al · Designed by Smitten Blog Designs · Log in