• Home
  • Recipe Index
    • Recipe Index
    • Breakfast/Brunch
    • Cakes and Puddings
    • Chocolate
    • Cookies and cupcakes
    • Custard and Mousse
    • Gluten Free
    • Ice Cream
    • Mains
    • Other Sweet Treats
    • Snack/Appetizers
    • Soups and Salads
    • Tarts and Pies
    • Vegetarian
  • About
  • Cookbook
  • Portfolio
  • Store
  • Press
  • Work with Me

Sugar et al

Because Life is a blend of flavours...

No-Bake Mocha Peppermint Cheesecake

12|11|2014

I know I have to step up my fitness regime. I can foresee two whole months of eating too much cake, cookies and indulgent treats. I have to make them and if there isn’t enough room in the fridge, someone has to make room for them. Someone who thinks she could hug them if they were real. Or showcase them in a museum.

IMG_3343-2


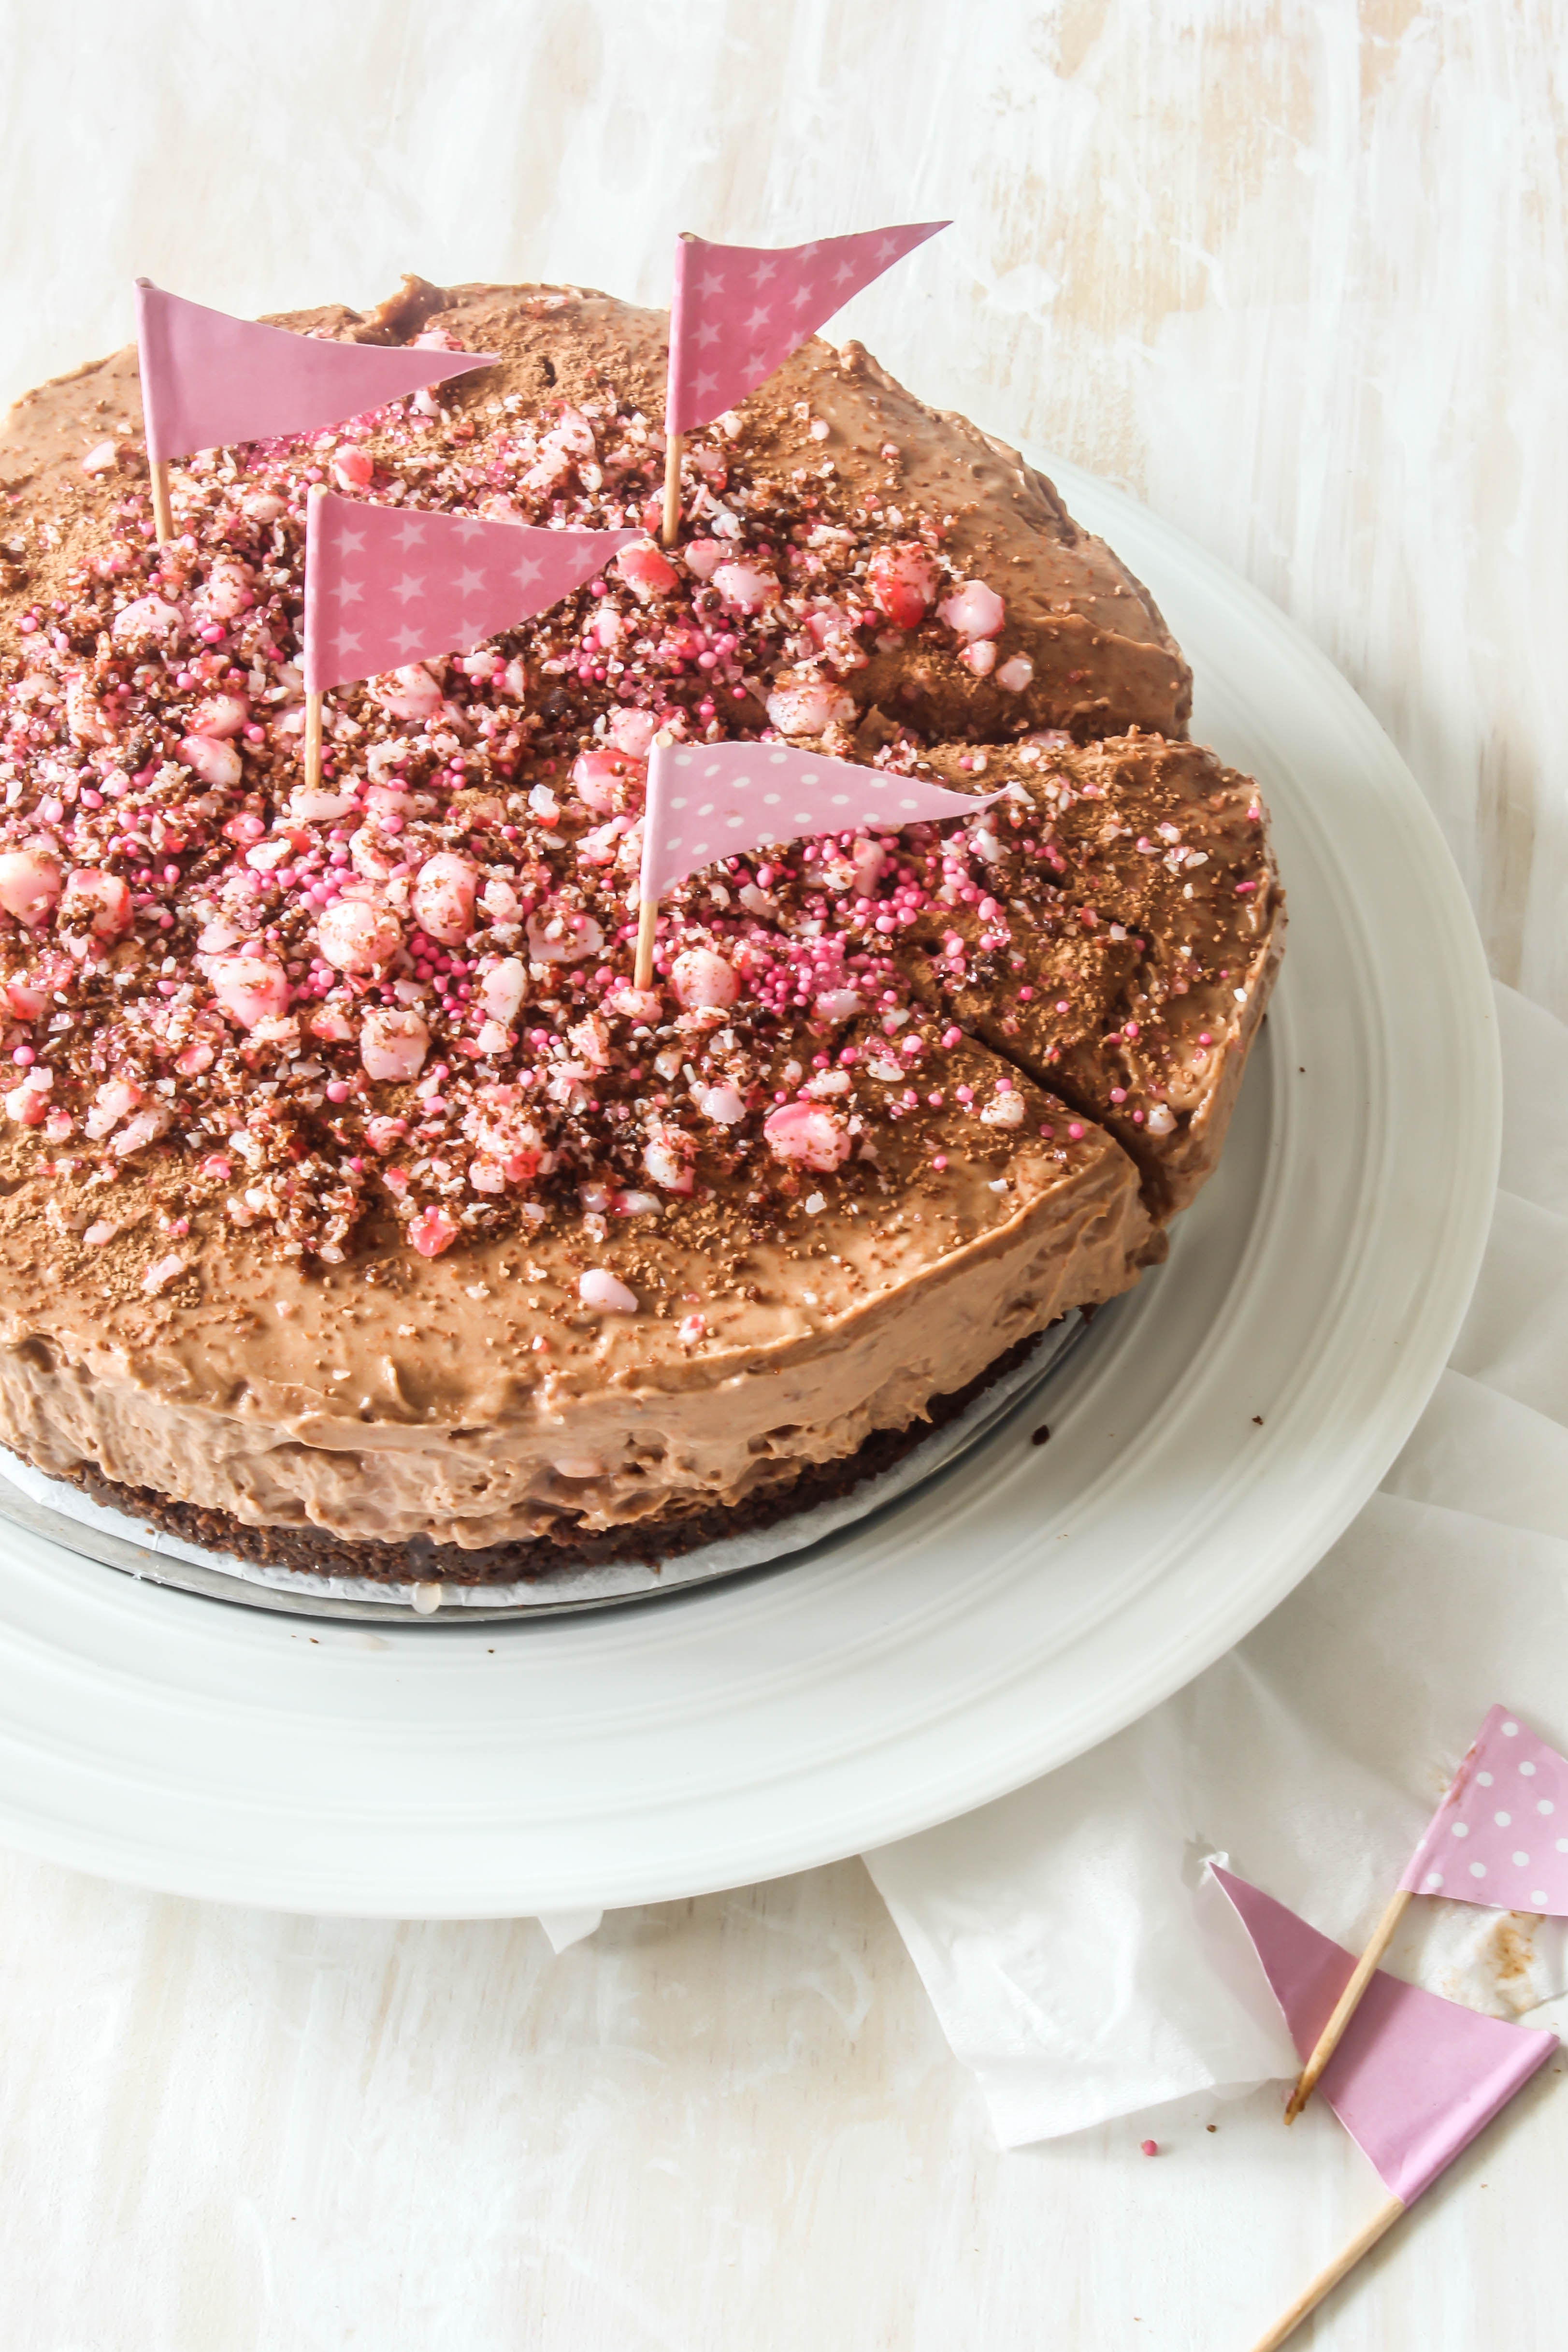
It’s really hard for me to decide if I like a no-bake cheesecake than the baked version. But I do find it a bit easier to put together and without eggs,it is lighter in texture than it’s baked counterpart.  In this recipe I’ve used my favourite chocolate cheesecake ingredients, added coffee to it for a mocha flavour and folded in crushed candy cane for a touch of Peppermint. Then I have topped the cheesecake with more crushed candy cane and pink sprinkles.And that’s all. Easy peasy. But the flavours are good together. Peppermint isn’t really my favourite but Mocha is. You have complete control over how subtle or strong you want the peppermint to be in the cheesecake.The candy cane tends to become sticky after crushing so my advice would be to not do this too much ahead in time.

IMG_3359

There are quite a few food-porn-ish cakes in the making now. One more resting in the fridge begging to be photographed. And then the one I am most excited about…for the twin’s fifth birthday. We decided to take a small vacation during that time so the cake will be made and cut in advance at home. We plan to have a store bought one on the actual birthday so whichever way it is, there’s going to be a lot of cake. Along with happy faces.

IMG_3364


No-Bake Mocha Peppermint Cheesecake
Serves 8-10

200 g chocolate cookies
70 g unsalted butter, melted
2 tbsp hot milk
2 tsp powdered gelatine
11/2 tsp instant coffee
10-12 candy canes (crushed with a rolling pin inside a ziplock bag)
200 g dark chocolate, melted and cooled
500 g cream cheese, room temperature
1 cup brown sugar
1/4 cup castor sugar
1/2 cup thickened cream
cocoa powder, to sprinkle

Grease a 19 cm round Springform pan. Line the base and sides with baking paper.
Place the cookies in a food processor. Process until fine crumbs. Add melted butter and mix to combine. Using your fingertips, press biscuit mixture over base of prepared pan. Refrigerate for 30 minutes or until firm.

Pour milk into a small bowl. Sprinkle over gelatine. add the instant coffee. Using a fork, whisk until gelatine and coffee are dissolved. Set aside to cool slightly.

Using an electric mixer, beat cream cheese and sugars in a large bowl until smooth. In a separate bowl, whip heavy cream to soft peaks. Add the melted and cooled chocolate and gelatine mixture to the whipped cream. Fold in to blend till smooth.

Add the chocolate-cream mixture to the cream cheese mixture. Fold in gradually till mixed. Next, add 1/2 the crushed candy cane (reserving the rest for the topping) and fold in. Spoon over the base of the cookie mixture. Smooth out the surface with a palette knife or the back of a spoon. Cover. Refrigerate for 4 hours or until set. Sprinkle generously with cocoa. Top with crushed candy cane.


Toffee Apple Self-Saucing Pudding

29|10|2014

A self saucing pudding with the addition of apples and a delicious toffee caramel sauce. Easy to make and a perfect homemade dessert.

5 years ago, the only pudding I knew of and would make was the bread and butter pudding. Easy to make, easily adapted to include and exclude your preferences and such a great way of eating bread. And of course the rice pudding that was so much more than a pudding. It was a tradition. The first solid food that was ceremoniously fed to me as a baby and thereafter adorned every occasion of my life, big and small. Then one day while desperately looking up on the Internet for a way to fix an under-cooked chocolate lava cake, I discovered the self-saucing pudding. I was fascinated at the concept of a pudding that uses the very same ingredients in the recipe and creates its own sauce. After I made my first one with satisfactory results, I was hooked on. Now the only problem was, which one to make! They are so good…every one of them!

caramel toffee apple self saucing pudding

The key to a good self-saucing pudding in my humble opinion lies in ratio of the pudding to the sauce. We want to stick our spoons in that sauce that is why we make it in the first place. This one has lots of sauce. The cake almost floats on top a rich caramel sauce. But let me tell you what is the best part of this toffee/caramel pudding. You don’t need to make caramel separately…so no burning sugar, no thermometers…just plain and simple mixing of ingredients. In fact, there is no egg in the picture either. But it works…like magic! Apples and nuts give the pudding an interesting texture and plenty of bite.

caramel toffee apple self saucing pudding


I figured out that the pudding tastes even better the next day as some of the sauce is soaked up further by the cake turning it into a gooey, food porn-ish mess. You get what I mean? Gooey messes are so welcome when it comes to the sweeter side of things. A gentle dusting of icing sugar completes the pudding and a some vanilla ice cream on the side is perfect to make you lose your mind. I love photographing such kind of food because you get to eat some of the deliciousness as you go. They are part of your shots.
You have to cut into the interiors to give the world an insight into a what is called a self-saucing pudding. Agree with me?


caramel toffee apple self saucing pudding

Toffee Apple Self-Saucing Pudding
Serves 4

60 g butter, chopped
1/2 cup milk
2/3 cup firmly packed brown sugar
1 cup self-raising flour
2 tablespoons golden syrup/maple syrup (I used golden syrup)
2 medium apples peeled, cored and chopped into 2 cm cubes
1/2 cup nuts, your choice (I used mixed)
icing sugar, to dust

For the sauce:
3/4 cup firmly packed brown sugar
40 g butter, chopped
1/2 cup heavy cream
1 cup boiling water.

Preheat oven to 180 degrees C. Grease a 6-cup (1.5 L) capacity oven-proof dish. Combine the butter and milk in a medium saucepan over medium heat. Cook, stirring with a wooden spoon, for 2 minutes or until butter melts. Remove from heat and add the sugar, flour and golden syrup and stir until combined. Fold in the chopped apples and nuts.
Pour the mixture into the prepared pan.
To make the sauce, combine the sugar, butter and water in a medium heatproof bowl. Stir until butter is melted. Stir in the cream. Pour slowly over the back of spoon into the pudding mixture.

Bake in preheated oven for 50-60 minutes or until centre is cooked through. Cool slightly, then dust with icing sugar. Serve warm with ice-cream or whipped cream.


Golden Apple Tart

15|10|2014

I believe that names of most (if not all) people have a meaning. Most likely in their own language. When I found out that I was expecting twins I was faced with the exciting but quite complicated task of finding names for them. For a first time Mum, it can be quite daunting going through the multiple permutations and combinations. Two little personalities you are just starting to know and you are about to give them an identity for life. My children were born in my native land, India, where sex determination is a crime. So you can imagine my plight when I was in the dark till the very last-minute if they were going to girls, boys or one of each. I had 3 spreadsheets worth of names on my laptop that I continued to update as days came closer. Finally when they were born, quite premature I did not even look at those spreadsheets that I had been filling up so religiously. I did not have the time nor the stamina. Their names just happened. My own name has no meaning in the English language but going back to my roots, it means golden.

IMG_2942


In real life I have no yearning for gold…neither literally nor figuratively. However, when it come to food, golden to me spells ‘delicious’. Whether a golden brown crust, gold dust on a cake or dessert, liquid forms like caramel, dulce de leche, honey or just golden syrup, the lustre in my eyes go up by 10 folds.

IMG_2936-1
Remember my Chocolate Treacle Tart? Apparently, you guys loved it and so did I. So it was time to recreate the magic whilst tweaking things a little bit. This one has the golden syrup again with a hint of spice and fresh apples to adorn the top. In the filling, I have used breadcrumbs, almond meal, dessicated coconut along with golden syrup. The amazing thing about the filling is that it tastes quite like frangipane, actually better but is easier to put together. The flavours are lovely, almost like toffee apple. If you have used golden syrup before you know what I mean. If you haven’t, I highly recommend giving it a try. You may fall in love with it like me. If you ask me, it is quite easy to put together a gorgeous tasting dessert with golden syrup if you (partly or wholly) substitute it for sugar in a recipe. The pastry has a bit of nutmeg added to it so you can smell all those warm comforting flavours as the tart is baking.

IMG_2965-2


IMG_2967-2

So tell me now, do you believe that names have anything to do with one’s personality? Did you ever wish you could change your name or are you pleased with it?

IMG_2948


Golden Apple Tart (slightly adapted from here)

Serves 8-10

For the pastry
1 2/3 cups plain flour
1 tsp ground nutmeg
1/4 cup icing sugar, sifted, plus extra, to dust
125 g cold unsalted butter, finely chopped

For the tart filling
400 g golden syrup
Grated zest and juice of 1 lemon
150 g fresh white breadcrumbs (about 4 slices of bread)
1/2 cup almond meal (ground almonds)
1/4 cup desiccated coconut
1 tsp cinnamon
3 

Place flour, nutmeg, sugar, butter and a pinch of salt in the bowl of your food processor and process until mixture resembles breadcrumbs. Add egg and 1 tablespoon chilled water and process until mixture just comes together. Shape dough into a 1.5cm-thick disc, wrap in plastic wrap and refrigerate for 1 hour.

Roll out pastry on a lightly floured surface and line a greased 23 cm tart pan. Trim sides and refrigerate for 30 minutes

Preheat oven to 190°C. Line tart shell with baking paper, fill with rice or beans and bake for 15 minutes. Carefully remove paper and beans, then bake for a further 10 minutes or until pastry is dry and golden. Cool.

For filling, place golden syrup, zest and juice in a small saucepan and stir over low heat until just liquefied. Whisk in remaining ingredients. Pour into tart shell

Quarter apples, core and cut into 2-3 mm-thick slices. Starting at the edge of the tart, arrange slices in concentric circles. Bake for 35 minutes or until firm to the touch (cover loosely with foil if pastry is over-browning). Cool for 15 minutes. Serve warm or at room temperature dusted with extra icing sugar.


Chocolate Beetroot Cake + Chocolate Sour Cream Frosting + Candied Beetroot Leaves

11|10|2014

In my previous workplace, I had two awesome friends. We were a group and since we always hung out together, most of the other colleagues called us ‘The Three Musketeers’. Perhaps for lack of a creative or better expression. I guess if there’s three of you, that is the most likely thing that comes to one’s mind. Nevertheless, going to work was fun and so were the long lunches, group meetings, gossips and just being able to connect with two people who were completely different personalities and you still got on like a house on fire. So even though the nickname wasn’t cool, our friendship was. Let me tell you what else is cool when three personalities come together. This cake.

IMG_2874

Gingerbread meets chocolate cake meets beetroot. Sounds complicated. Well, it really isn’t. This is hands down the best chocolate beetroot cake I have ever tasted. You don’t taste the beetroot. What you taste is rich chocolate flavour which is intensified by the addition of treacle. Golden syrup and maple syrup will work too but treacle gives it strong flavour and rich colour. It is truly a treat! You know by now that my kitchen is nothing short of a test kitchen and I am constantly trying out different things. But in this case the stakes were high. I mean sky-high. I made this cake for my husband on his birthday who is not a big fan of sweet things. The only sweet treats he would like are the ones that have bittersweet chocolate, not overly sweet. Once he had a taste of my ginger cupcakes and asked me ‘What’s in there? Something strong that I cannot quite figure out but it tastes good’ He was obviously referring to treacle. So this was the excuse for me to combine the two. But I also needed an extra something to complement the two that would give body and moisture to the cake. The ginger cakes/cupcakes I make are quite moist and sticky and I didn’t want a sticky birthday cake.

IMG_2879

The cake was everything I wanted and more. Luscious, moist, chocolate-y and now it was time to try out a gorgeous frosting that was not going to be buttercream. I love liquid and whipped ganache but I am beginning to get a bit bored with it. Enter this 2-ingredient, 5-minute chocolate frosting which I was dying to try out since months. I had come across something similar on Epicurious. I made a few changes and it worked. Wow! A fabulous addition to my frosting repertoire. I know this is one recipe I am going to use over and over again. It is not too sweet and has a great consistency. Spread or dollop or sandwich between your creations.

IMG_2868-2

The man loved the cake. He was surprised when I told him there was beetroot in it. I decorated the cake with berries and candied beetroot leaves. Isn’t the colour amazing? I love candying things..it makes them look and taste lovely. I was a bit concerned if the beetroot leaves would bleed into the egg whites and spoil everything but they didn’t. In fact they were irresistible. We kept munching on them even before I put them on the cake.

page

Do give this cake a try with the frosting, candied leaves et al. It cannot get simpler than this. You are going to love it.

Notes :Please do ensure that you use a Dutch Processed Cocoa Powder or else the colour and flavour will not be the same. Do not grate the beetroot too finely or it would just get lost in the batter. While candying the leaves ensure that all the excess egg white is scraped off or they will take forever to dry up.

IMG_2871


Chocolate Beetroot Cake + Chocolate Sour Cream Frosting + Candied Beetroot Leaves (minimally adapted from here, here and here)
Serves 8-10

For the cake
1/2 cup (125 ml) vegetable oil
1 cup (220 g) firmly packed brown sugar
1/2 cup (125 ml) treacle (can be substituted with maple syrup)
60 g dark chocolate (70%), chopped
250 g (around 2 cups) raw beetroot, coarsely grated
3 eggs, lightly beaten
1 1/2 cups (225 g) self-raising flour
1/4 cup dutch processed cocoa powder
Chocolate sour Cream Frosting, to frost
Fresh fruits or berries, to decorate
Icing sugar, to dust
Candied beetroot leaves, to decorate

For the Chocolate-Sour Cream Frosting
150 g dark chocolate (semi-sweet)
50 g milk chocolate
1/2 cup sour cream (do not use the lite version)

For the Candied Beetroot Leaves
1 egg white
1/4 cup castor sugar
12-15 small beetroot leaves

Preheat the oven to 160°C. Grease and line the base of a 18 cm round cake tin with baking paper and set aside.
Warm the oil in a medium size sauce pan on very low heat. Add the brown sugar, treacle and chocolate and stir until the chocolate is melted. Remove from heat. Add the grated beetroot. Whisk the eggs in a small bowl and then add them to the sauce pan. Sift the flour and cocoa powder together and stir into the beetroot mixture. Pour the batter into the tin and bake for 1 hour or until a skewer inserted comes out clean. Leave to cool for 5 minutes in the tin, before turning out and cooling completely.

Once cooled, dollop the frosting (recipe below) on top. Decorate with fresh berries/fruits. Dust with icing sugar and decorate with candied leaves.

Make the frosting: Melt the two chocolates in a heatproof bowl over a saucepan of simmering water. Remove from heat. Cool for 2 minutes. Add the sour cream and mix till smooth. The mixture thickens as it cools. If it sets faster than you want, warm slightly again before using.

Make the candies leaves: Line a baking tray with baking paper. Place the egg white in a small bowl and the castor sugar onto a small plate. Make sure the leaves are dry before you start. If not pat dry with a kitchen towel. Working one at a time, dip each beetroot leaf into the egg white (scrape off excess against the bowl) and then dip into the plate of castor sugar, turning it to ensure an even coat on both sides. Lay the leaves in a single layer on the tray lined with baking paper to dry out. Leave aside for 24 hours, turning once in between.


  • « Previous Page
  • 1
  • …
  • 40
  • 41
  • 42
  • 43
  • 44
  • …
  • 57
  • Next Page »
Hey Sugar
Cake
Link to my Facebook Page
Link to my Instagram Page
Link to my Pinterest Page
Link to my Mail Page
Subscribe to this site
Fresh Awards
2019 Aus mumpreneur
2019 aus mumpreneur
Mumbrella

Copyright © 2025 · Sugar Et Al · Designed by Smitten Blog Designs · Log in