• Home
  • Recipe Index
    • Recipe Index
    • Breakfast/Brunch
    • Cakes and Puddings
    • Chocolate
    • Cookies and cupcakes
    • Custard and Mousse
    • Gluten Free
    • Ice Cream
    • Mains
    • Other Sweet Treats
    • Snack/Appetizers
    • Soups and Salads
    • Tarts and Pies
    • Vegetarian
  • About
  • Cookbook
  • Portfolio
  • Store
  • Press
  • Work with Me

Sugar et al

Because Life is a blend of flavours...

Coffee Lovers Cake

30|10|2017

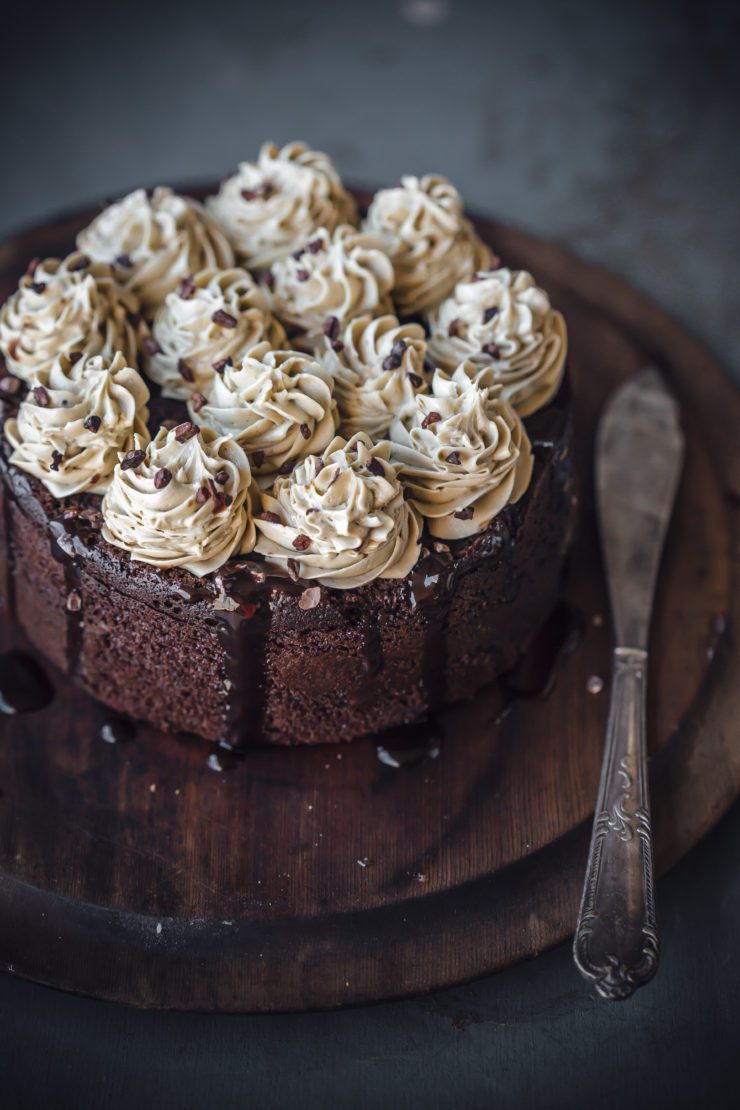
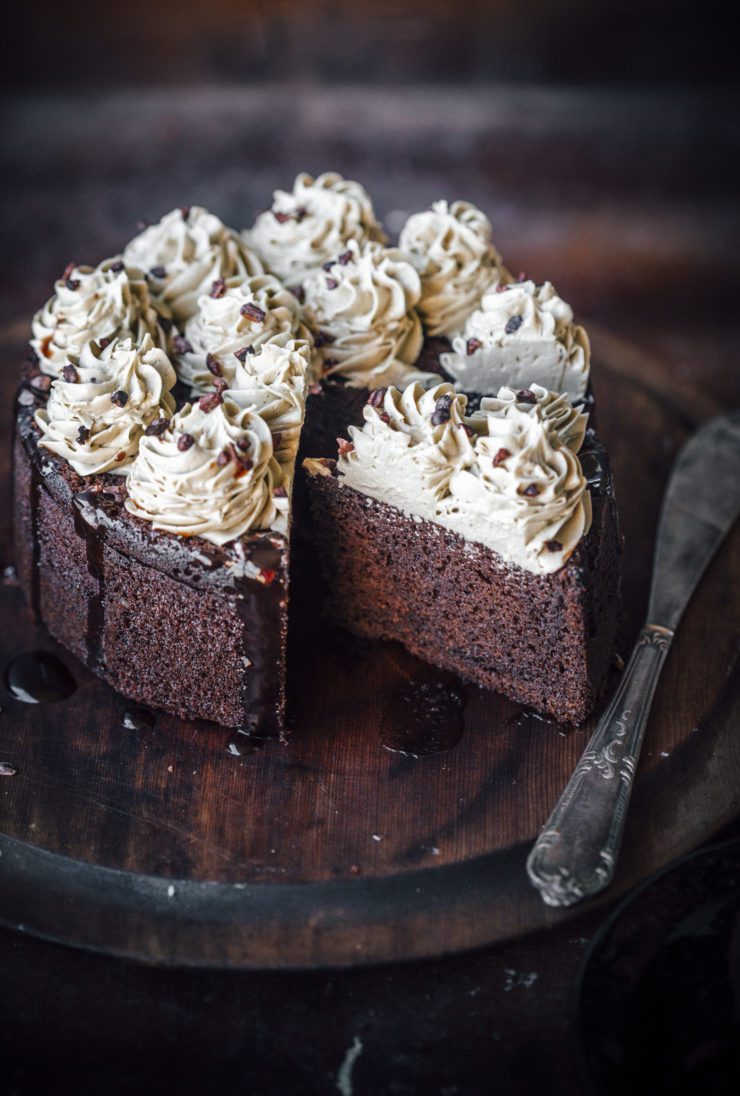
Coffee is definitely the solution to all my morning woes. Cake is probably the solution to ALL my woes. At least many of them! So I figured out that the best way to deal with life and its woes is to make a coffee cake. Not just any cake but a very rich, intensely coffee-ish cake. This Mocha Mud cake has been topped with Coffee Buttercream and drizzled with Mocha sauce. If you are crazy for coffee, this is your cake.

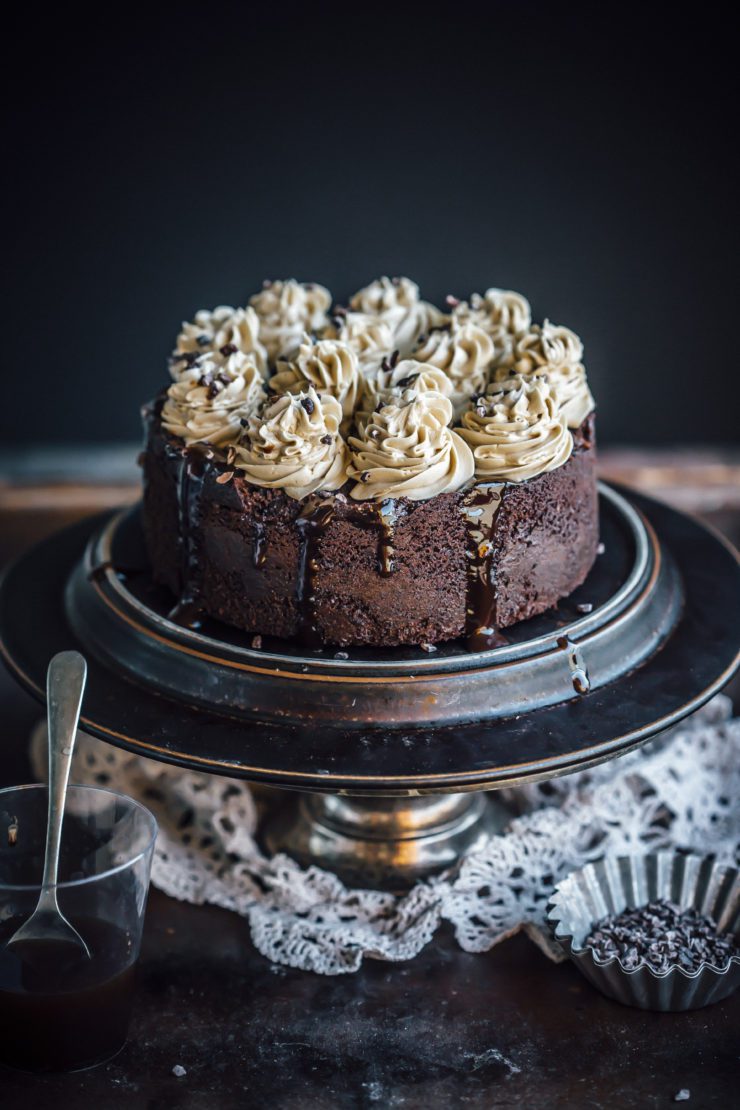
It’s Halloween tomorrow and I am just not guilty for making a creepy looking something. But everyone seems to be enjoying it and coming up with both scary and cute creations. I cannot make a single spooky treat to save my life and since I was feeling quite left out, I thought this cake was somewhat more apt to share at this time than my floral creations. Tall, dark, handsome:-) Now tell me is it freaking you out? No? Great! That was not my intention anyway. But the taste will. It is so freaking good!


Mocha Mud cake
Makes a 6 inch round cake

250g butter, chopped
200 g good-quality dark chocolate, coarsely chopped
11/4 cup freshly brewed strong coffee (or 1 tbsp instant coffee powder dissolved 11/4 cup warm water)
11/4 cup castor sugar (or more depending on the strength of the coffee you are using)
2 eggs, lightly whisked
1 cup self-raising flour
1 cup plain flour

Coffee Buttercream
125 g unsalted butter, softened
1.5 cups icing sugar
2 tbsp strongly brewed coffee (or 1tsp instant coffee powder dissolved in 2 tbsp warm water and cooled)
1 tsp vanilla essence
1 tbsp milk (if consistency is not smooth)

Mocha Sauce

100 g dark chocolate, roughly chopped
1/2 cup (125 ml) pouring cream
1 tsp instant coffee powder

Preheat oven to 160 degree C. Grease and line the base and sides of a 20 cm round cake pan with baking paper.

Place butter, chocolate and coffee in a saucepan over low heat. Cook, stirring, for 5 minutes or until chocolate melts and mixture is smooth. Remove from heat and set aside for 5 minutes to cool.

Pour chocolate mixture into a large bowl. Add sugar and egg, and use a wire balloon whisk to whisk until well combined. Sift flours over chocolate mixture and stir with the whisk until well combined. Pour into prepared pan. Bake in preheated oven for 1  1/4 hours or until crumbs cling to a skewer inserted into the centre of the cake (cover with non-stick baking paper halfway through cooking if it browns too quickly). Remove from oven and set aside to cool to room temperature.

Once cooled completely, pipe or spread coffee buttercream on the top of the cake. Drizzle with mocha sauce. Sprinkle with cocoa nibs (if using).

To make the coffee buttercream, using an electric mixer, beat the butter until soft and fluffy. Add the icing sugar, little at a time, beating after each addition until combined.
Add the coffee mixture, vanilla essence and beat till combined. If consistency of the buttercream is too thick, add milk to soften it.

To make the Mocha sauce, place the dark chocolate, thickened cream and coffee in a medium saucepan over low heat.
Use a metal spoon to stir until the chocolate melts and the mixture is smooth. Cool before use.


Honey and Poppy Seed cake

1|05|2017

Layers of Honey and Poppy seed cake with Rosewater Swiss Meringue Frosting, sprinkled with finely chopped pistachios and dried edible rose petals.

Mother’s day is around the corner and my excitement goes up by several notches at the thought of all the pink and floral creations that I will find an excuse to make. If only I could have them delivered to my own Mummy who lives in an entirely different continent. My children come up with all kinds of cute surprises with the help of their of school. Daddy of course plays a big role in all the hush hush exchanges that go on between them in that week and a customary ‘breakfast in bed’. You know, I am not at all a breakfast in bed kinda person. Yikes! I need to brush my teeth and sit down to a proper breakfast which I’ve already communicated to them in so many ways.Hopefully someone will get the message:-)

honey and poppy seed cake

Coming to this cake, I had intended to post the recipe during Valentine’s Day but later on felt that it might be more suited to a Mother’s Day kind of occasion. Something light, aromatic, delicate and very delicious. The rosewater-pistachio-honey combination are a bomb together. Poppy seeds add an extra bit of crunch. If you are not comfortable with piping, feel free to spread the frosting between the layers.

honey and poppy seed cake

In other news, my Collection with VIDA is up and ready. If you remember I had mentioned to you that I would be designing fashion products for this company using my own art. They are based in USA and have an amazing team of experts bringing these designs to life. I can’t even explain my excitement to you when I received my shipment. Being able to wear my work in the form of a scarf is something I had never imagined. You can check them out here. https://www.shopvida.com/collections/sonali-ghosh. It is quite basic at the moment and I will be updating more food-related designs as I go. They ship globally too which is really a great thing.

honey and poppy seed cake

Have a great week, all of you. I have quite a few Mother’s Day recipes coming up.

honey and poppy seed cake


Honey And Poppy Seed Cake
Makes a 3 layered 6 inch round cake

260 g unsalted butter, softened
3/4 cup castor sugar
125 g clear honey
4 large eggs
12/3 cups self raising flour
31/2 tbsp corn flour
3 tbsp poppy seeds
Finely chopped pistachios, to decorate
edible rose petals (slightly crushed), to decorate

Rosewater Buttercream
4 egg whites
1 cup castor sugar
300 g unsalted butter, room temperature, cubed
1 tbsp rosewater

Preheat oven to 160 degrees C (140 degrees C for fan forced ovens). Grease the sides and bases of 3, 6 inch pans and line with baking paper.

Beat butter, sugar and honey with a hand mixer (or an electric mixer) until pale and fluffy. Add the eggs, one at a time beating well after each addition. In a separate bowl mix together the self-raising flour, corn flour and poppy seeds. Add the dry mixture to the honey mixture and fold in gently.

Divide the batter uniformly between the 3 cake pans. Bake for 25-30 minutes or until surface is firm to touch and a skewer inserted in the middle of each layer comes out clean and dry. Remove from oven. Leave aside for 10 minutes to cool in the pans, then carefully remove, easing the sides with a palette knife. Turn cakes onto a wire rack to cool completely.

To make the Rosewater Swiss Meringue Buttercream:  Place the egg whites and sugar in a large bowl that is placed over a saucepan of simmering water (over low heat), and whisk continuously, until the sugar has completely dissolved and the bottom of the bowl is warm to touch

Remove the bowl from the heat and whip on high speed until meringue holds stiff peaks and looks glossy. The bowl should have completely cooled by now.
Add the butter, 2 tablespoon at a time, until thick and fluffy. If it begins to look curdled, continue to whip until it comes back together, before adding in remaining butter.
When the buttercream is smooth and has come together, add the rosewater and whip gently again to blend.

To assemble:  On a cake plate or stand, spread a little buttercream in the centre and place one layer of the cake (so that the cake does not move about while frosting). Using a start nozzle tip and a piping bag, pipe frosting to cover the entire layer. Sprinkle with pistachios and dried rose petals. Place the second layer. Repeat till you reach the final layer. Decorate with fresh roses. Ensure that the roses are free of pesticides or as a precaution vover the stems with baking paper (so they don’t come in contact with the buttercream).

Orange and Carrot Cake

27|07|2016

The best part about winter for a person like me who does not really enjoy the cold is definitely the food. I like a bit of spice in everything, sweet or savory! I noticed that I’ve been using nutmeg a lot this winter as compared to the rest of the year when the spice is lying quietly in one corner of my cupboard.  What is a Winter without Carrot Cake? The Internet is flooded with Carrot cake recipes and there is no point in me adding just another one. So I’ve combined the flavours of a classic carrot cake with zesty oranges and the marriage is nothing short of a flavour explosion! Think of warm spices, soft caramel kissed Carrot Cake, the bitterness of orange marmalade and just a touch of sweet white chocolate. I’ll let the pictures do the talking for you.

Orange and Carrot Cake

Orange and Carrot Cake

Cakes like these don’t need tonnes of buttercream. It is there in the cake to cement the flavours and the layers together. So I have applied a thin coat of swiss meringue buttercream and a generous amount of orange marmalade to complement the cake. One important factor that I always stress on is that making a cake should not mean toiling away in the kitchen or an elaborate prep. I did not even grate the carrots at home this time. The supermarkets sell shredded carrots that obviously differ in thickness. I’ve been meaning to try them out as I was pretty sure they would add a bit more texture to the soft cake. I was right! So I easily skipped the longest step in making a carrot cake. The top as quite a few of you asked me on Instagram is entirely edible. There are meringues, edible flowers and little candy discs that I created in a two-tone effect using candy melts. I sprinkled a bit of gold dust on them. They are are my favourite new experiment and they just take your desserts to a whole new level. You know what, I can’t wait till Christmas. I am all about sprinkles, chocolate and candy already.

Orange and Carrot Cake


Orange and Carrot Cake

Orange and Carrot Cake

Orange And Carrot Cake (carrot cake adapted with variation from Epicurious)
Makes a 6 inch, 3 layered round cake

1 1/2 cups vegetable oil
|1 cup (packed) golden brown sugar
3/4 cup castor sugar
4 large eggs
1/3 cup orange juice
1/4 cup citrus peel (or 1 tbsp freshly grated orange peel)
2 cups self-raising flour
11/2 tsp baking soda
1 tsp ground cinnamon
1 tsp ground ginger
1/2 tsp ground nutmeg
1/2 teaspoon salt
2 cups finely grated peeled carrot
1/2 cup raisins
Cinnamon swiss meringue buttercream (recipe below)
1/2 cup Orange Marmalade
Decorations- meringue kisses, edible flowers, candy discs, grated chocolate

Cinnamon Buttercream
4 egg whites
1 cup castor sugar
300 g unsalted butter, room temperature, cubed
1 tsp powdered cinnamon
1 tsp vanilla essence
2-3 drops of orange food colouring (I used a mix of red and yellow coloring)

For the orange colored, white chocolate ganache
100 g white chocolate, roughly chopped
3 tbsp heavy cream
3-4 drops of a mix of red and yellow food colour

Preheat oven to 170 degrees C. Lightly grease the sides and bottom and line the bottoms of 3, 6-inch pans with non-stick baking paper.

Using an electric mixer (or by hand), beat oil and both sugars in large bowl until well blended. Add eggs 1 at a time, beating well after each addition. Beat in orange juice and peel. Sift flour, baking soda, cinnamon, ginger, nutmeg and salt into large bowl; add to sugar mixture and beat to blend. Stir in carrots and raisins.

Pour batter into the prepared pans. Bake until a wooden skewer inserted into center of cake comes out clean, about 25 minutes. Remove from oven. Cool cake for 10 minutes. Turn cake out onto a wire rack. Remove baking paper and cool. (Can be prepared 1 day ahead. Wrap tightly in plastic and store at room temperature.)

To make the cinnamon swiss meringue buttercream
Place the egg whites and sugar in a large bowl that is placed over a saucepan of simmering water (over low heat), and whisk continuously, until the sugar has completely dissolved and the bottom of the bowl is warm to touch

Remove the bowl from the heat and whip on high speed until meringue holds stiff peaks and looks glossy. The bowl should have completely cooled by now.
Add the butter, 2 tablespoon at a time, until thick and fluffy. If it begins to look curdled, continue to whip until it comes back together, before adding in remaining butter.
When the buttercream is smooth and has come together, add the cinnamon, vanilla and  food color and whip gently again to blend.

To make the orange colored, white chocolate ganache: Heat the white chocolate and heavy cream over very low heat in a small saucepan. When cream just reaches boiling point, remove from heat and leave aside. Stir with a spoon to make a smooth mix. Add the food colour and stir to blend.

To assemble 
Once the cake layers are completely cool, start assembling..
On a cake plate or stand, spread a little buttercream in the centre and place one layer of the cake (so that the cake does not move about while frosting). Spread about 1/2 a cup of cinnamon swiss meringue buttercream. Spread half the quantity of orange marmalade. Place the second layer. Repeat. Place the last layer upside down (so you get a flat top). Spread buttercream on the top and sides. If you want to make it look like a naked cake, a thin layer of frosting is good enough.
Stick the cake into the refrigerator for 15-20 mins.
Make the white chocolate ganache 5 minutes before you take the cake out from the fridge.Once the ganche is cool, but still flowing freely when you lift it with a spoon, spoon it onto the cake slowly. Be gentle on the edges to create the drippy effect.
Decorate with meringues, candy and edible flowers.


Orange Cupcakes With Cherries

4|07|2016

It is so easy to forget that it is winter here in Australia when you gaze at the vibrant summery posts across the blog-o-sphere and certainly when you see lush red cherries and colourful berries on Instagram. Living in Sydney, we are fortunate to have access to every kind of fresh produce at any time of the year whether local or imported. Usually I won’t even look at imported produce and believe in eating fruits in season because they are not only fresher and cheaper but it also means supporting our wonderful farm community that I am a die hard fan of. There are however, two instances when I find myself deviating from this. Either when I am working for a publication on the other side of the globe and I am shooting summer in winter (speaking of which, I have some wonderful news to share soon) and when I spot CHERRIES! Sorry, can’t resist! No matter what!

orange cupcakes with cherries

I haven’t met my little brother and darling cousins who live in the USA and UK for years and I’ve kind of made a mental note to be there only during cherry season. Who doesn’t want to enjoy 2 cherry seasons in the same year? But that has to wait and this at least is easier. Buying it from from the supermarket! I couldn’t stop staring at them last week when I saw them. They were 5 times the regular price but no, there was no thinking twice when so many combinations were racing in my mind. Oh the possibilities!

orange cupcakes with cherries

orange cupcakes with cherries

I decided to make orange flavored cupcakes and add cherries to the batter. It was delicious. The best of winter and summer in a cupcake! I had some leftover vanilla frosting from a cake I made for a dear friend’s son’s birthday and I thought the colours would looking amazing together. To add extra tang to the cupcakes, I’ve used citrus peel that you could either make at home or use store bought. They are inexpensive and a great addition to your pantry if you like baking. You could add them to pretty much anything a get a nice little citrus boost in your baked goods. The birthday cake, I mentioned earlier (Chocolate Mud Cake with Pineapple Tim tams and vanilla frosting) was a huge success so I am sharing a photo of that as well at the end of the post.

orange cupcakes with cherries

orange cupcakes with cherries

Do you ever buy produce that is not in season? What is that one fruit or vegetable you would be ready to defy the seasons to bring home?

589A2192-2

Orange Cupcakes With Cherries (partly adapted from Taste.com)
Makes 12

Vanilla Swiss Meringue Buttercream
4 egg whites
1 cup castor sugar
300 g unsalted butter, room temperature
1 tsp pure vanilla extract
1-2 drops, food coloring of your choice (optional)(I used teal)

To make the cupcakes : Preheat oven to 200 degrees C (180 degrees C for fan forced ovens). Line a 12-hole muffin pan with paper cases.
Combine flour and caster sugar in a bowl. Make a well in the center.
Add milk, butter, eggs, orange rind, vanilla and 1/2 cup of orange juice to flour mixture. Using a large metal spoon, stir gently to combine. Gently fold in 1/4 cup of the citrus peel and the chopped cherries.
Spoon mixture into prepared muffin pan. Bake for 12 to 15 minutes, or until a skewer inserted into the center comes out clean. Stand in pan for 5 minutes before transferring to a wire rack to cool.

To make the Vanilla Swiss Meringue Buttercream : Place the egg whites and sugar in a large bowl that is placed over a saucepan of simmering water (over low heat), and whisk continuously, until the sugar has completely dissolved and the bottom of the bowl is warm to touch

Remove the bowl from the heat and whip on high speed until meringue holds stiff peaks and looks glossy. The bowl should have completely cooled by now.
Add the butter, 2 tablespoon at a time, until thick and fluffy. If it begins to look curdled, continue to whip until it comes back together, before adding in remaining butter.

When the buttercream has come together, add the vanilla extract and food coloring (if using) and mix till you get the desired shade.

To assemble: Once the cupcakes have cooled completely, pipe a swirl of buttercream on the tops or could dollop it with an ice cream scoop. Decorate with fresh cherries and the leftover citrus peel.

  • « Previous Page
  • 1
  • 2
  • 3
  • 4
  • …
  • 9
  • Next Page »
Hey Sugar
Cake
Link to my Facebook Page
Link to my Instagram Page
Link to my Pinterest Page
Link to my Mail Page
Subscribe to this site
Fresh Awards
2019 Aus mumpreneur
2019 aus mumpreneur
Mumbrella

Copyright © 2025 · Sugar Et Al · Designed by Smitten Blog Designs · Log in