• Home
  • Recipe Index
    • Recipe Index
    • Breakfast/Brunch
    • Cakes and Puddings
    • Chocolate
    • Cookies and cupcakes
    • Custard and Mousse
    • Gluten Free
    • Ice Cream
    • Mains
    • Other Sweet Treats
    • Snack/Appetizers
    • Soups and Salads
    • Tarts and Pies
    • Vegetarian
  • About
  • Cookbook
  • Portfolio
  • Store
  • Press
  • Work with Me

Sugar et al

Because Life is a blend of flavours...

Mango and Coconut Mousse Bars

21|10|2021

It’s not summer until you get to enjoy mangoes. In Australia, the first mangoes appear as early as Spring. Though I woudn’t say that they are at their best, it’s impossible to resist the aroma as you pass through the aisles at your greengrocer or supermarket.

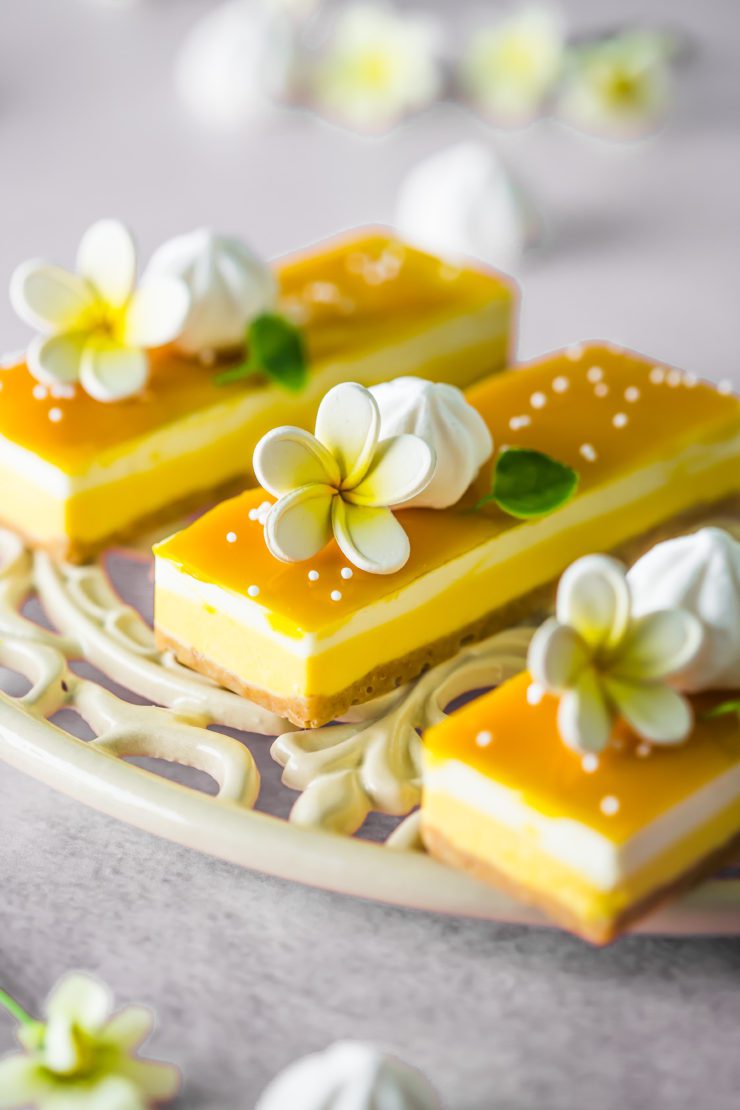
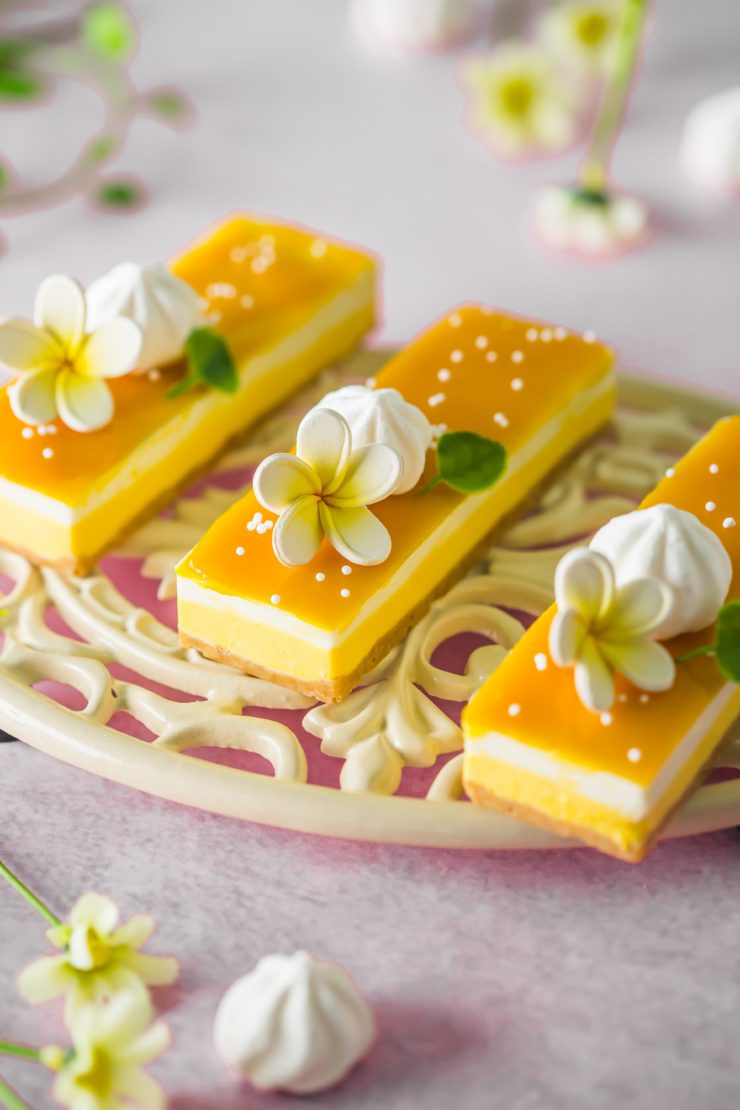
Mangoes pair beautifully with coconut. Together they are a burst of the tropics in your mouth. This a deceptively simple dessert to make, with absolutely no baking invoved. I have used sillcon rectangular molds. You could use round or square molds and even make them in serving glasses.

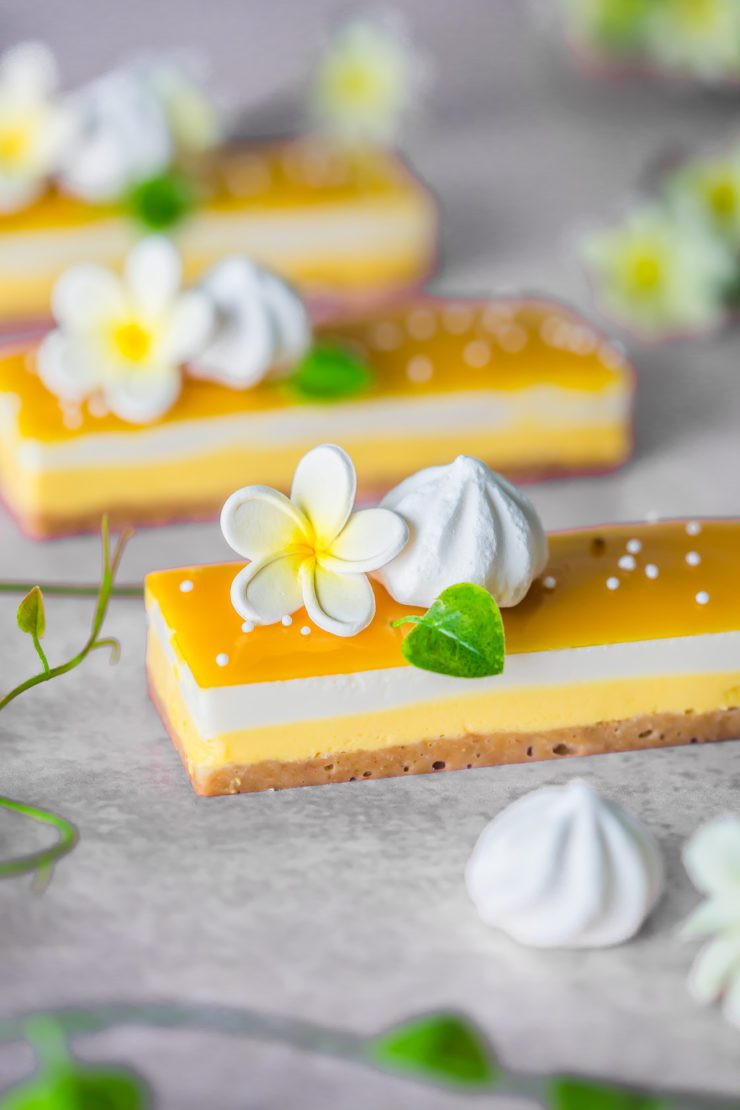
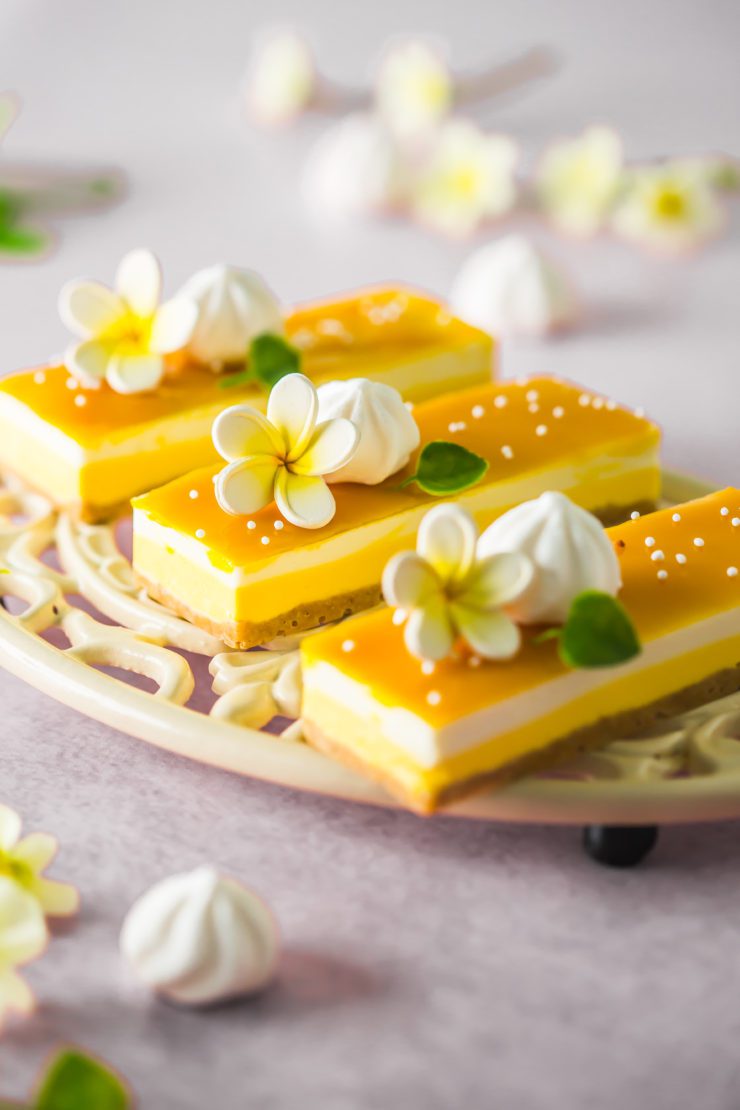
Mango Coconut Mousse Bars 
Makes 4 bars 

For the base

7-8 digestive biscuits
2 tbsp coconut oil, melted

For the mango and coconut filling
3 tsp powdered gelatine
150 ml thin (pouring) cream
120 ml Coconut cream
40 g caster (superfine) sugar
3 tbsp mango purée

Mango jelly

3/4 cup mango purée
1/2 tsp powdered gelatine 

Place the biscuits in a food processor and pulse to form fine crumbs. Pour the melted coconut oil into the processor and pulse to combine. Press the biscuit mixture into the base of rectangular silicone molds. Freeze until needed.

To make the mango-coconut layer, soften the gelatine in 2 tbsp cold water in a small bowl for 5 minutes. Warm 30 ml of the cream in a saucepan over low heat. Add the gelatine and stir through the warm cream until dissolved. 

Cool slightly, then fold through the coconut cream.

Whip the remaining cream, sugar and vanilla bean paste until soft peaks form, then fold into the coconut cream mixture. Divine the mixture between two bowls. In one bowl, fold through 3 tbsp mango puree. In the other bowl add vanilla extract. 

Spoon the mango mixture over the crust. Freeze for 15 minutes or until slightly firm. Sooon the coconut-vanilla mixture over the mango layer. Freeze for 15 mins. 

Meanwhile, prepare the mango jelly. Place the mango purée in a small saucepan. Add the gelatine. Allow to bloom for 2-3 mins. Warm over a low flame, stirring continuously until gelatine has dissolved. Cool slightly. Pour over coconut layer. Place in freezer to set. 

Allow to thaw 30 mins before serving. Decorate with edible flowers or shaved coconut. 

Grapefruit and Orange Tart

18|09|2021

Do you like the taste of grapefruit? To be honest, I don’t enjoy having it on its own, however, the refreshing citrus flavour with a slightly bitter aftertaste is so perfect in a dessert. This absoloutely divine tasting Grapefruit and Orange tart has a few different elements to it but it is definitely not difficult to make. All of them can be made ahead of time and assembled at the time of serving.

Grapefruit and Orange Tart

This Grapefruit and Orange Tart has a lovely shortcrust pastry base, a grapefruit custard filling, a layer of orange curd, a white chocolate decoration that complements the citrus duo beautifully and some vanilla chantilly cream to balance the sweetness. It is sure to impress your guests both by it’s apperance and by taste.
If you didn’t want to make all the layers, you could easily leave out the orange curd or white chocolate spiral and it would still be fanatstic.

Grapefruit and orange tart

Want to see more Orange desserts? Try this Carrot and Orange Cake or these Orange KitKat Brownie Cakes

The spiral mold can be found here

Grapefruit and Orange Tart
Makes an 19 cm fluted tart

For the pastry
1 cup 150 g plain flour
1/4 cup, icing sugar mixture
100 g chilled butter, roughly chopped
1 egg yolk

For the grapefruit custard
3 eggs, lightly whisked
150ml single/pure cream
1 tbsp finely grated grapefruit rind
1/3 cup fresh grapefruit juice
1/2 cup caster sugar

Orange Curd
2  eggs
2 egg yolks
3/4 cup castor sugar
80 g unsalted butter, chilled and roughly chopped
zest and juice of a Navel Orange

White Chocolate Decoration
100 g white chocolate, melted
1tsp grapeseed oil/coconut oil
orange/peach gel food colour

Vanilla Chantilly cream
200 ml thickened/double cream
1 tbsp castor sugar
1/2 tsp vanilla extract
gel food color, as required

To make the pastry, process the flour, icing sugar and butter in a food processor until mixture resembles fine breadcrumbs. Add the egg yolk and process until mixture just comes together. Gently knead on a lightly floured surface until smooth. Shape into a disc. Cover with plastic wrap and place in the fridge for 15 minutes to rest.

Roll the dough on a lightly floured surface to a 3 mm-thick disc. Line a 19 cm fluted tart pan with a removable base with the pastry. Trim edges. Place in the fridge for 30 minutes to rest

Meanwhile, to make the grapefruit custard filling, whisk the eggs, cream, sugar, grapefruit rind and juice together in a large bowl. Strain through a fine sieve.

Preheat oven to 200 degrees C (180 degrees C fan-forced). Place the tart pan on an baking tray. Line with baking paper and fill with pastry weights or dried rice or beans. Bake in preheated oven for 10 minutes. Remove paper and weights and bake for a further 10 minutes or until pastry is light golden. Remove from oven. Reduce oven to 150 degrees C.

Pour the grapefruit mixture into the pastry case. Bake for 20-25 minutes or until custard is almost set. Remove from oven. Set aside for 15 minutes to cool to room temperature. Place in the fridge for 30 minutes to chill.

Make the Orange Curd :To make the orange curd, place the eggs, egg yolks and sugar in a medium saucepan and whisk together until smooth. Add the butter, orange juice and zest and place the pan over low heat, stirring continuously. Cook until thick enough to coat the back of a spoon. Remove from heat. Cool and refrigerate until needed.

Make the white chocolate decoration: Combine melted white chocolate, grapeseed oil and food colour. Mix until smooth. Pour into spiral mold and place in the fridge to set.

Vanilla Chantilly Cream : Combine thickened cream, vanilla extract and caster sugar in the bowl. Use an electric mixer or balloon whisk to whisk the cream until it forms soft peaks. Add the food colour and whisk just a bit more until almost stiff peaks form. Refrigerate until needed.

To assemble : Spread a thin layer of orange curd over the set custard filling. Place the white chocolate decoration in the centre. Pipe vanilla chantilly around the chocolate decoration. Decorate with edible flowers and dehydrated orange slices.

Grapefruit and Orange Tart

Orange KitKat Brownie Cakes

30|08|2021

I’ve always had a thing for Kitkat chocolates. Not only do I love eating them, I find them the perfect decorations for pastries and cakes. You might have come across them before in my posts and if you follow me on Instagram, you might have noticed a few creations in the past using them in various desserts. I noticed this orange flavoured ones and I loved the two toned effect on the top. I just knew I wanted to make Orange KitKat brownie cakes with them.

Orange KitKat Brownie cakes

In related news, have you seen the recent reels I have created? This is one of them. So if you’re keen on watching a snippet of how the brownie is decorated, go check out my Instagram reels. Unfortuantely, it only allows me a max of 30 seconds so I am unable to show the creations from scratch but hopefully it will be upgarded to the 1 min duration like it has for a few craetors.

The brownie cakes are soft and delicious. They don’t have a cracked top as I use this recipe for a cake like texture. But nonetheless they are AMAZING to taste.

If you’re a fan of chocolate desserts, you’d love this Easy Chocolate cake with raspberries or this Beet Chocolate Cake

Orange KitKat Brownie Cakes
Makes 6

150 g unsalted butter
1 1/4 cups (250 grams) castor sugar
3/4 cup (approx 80 grams) unsweetened cocoa powder
1/2 teaspoon vanilla extract
2 large eggs
1tbsp orange zest
1/2 cup (65 grams) plain flour
KitKat bars, to decorate
Dehydrated orange slices

Chocolate Hazelnut whipped cheesecake
200 g cream cheese, room temperature
200 g Nutella

Preheat oven to 180 degrees C. Grease 6 fluted tart pans/baking cups/ramekins. If you are using the ones with a removable base, make sure you cover the base with foil.
Place butter, cocoa and sugar in a microwaveble bowl and microwave in short bursts constantly stirring until butter has melted and mixture is smooth. Keep bowl aside until just warm to touch.
Add the eggs, vanilla and orange zest. Whisk until smooth. Add the flour and whisk until dough pulls away from the sides of the bowl.
Pipe or spoon batter into pans. Bake for 20-25 mins or until a skewer comes out with few crumbs.
Cool to room temperature before decorating.
To make the frosting, blend Nutella and cream cheese together (don’t overwhip). Pipe onto cooled brownies.
Decorate with Kitkat bars and dehydrated oranges slices.

Lemon Poppyseed and Blueberry Cake

20|08|2021

If I ever need to bake a cake that is striking in apperance yet always delicious and simple, I would opt for a blueberry cake. Where else will you find a colour so gorgeous and naturally subtle or strong depending on how you use it? Eye catching shades of mauve and purple without a drop of food colour. And bonus, the sweetest, quickest berry available to most people. No need to hull, no seeds, just pop hem into your mouth or top your favourite desserts with them for that show stopper look.

This cake is pretty easy to make except that there is a different set of challenge with intricate bundt cakes that you need to be mindful of. I’ve learnt it the hard way and had a my fair share of destroyed bundts. So please grease your pan enough so as to cover every edge and corner and turn of the design. I normally don’t flour the pan, sometimes I may use a coating of icing sugar if I’m concerned about the texture of the batter. If you know your pan well, feel free to go ahead and follow a technique that works for you.

I hope you enjoy making and sharing this cake with your loved ones.

Lemon Poppy Seed and Blueberry Cake
Makes a medium bundt cake

200g (1 1/3 cups) plain flour
150g (1 cup) self-raising flour
285g (1 1/3 cups) caster sugar
1 tbsp poppy seeds
150g butter, melted, cooled
3 eggs
100ml milk
1 tbsp finely grated lemon rind
100ml (1/3 cup) fresh lemon juice

Blueberry Glaze
1/2 cup blueberries (I used frozen)
1 tbsp lemon juice
1 tbsp water
1 and 1/2 cup icing sugar (more if required)

Preheat oven to 180°C. Spray a bundt pan with canola oil. Make sure you grese it really well.

Sift both flours into a large bowl. Stir in caster sugar and poppy seeds. Make a well in the centre. Whisk the butter, eggs, milk, lemon rind and lemon juice in a bowl until combined.

Add the lemon mixture to the flour mixture and stir until well combined. Spoon into the prepared pan and smooth the surface. Bake for 40-45 minutes or until a skewer inserted into cake comes out clean. Turn onto a wire rack to cool completely. Once cooled, drizzle with blueberry glaze (recipe below). Allow to set for 30 minutes. Top with fresh blueberries.

To make the blueberry glaze, place the blueberries, lemon juice and water in a small saucepan over medium heat. When the blueberries soften and release their juices, use a blender to puree the blueberries. Add the icing sugar in intervals, stirring constantly until glaze is smooth and desired consistency is reached.

  • « Previous Page
  • 1
  • …
  • 12
  • 13
  • 14
  • 15
  • 16
  • …
  • 111
  • Next Page »
Hey Sugar
Cake
Link to my Facebook Page
Link to my Instagram Page
Link to my Pinterest Page
Link to my Mail Page
Subscribe to this site
Fresh Awards
2019 Aus mumpreneur
2019 aus mumpreneur
Mumbrella

Copyright © 2025 · Sugar Et Al · Designed by Smitten Blog Designs · Log in