• Home
  • Recipe Index
    • Recipe Index
    • Breakfast/Brunch
    • Cakes and Puddings
    • Chocolate
    • Cookies and cupcakes
    • Custard and Mousse
    • Gluten Free
    • Ice Cream
    • Mains
    • Other Sweet Treats
    • Snack/Appetizers
    • Soups and Salads
    • Tarts and Pies
    • Vegetarian
  • About
  • Cookbook
  • Portfolio
  • Store
  • Press
  • Work with Me

Sugar et al

Because Life is a blend of flavours...

Easy Chocolate Mousse Cake

5|08|2021

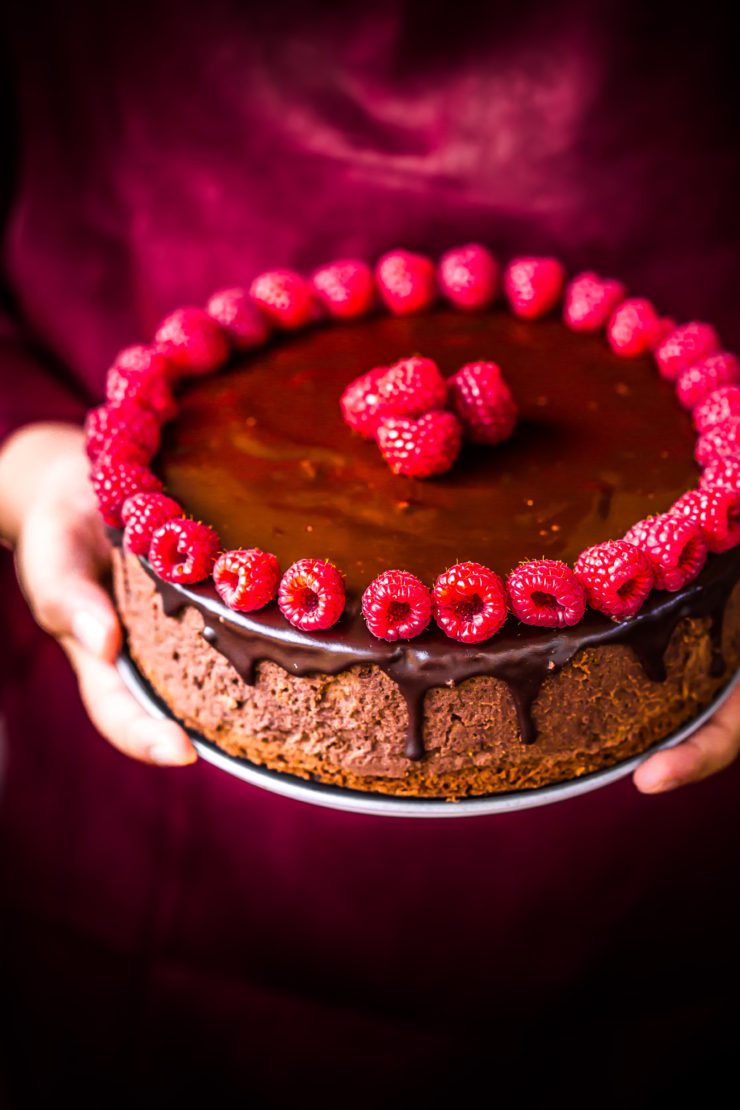
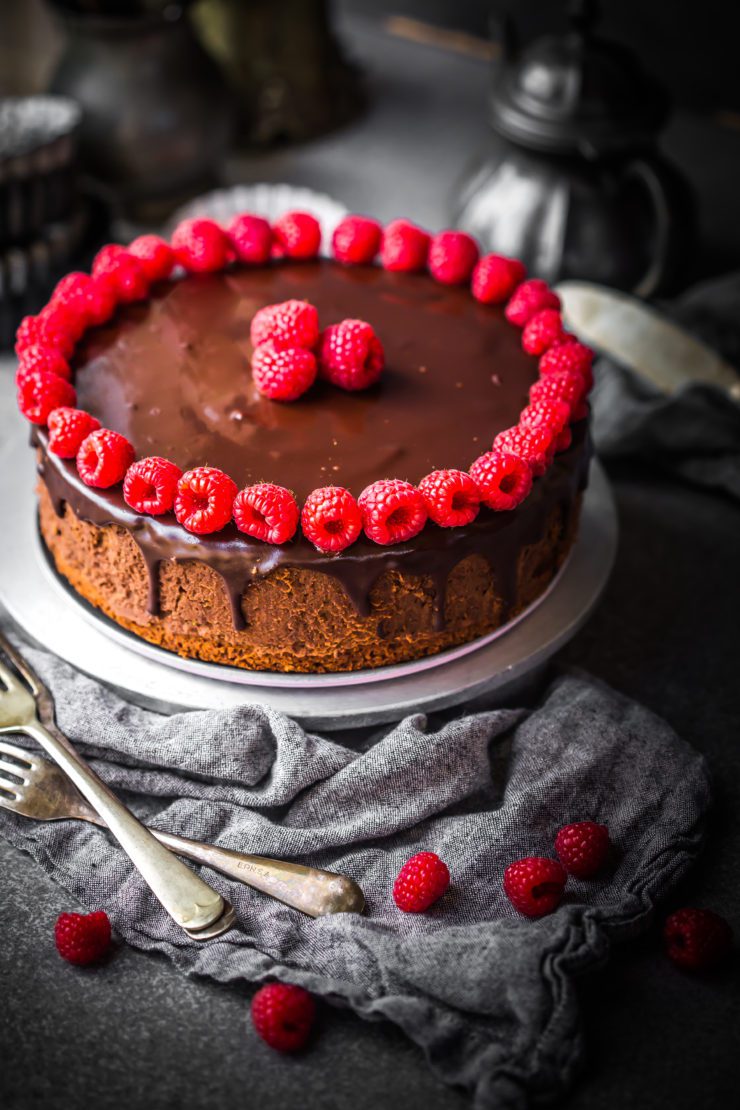
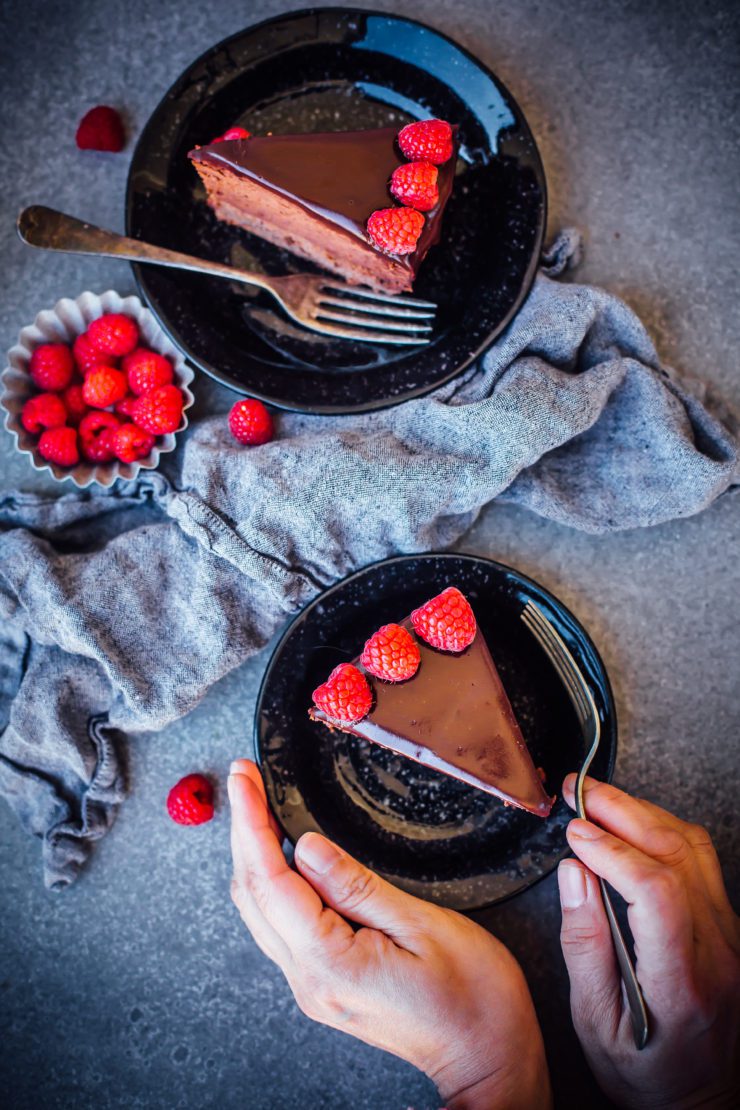
Is it weekend yet? Let’s pretend it is because this easy chocolate mousse cake is nothing short of a celebration. It is rich, decadent, sinful and oh so heavenly! You cant have too much in one go but you also can’t stop. This cake makes everyone happy!
Every time I open the refrigerator, I’m delighted at the sight of this cake.

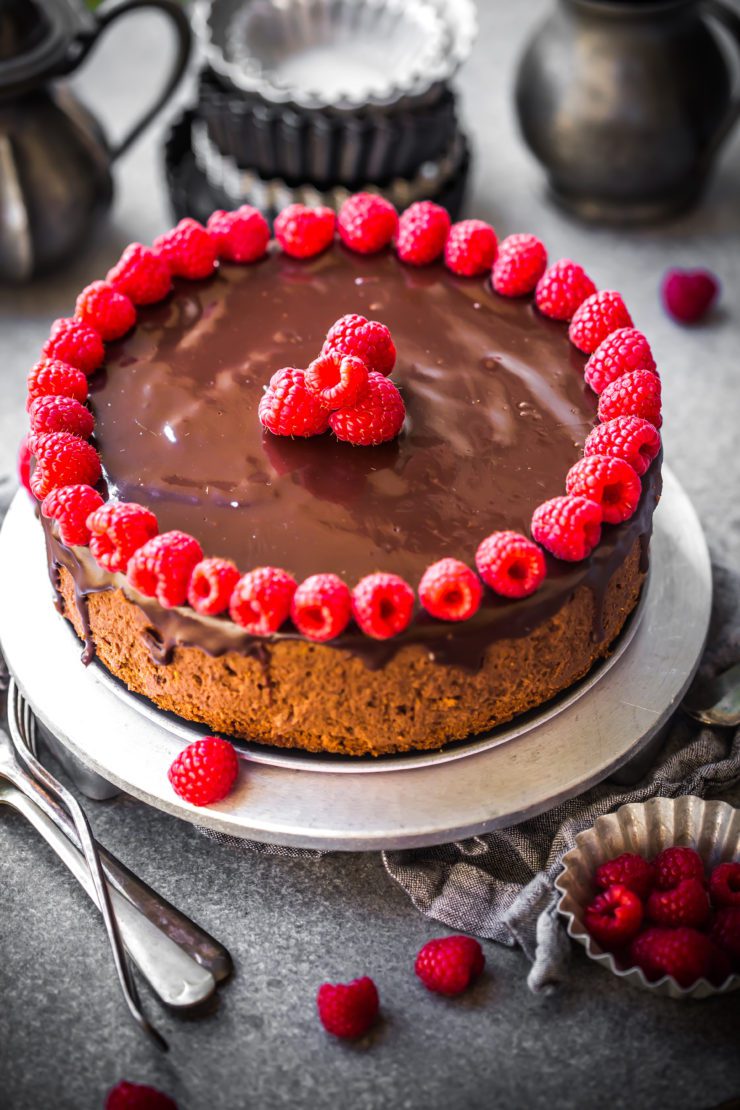
Though it seems like there are a few steps to make this easy chocolate mousse cake’s different layers, they are really easy and hard to mess up. Making it a day ahead, helps to nicely set the mousse while you can top it with the shiny glaze on the day you serve it. The cake also stays for quite a long time in the fridge if you store it in an air tight container. Right now, it’s a week old and we are still enjoying the last few slices.

Easy Chocolate Mousse Cake

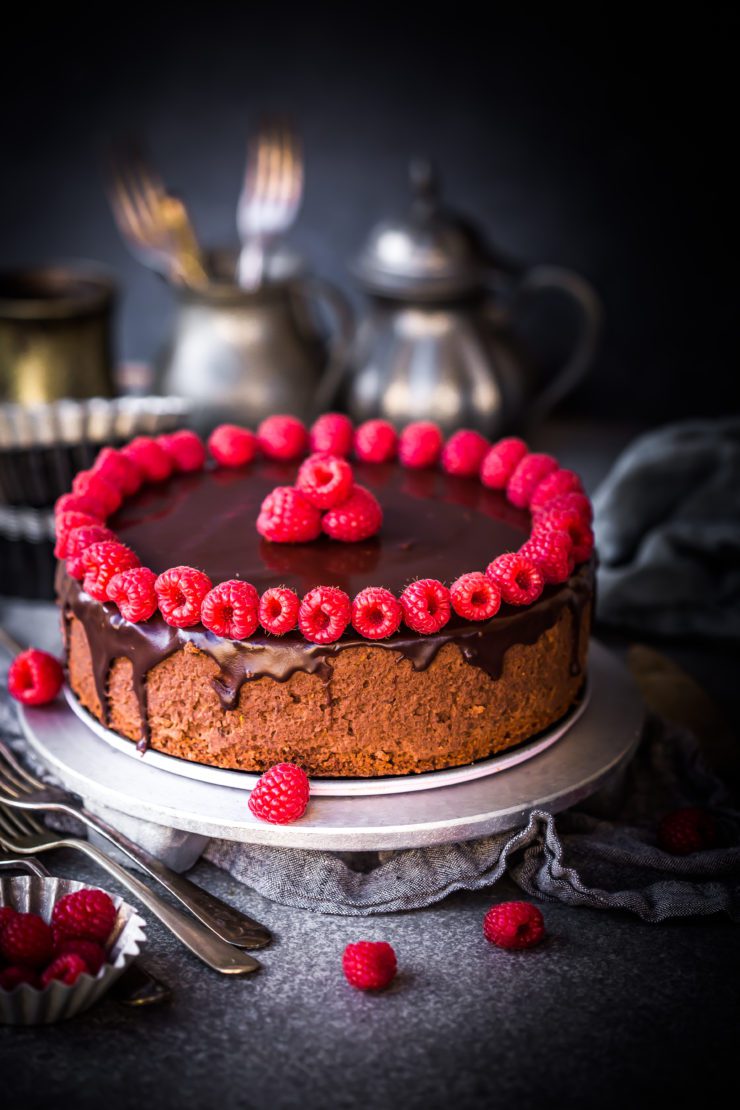
What is the best part about this easy chocolate mousse cake? That it is a no-bake cake yet there is no gelatine or egg used in the mousse. If you’ve made a no bake cheesecake or mousse cake before, you know gelatine is sensitive to the temperature of the other ingredients and can be tricky to use in these sort of recipes. Here, it’s just the magic of chocolate and cream. I’ve added a bit of orange zest to the mousse to cut down the richness. This is of course optional but I do recommend it.

Easy Chocolate Mousse Cake

If you love indulgent and easy chocolate cakes don’t forget to check out this Easy Chocolate Cake with raspberries

Chocolate Mousse Cake
Makes an 8 inch round cake

Cake layer
60 g dark chocolate, roughly chopped
50 g unsalted butter
1/2 cup castor sugar
1/4 cup water
1/3 cup (50 g) plain flour
1/4 cup (40 g) self raising flour
1 tnsp cocoa powder
1 egg

Mousse layer
400 g dark chocolate, roughly chopped
600 ml thickedned cream
1 tsp orange zest (optional)

Chocolate Glaze
120 g dark chocolate, roughly chopped
100 ml thickened cream
2 tbsp liquid glucose

To make the chocolate cake : Preheat oven to 160 degrees C (140C fan forced) Release base of a 22cm (base measurement) springform pan. Invert. Line with baking paper. Secure in pan, allowing edge to overhang. Grease side with melted butter.

Melt chocolate, butter, sugar and water in a heatproof bowl over a saucepan of simmering water. Remove from heat. Stir in flours, cocoa and egg. Pour in prepared pan. Bake for 25 minutes or until a skewer comes out clean.
Cool cake completely in pan.

To make the chocolate mousse : Place chocolate in a large heatproof bowl over a saucepan of simmering water. Stir with a metal spoon for 10 minutes or until melted and smooth. Remove from heat. Cool for 10 minutes.
Using an electric mixer, beat cream until soft peaks form. Fold cream mixture into chocolate. Add the orange zest, if using, mix. Pour chocolate mixture over base in prepared pan. Smooth with a spatula. Cover. Refrigerate for 3 hours or until set.

To make the chocolate glaze : combine chocolate, cream and glucose in a small saucepan. Stir over low heat until melted and smooth. Cool slightly. Pour over mousse. Place in the fridge for to set (about an hour).
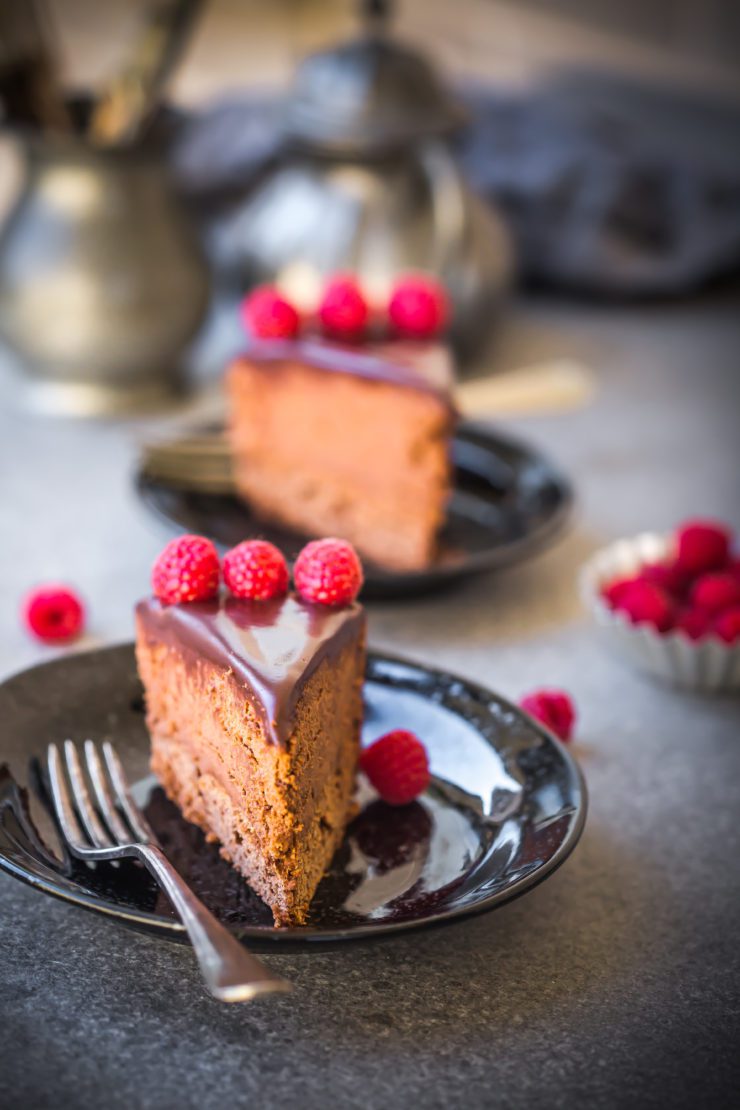
When ready to serve, top with fresh berries, slice and enjoy!

Lemon Friands

30|07|2021

I have quite a few friand recipes on this blog and they are all my favourites. That is because in Australia we can never grow tired of these delicious nutty treats. If I ever need to produce a baked treat at a short notice, I always go for a friand. If you the word ‘friand’ is new to you, you might have heard of the french financiers. They are the same!

This time around, I decided to give them a ‘high tea’ look. Imagine them being served on tiers at a special occasion. So naturally I had to glam them up. All I did was coat them in white chocolate and they looked ‘high tea ready’! I used a flower cookie mold so my friands were small and thin. You could also use a regular friand mold/pan but you may need to double the recipe in that case for 12 regular sized friands.

Lemon Friands
Yields 12 small friands

70 g unsalted butter, melted
3 egg whites, lightly whisked
100 g icing sugar
30 g self raising flour
60 g almond meal
1 tbsp grated lemon zest
200 g white chocolate
yellow gel food colouring

Preheat oven to 180 degrees C. Grease a 12 hole flower cookie mold or 6 hole friand pan.
Place all the ingredients in a medium bowl and whisk until combined. Spoon batter into prepared pan. Bake for 15-20 minutes or until cooked through.

Remove from oven. Cool on a wire rack.
Melt white chocolate using a microwave or double boiler. Add the food colour as per desired shade. Mix till well blended.
Pipe white chocolate onto the flower cookie mold. Shake off excess. Press friands into the white chocolate. Place mold in the refrigerator to set. Remove friands carefully from mold. Enjoy!

Carrot and Orange Cake

14|07|2021

Carrot and orange cake

Winter is very synonymous with carrots and oranges at my place. Perhaps something to do with the cold season during my growing up years in India when this kind of produce was seasonal.
Before I share the recipe for this truly amazing Carrot and Orange cake, I would like to apologise for my long absence from this space. It was never intentional because creating gives me more joy than anything in this world. I started a new venture in the middle of a global pandemic in an industry which was not only unknown but also probably the worst hit by Covid-19. I think it was a really brave decision, however it caused much stress, anxiety and dissappointment to my family and myself.
When we embark on a new journey, our heart is filled with hope and courage and faith that we could possibly beat all odds. But more often than not, there are external factors that influence our circumstances that are barely in our control. We can only do our best!
I had to say a sad but practical goodbye to our venture and here I am as happy as ever to be back in my cosy corner of the Internet doing the things I love. I believe, experiences, good or bad teach us a lot. It can change our perspective of the world around us. It can help us discover new facets about ourselves.

It is lockdown once again in Sydney, but everything seems different this year. For one, my twins seem to have grown up in leaps and bounds. I have discovered a new baking companion in one of them. We baked this cake together and oh the joys, when you can pass on the not so enjoyable tasks (like grating carrots) to an enthusiastic boy.
The recipe for this Carrot and Orange Cake is easy but results are amazing. You can taste both the carrots and a little hint of citrus from the orange. Spices are another reason I love baking this in winter.

Carrot and orange cake

There is abundance of Orange Cakes here. If you like this, you should try out my Blood Orange Olive Oil Cake and this stunning layered Orange Carrot Cake with cinnamon Buttercream.

Carrot and Orange cake
Makes a 6 inch round cake

2 eggs
3/4 cup vegetable oil
1 cup brown sugar
1 cup grated carrots
1 and 1/2 cup plain flour
1 tsp baking powder
1 tsp baking soda
1 tsp cinnamon powder
1/2 tsp nutmeg powder
1/2 tsp ginger powder
1/2 tsp all spice powder
1 tsp grated orange zest
1/2 milk
Fresh slices of oranges, to serve

Orange Buttercream
125g unsalted butter, room temperature
1 and 1/4 cups icing sugar
1 tbsp milk
1 tbsp finely grated orange zest


Method :
To make the cake
Preheat oven to 180 degrees C.
Grease a 6 inch cake pan and line the base with baking paper.
Place all the ingredients in a large bowl and mix together either with an electric mixer or by hand with a whisk.

Pour the batter into the prepared pan. Bake for 35-40 mins. or until a skewer inserted into the middle of the cake comes out clean. Remove from oven. Turn onto a wire rack to cool completely. Once cooled, spread orange buttercream. Top with fresh orange slices.

To make the buttercream
Beat the butter until pale and fluffy using an electric mixer or with a whisk. Gradually add the icing sugar and milk while constantly beating until well combined. Add the orange zest and beat for 30 seconds.


Honey and Apple Granola Cake

25|06|2020

I have promised this recipe weeks ago but I haven’t been able to sit down and open my website at all, let alone post a recipe. I apologise! A few significant changes (good changes) are happening in my life at the moment and I have been really busy. I will share when the time comes.

This is my second granola cake in recent times. To say I am obsessed is an understatement. We have been eating granola with yogurt regularly for breakfast mainly for the convenience and inclusion of nuts and fruit but the possibility of using it as a topping for muffins and cake is far too tempting.

Honey and Apple Granola Cake

The cake is really easy to make, however, it is baked in two stages. We bake the batter partially, then remove it from the oven to add the topping. Then it is baked until fully cooked through. This is done to prevent the top from overcooking and burning. Honey in cakes is another thing I absolutely love. The flavour is amazing.! But it is also healthier than using regular sugar. So since I was using honey, I felt I could make this cake refined sugar free by using coconut sugar. Feel free to use regular sugar/castor sugar if that is available to you.

Honey and Apple Granola Cake
Makes a 7 inch round cake

150 g unsalted butter, melted
1/2 cup (125ml) honey
3 eggs, lightly whisked
1/2 cup sour cream
1 and 1/4 cup self raising flour
1/2 cup almond meal
3 tbsp coconut sugar (or use castor sugar)
1 apple, cored, diced

For the top
1/2 cup home made granola (recipe here, swap fruit with nuts and seeds, swap brown sugar with coconut sugar) OR you could use store bought
20 g unsalted butter, softened

Preheat oven to 180 degrees C. Grease the base and sides of a 7 inch round cake pan and line the base with baking paper.
I’m a large bowl, whisk together butter, honey, eggs and sour cream. Add the flour, almond meal and coconut sugar.
Beat until smooth. Fold in half the apples. Pour batter into prepared pan.

Bake for 20 minutes. Meanwhile rub the butter into the granola with your fingers.
Remove cake from oven. Scatter with remaining apples and granola.

Bake for another 30-35 minutes or until cooked through (a skewer inserted in the middle should come out clean). Remove from oven, leave aside for 5 minutes, then loosen the edges of the cake with a blunt knife. Turn slowly onto a wire rack to cool. Slice and enjoy!

  • « Previous Page
  • 1
  • …
  • 13
  • 14
  • 15
  • 16
  • 17
  • …
  • 111
  • Next Page »
Hey Sugar
Cake
Link to my Facebook Page
Link to my Instagram Page
Link to my Pinterest Page
Link to my Mail Page
Subscribe to this site
Fresh Awards
2019 Aus mumpreneur
2019 aus mumpreneur
Mumbrella

Copyright © 2025 · Sugar Et Al · Designed by Smitten Blog Designs · Log in