• Home
  • Recipe Index
    • Recipe Index
    • Breakfast/Brunch
    • Cakes and Puddings
    • Chocolate
    • Cookies and cupcakes
    • Custard and Mousse
    • Gluten Free
    • Ice Cream
    • Mains
    • Other Sweet Treats
    • Snack/Appetizers
    • Soups and Salads
    • Tarts and Pies
    • Vegetarian
  • About
  • Cookbook
  • Portfolio
  • Store
  • Press
  • Work with Me

Sugar et al

Because Life is a blend of flavours...

Easy Chocolate Tart

18|04|2023

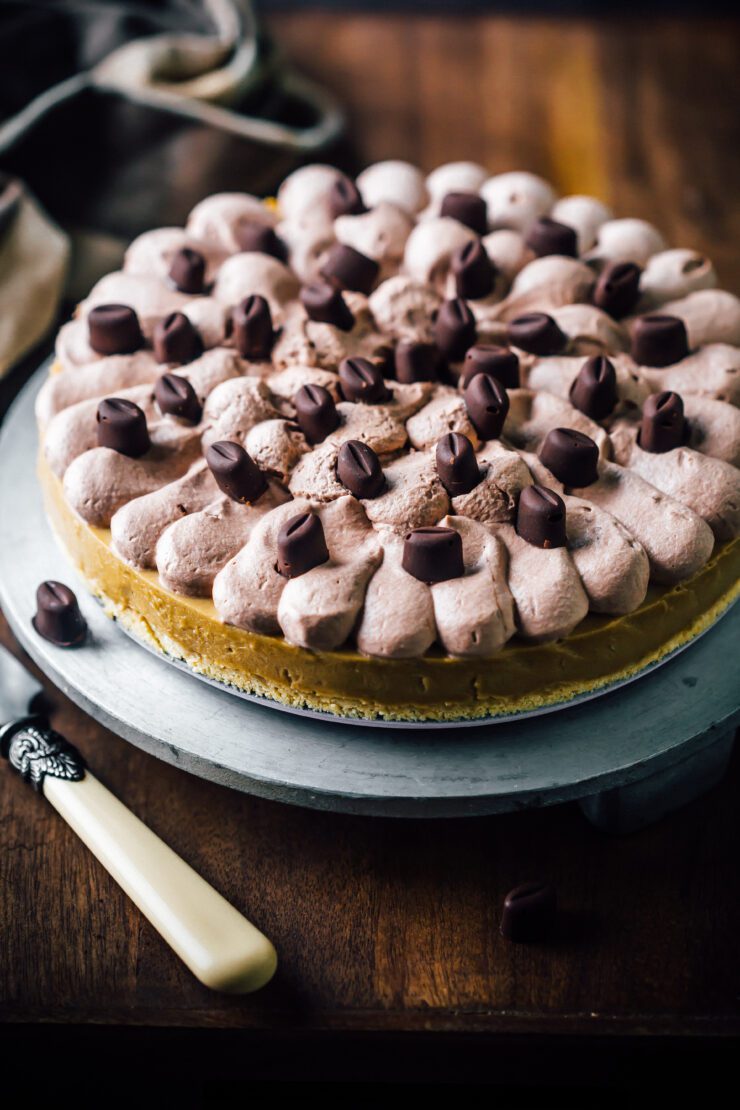
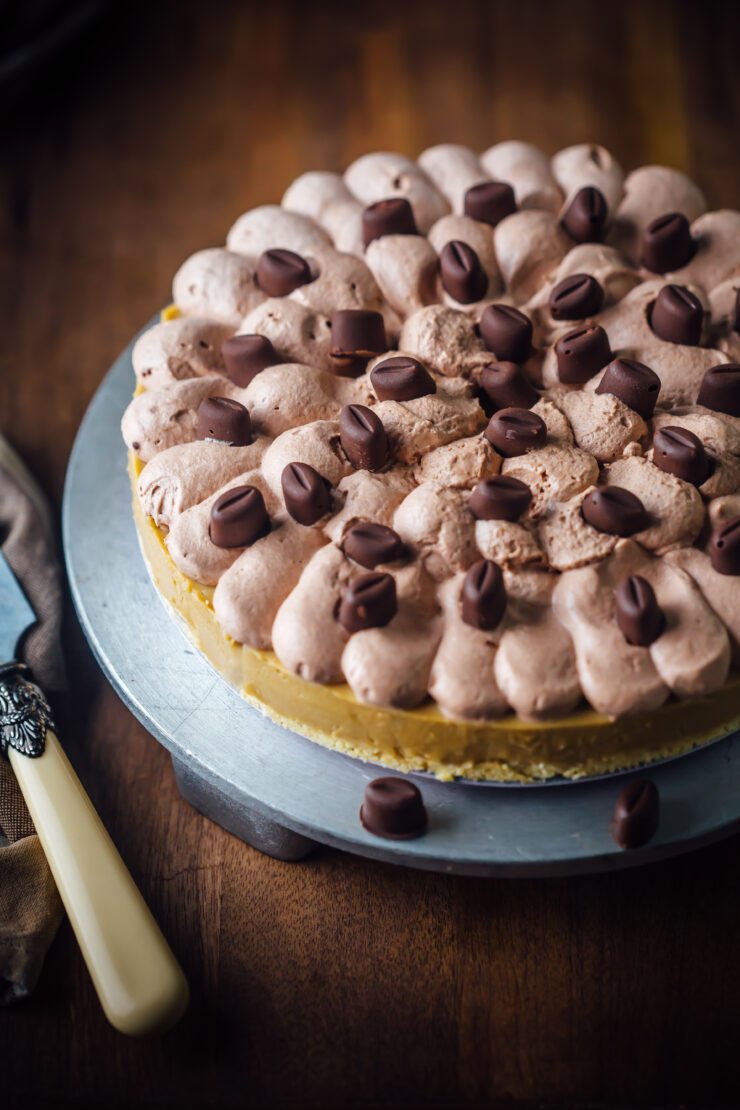
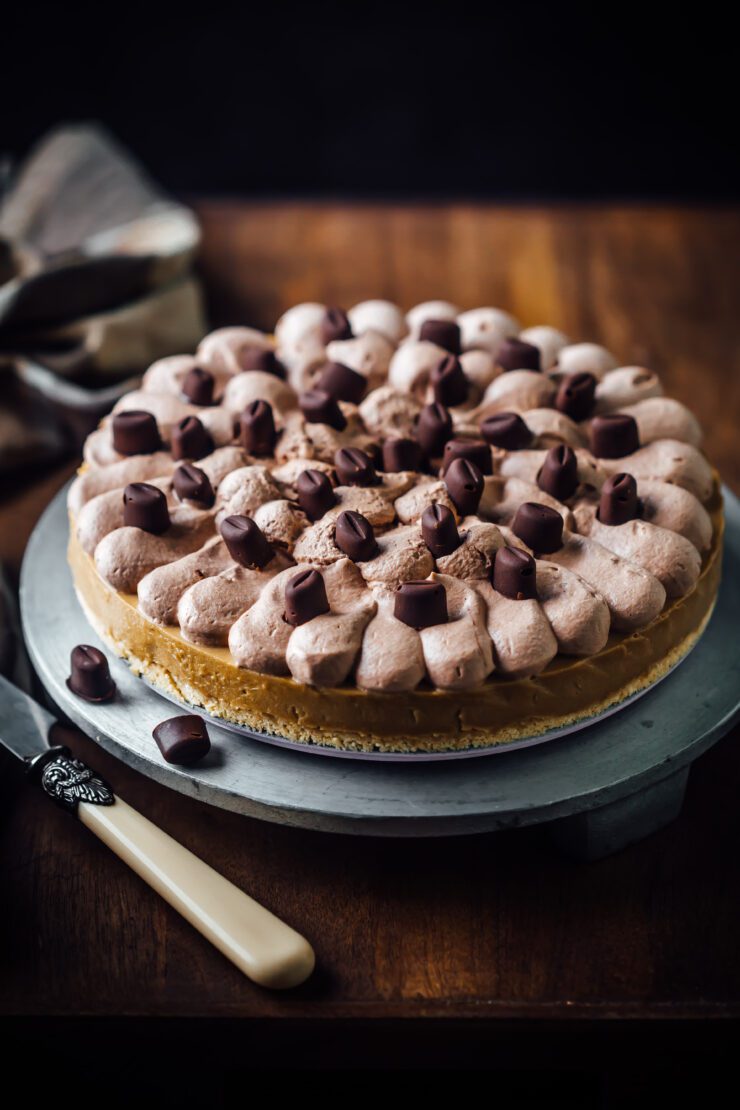
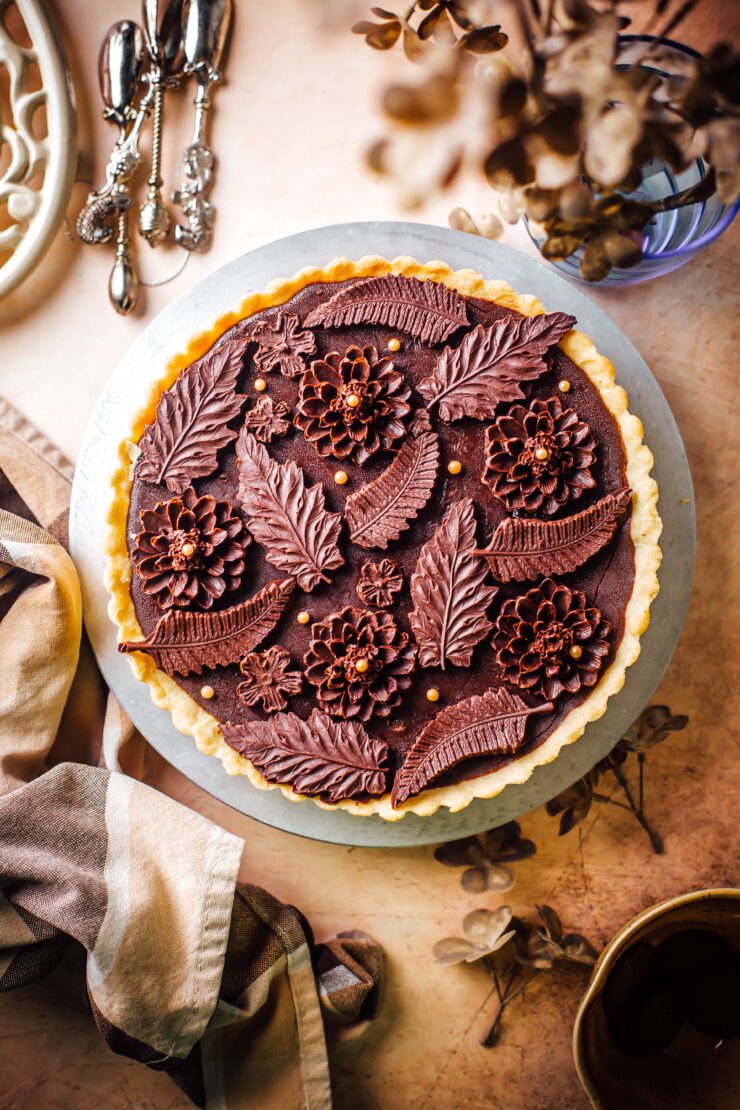
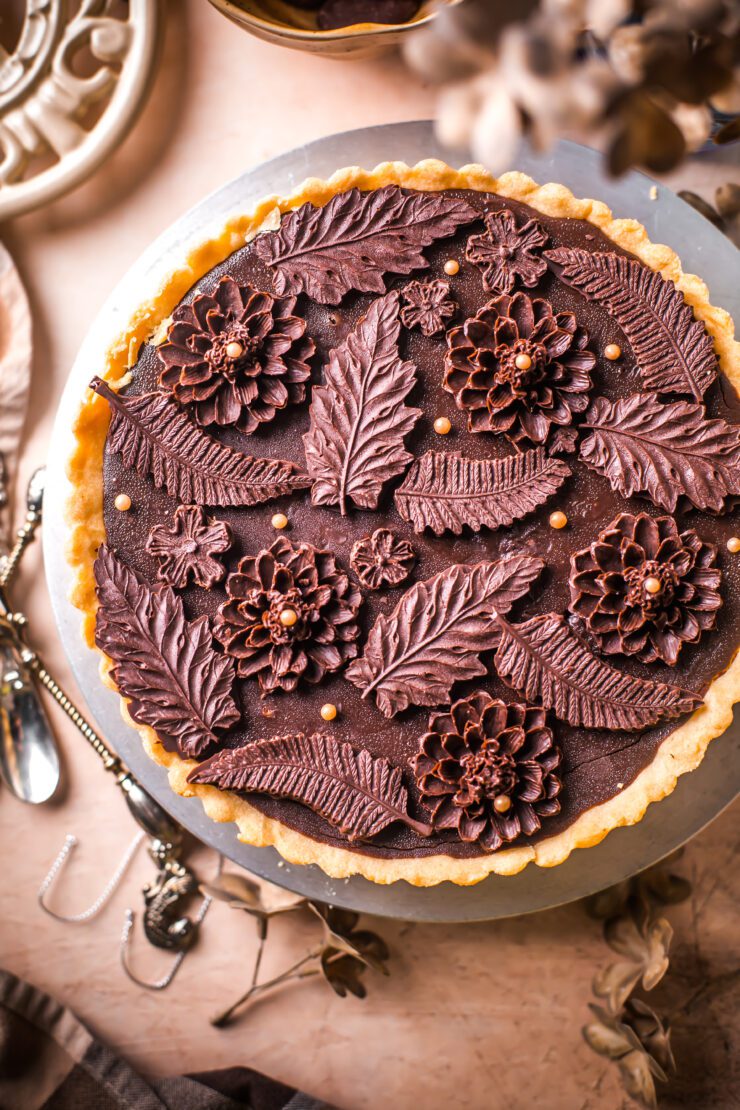
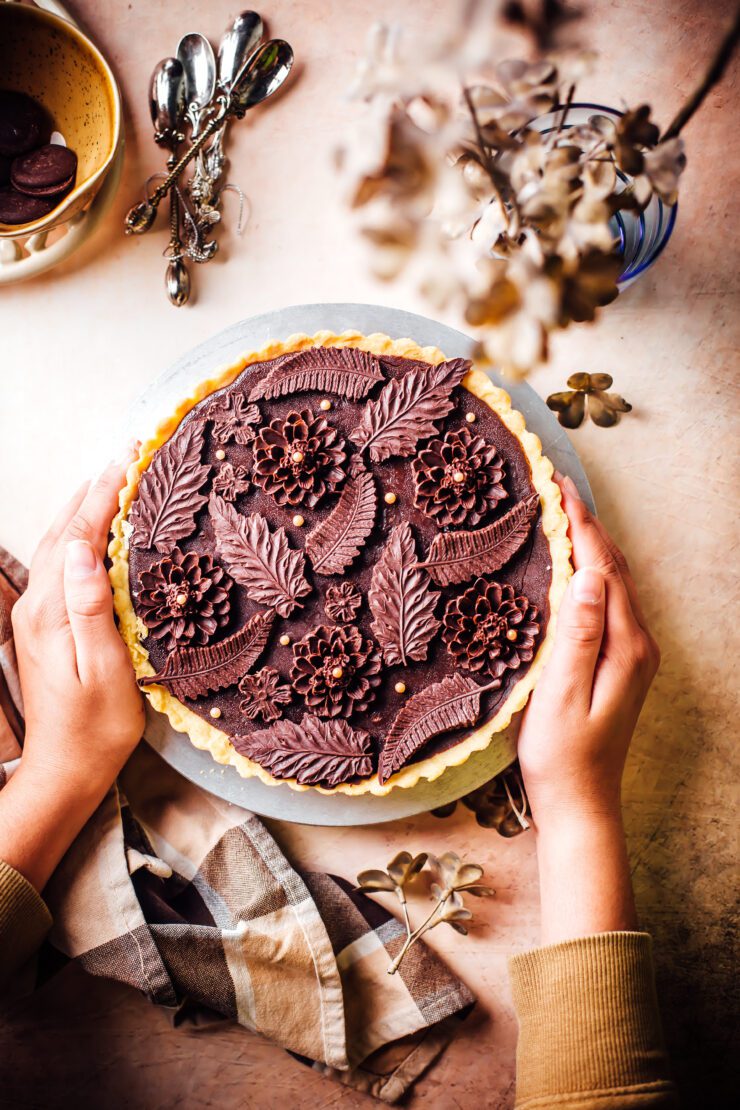
Your weekly chocolate fix in the form of an easy chocolate tart is right here. It stays for days in the fridge, not that it will actually last that long. The simple ganache filling is elevated to an untimate showstopper standard by the addition of dark chocolate decorations which are nothing but melted chocolate, set in beautiful molds.

The easy chocolate tart is simpler than it looks and tastier than it sounds. A slice of this tart is the perfect treat you gift to yourself after a hard week of labour. You deserve it!

Easy Chocolate Tart
Easy Chocolate Tart

The filling can be customised to your taste by a variety of options. Add orange zest or lemon zest for a citrus-y finish, a tsp of instant coffee powder for a mocha twist, fold in nuts or berries for a delicious bite. It’s totally left to your imagination. If you’d like a no-bake tart, you could use a biscuit crust for the base instead of a baked crust. A store bought ready crust is also fine.
For the decorations, you could use white or milk chocolate as well or a combination.

If you love chocolate as much as I do, you should check out this Chocolate, almond and strawberry cake or this Chocolate Mousse Cake

Easy Chocolate Tart
Makes an 8 inch round tart

For the pastry
1 cup (125 g) plain/all purpose flour
1/4 cup, icing sugar mixture
1/2 cup (114 g) chilled butter, roughly chopped
1 egg yolk

Chocolate ganache filling
1 cup (240 ml) thickened cream
12 oz (340 g) dark chocolate, roughly chopped
1/4 cup (57 g) unsalted butter
1 tbsp orange zest (optional)

Chocolate Designs

7 0z (200 g) dark chocolate, roughly chopped

Make the pastry: process the flour, icing sugar and butter in a food processor until mixture resembles fine breadcrumbs. Add the egg yolk and process until mixture just comes together. Gently knead on a lightly floured surface until smooth. Shape into a disc. Cover with plastic wrap and place in the fridge for 15 minutes to rest.

Roll the dough on a lightly floured surface to a 3 mm-thick disc. Line an 8 inch fluted tart pan with a removable base with the pastry. Trim edges. Place in the fridge for 30 minutes to rest.

Preheat oven to 200 degrees C (180 degrees C fan-forced). Place the tart pan on an baking tray. Line with baking paper and fill with pastry weights or dried rice or beans. Bake in preheated oven for 15 minutes. Remove paper and weights and bake for a further 15-18 minutes or until pastry is golden and completely cooked. Remove from oven. Allow to cool completely.

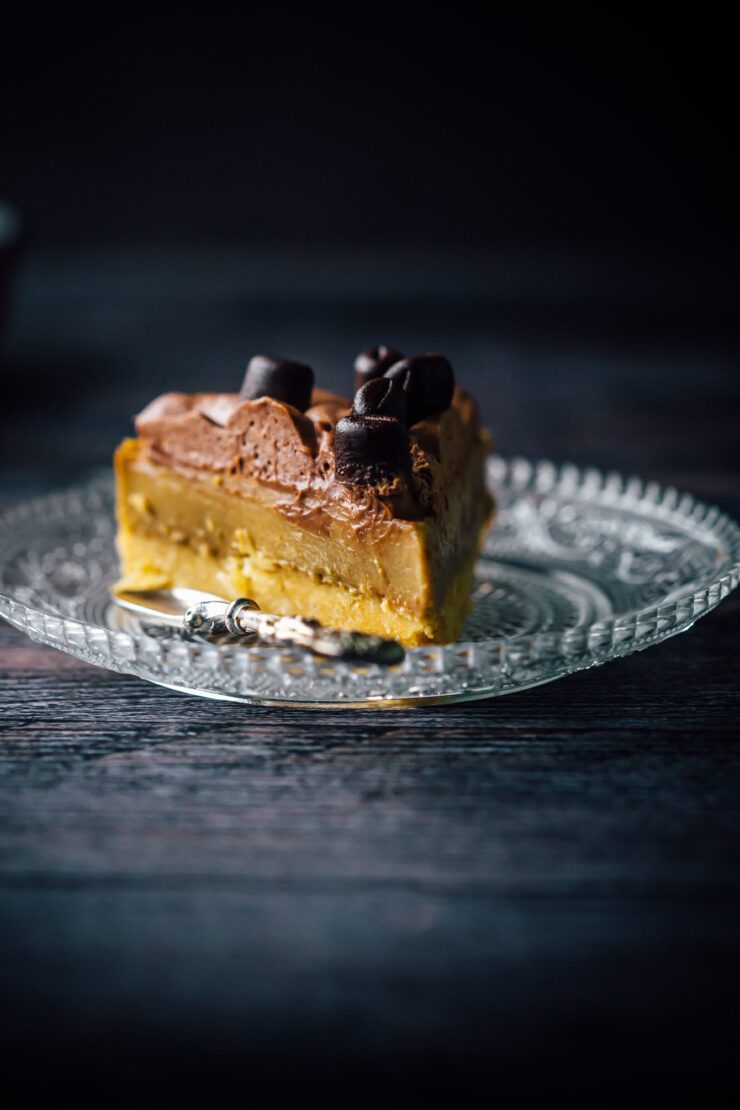
Make the chocolate filling : While the tart crust is cooling, make the filling.  Warm the cream in a medium saucepan over low heat until about to boil (do not boil). Remove from heat, add the chocolate. Leave aside whilst stirring intermittently until chocolate has melted and mixture is smooth. Add the butter, mix. Add the orange zest, if using and stir.

Allow the mixture to cool down to room temperature. Pour carefully into the baked crust. Place the tart into the fridge and allow to set, about 4-6 hours, preferably overnight.

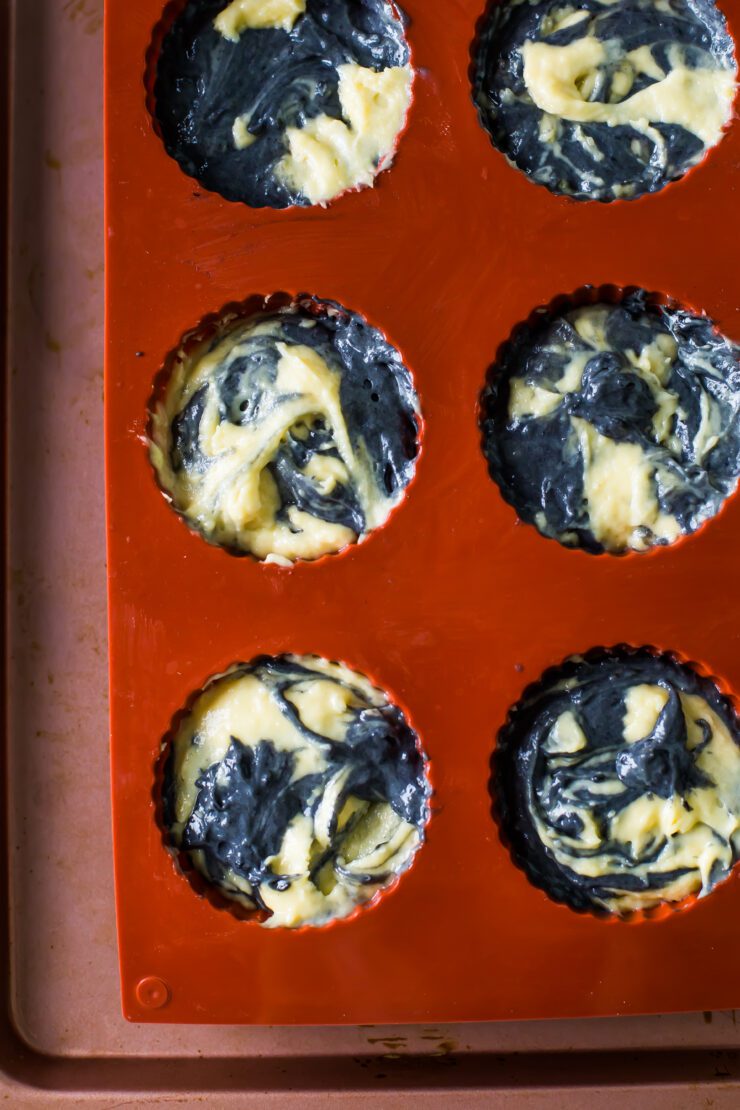
Make the chocolate decorations: In a microwave-safe bowl, microwave the dark chocolate pieces on low for 20 seconds, then remove and stir. Return the bowl to the microwave and repeat the process until all the chocolate has melted and has turned into a smooth liquid. Alternatively, the chocolate can be melted in a heatproof bowl that is placed over a saucepan of simmering water (make sure the bottom of the bowl doesn’t touch the water).

Spoon or pipe the chocolate carefully into silicone molds that is placed on a small baking sheet or plate for ease of movement into the fridge. For the leaves I used the 3 leaf mold and for the flowers, I used the crysanthemum mold. Both are from my store on the tab in the menu above. Chill in the fridge to set, about 30 minutes. Then, gently unmold and store in an airtight container in the fridge until needed.

To assemble : Once the chocolate ganache filling has set, place the chocolate decorations on top. Keep the tart in the fridge until ready to serve. Place it on a serving plate at room temperature for 30 minutes prior to serving. Slice and enjoy!

Coffee Mousse Cake

2|04|2023

How much do you love coffee? Would you be willing to replace your morning espresso with a slice of this decadent Coffee Mousse cake? Because where a rich, creamy mousse is involved, it’s hard to say no. To sweeten the pot, the coffee mousse cake is topped with a fluffy cocoa spiked whipped cream and coffee bean chocolates that are also made at home.

Coffee Mousse Cake

The coffee mousse cake involves no baking and is pretty easy to put together. You just have to pay attention the first time when you’re making a mousse. After that it gets easier because you know exactly what to expect at every step. The coffee bean shaped chocolate mold is by far the most popular item in my store ( on the menubar) at the moment. Don’t they look real? And it’s just plain dark chocolate.

It’s finally started to feel like Autumn in Sydney. Until 3 days ago, we were complaning about the extreme heat during the day but now with school holidays, we will finally get to visit the locations with colour changing leaves. I know a lot of you are in fact experiencing spring on the other side. The great thing though is that a coffee mousse cake can be made and enjoyed irrespective of the seasons or the weather. Coffee is always a good idea!

Coffee Mousse Cake

If love a good coffee dessert don’t forget to check out this Coffee Cake or these Easy Tiramisu Cups.

Coffee Mousse Cake
Makes an 8 inch round cake

Biscuit Crust
200 g (7 oz) digestive biscuits
½ cup (114 g) unsalted butter, melted

Coffee Mousse Filling
5 tsps (16 g) powdered gelatine
2 tbsp (30 ml) water
4 egg yolks
¾ cup (150 g) granulated sugar
2 tbsp (16 g) cornstarch
½ cup (120 ml) full cream milk
1 tsp vanilla extract
1 ½ cups (360 ml) double cream (divided)
1 tsp instant coffee powder

Cocoa whipped cream
½ cup (120 ml) whipping cream, whipped to stiff peaks with 1 tsp sugar and 1 tsp of Dutch processed cocoa

Coffee Bean Shaped chocolate
3.5 oz (100 g) dark chocolate, melted

Make the biscuit crust: Grease the base and sides of an 8 inch (20 cm) spring form pan with 3 inch (8 cm) height and line the base with baking paper. Place the biscuits in a food processor and process until they resemble fine crumbs. Add the butter and process briefly until combined. Press the biscuit mixture evenly over the base of the prepared pan. Place in the fridge for 30 minutes to chill.

Make the coffee mousse filling: In a small bowl, combine the gelatine and water. Leave the mixture aside to bloom.

In a heavy bottomed saucepan, combine the egg yolks, sugar, cornstarch, milk and vanilla extract. Beat with a whisk. The mixture will initially appear a bit dry bit will become smooth upon whisking. Add ½ cup (120 ml) of the cream and whisk until smooth.

Place the saucepan over low heat and cook whisking continuously until the mixture starts to thicken, about 6-7 minutes. It is important to do this slowly and steadily so the eggs don’t scramble and the cornstarch cooks evenly. The mixture is ready when it resembles custard and is thick enough to coat the back of a spoon.

Remove the saucepan from heat. Add the gelatine mixture and the instant coffee. Mix until all the gelatine is dissolved.  The heat from the custard should be enough to cook the gelatine. Strain the mixture into a large bowl. Set aside to cool to room temperature.

In a separate bowl beat the remained whipped cream (240 ml) to soft peaks. The cream should be thick enough to form soft shapes and just firm enough to hold briefly as you lift the whisk, then fall back into the cream. Fold the cream gently into the custard mixture until well combined.

Transfer the filling into the prepared pan over the biscuit base. Place in the fridge for a minimum 4 hours, preferable overnight.

Make the coffee bean shaped chocolate : Pipe the melted chocolate into a coffee bean shaped mold. Allow to set in the fridge. Unmold and keep refrigerated until needed.

When ready to serve, decorate with cocoa whipped cream. Decorate with coffee bean shaped chocolate. Slice and enjoy cold.

Chocolate Yoghurt Cake

30|03|2023

It sounds like an unusual combination but so many good, moist cakes have yoghurt in them. But the star of this cake is not the really the Chocolate Yoghurt Cake but the frosting. Rich, glossy, easy to whip up easy to pipe and ridiculously delicious.

Chocolate Yoghurt Cake

It’s time to move over ganache or buttercream and try this frosting. Who knows, maybe this is going to become your favourite new frosting.

The Chocolate Yoghurt cake cannot be any easier. It’s made by throwing all the ingredients into one bowl. Don’t you just love one bowl recipes?

Chocolate Yoghurt Cake

Love a good chocolate cake? Try my Easy Chocolate Cake with Raspberries or my Chocolate Oilve Oil cake

Chocolate Yoghurt Cake
Makes an 8 inch round Cake 

1 1/2 cups self-raising flour (188 g)
1/3 cup (40 g) Dutch processed cocoa powder
1 1/4 cup (275g) brown sugar 
1/2 cup (120 g) Greek yoghurt 
3 eggs, lightly whisked
3/4 cup +2 tbsps (approx 200 g) unsalted butter, melted 

Chocolate Yoghurt Frosting 
4 oz (113) grams dark chocolate, roughly chopped
1/4 cup ( 57 grams) unsalted butter
3 cups (360 g) icing sugar
1/3 cup (80 g) Greek yoghurt

Method: Preheat oven to 160°C. Grease and line the base of an 8 inch round pan. In a large bowl, place the self-raising flour, cocoa and brown sugar. Stir to mix. Add the yoghurt, eggs and melted butter. Beat until just combined. 

Bake for 65 to 75 minutes or until a skewer inserted in the middle of the cake comes out clean. Remove from oven, leave aside for 5 mins, then your onto a wire rack to cool completely. Once cool, pipe pr spread with chocolate yoghurt frosting. 

To make the frosting 

In a small saucepan melt the butter and chocolate. Remove from the heat and pour into a mixing bowl. Add the sugar and yogurt and mix at the lower speed until smooth. Gradually increase speed and beat until thickened. Place the bowl in the fridge for about 10 minutes to firm up.

ReplyForward

Mini Black Sesame Cake

17|03|2023

A mini black sesame cake or cakes have everything in them that makes you want to go back for seconds. They are nutty, warm, the swirls are striking to look at when you cut a cross section and they’re mini, indivudial sized portions. What is not to love, right?

Mini Black Sesame Cake

Though it doesn’t look like it, the mini black sesame cake is actually really simple to make. The swirl is made from the same batter so it’s only a matter of mixing black seasme powder into a part of a vanilla batter. Black sesame powder can be found in supermarkets and asian stores or you could make your own by gringing black seasme seeds in a grinder or mortal and pestle.

To make these, I’ve used my favourite molds that provide a beautiful shape to the cakes. You can find them at my store under Mousse and Cake Molds. You also use any round or hemisphere mold.

If you love mini cakes, don’t forget to check out these Blueberry Mini Cakes or Mini Pistachio Cakes

Mini Black sesame cake

Mini Black Sesame Cakes
Makes 6

1/3 cup (75 g) unsalted butter
1/2 cup (100 g ) castor sugar
1 egg
1 cup + 1 tbsp (133 g) self-raising flour
1/2 cup (120 ml) yoghurt
1 tsp vanilla extract
1 tbsp black sesame powder
black food colour, optional
5.3 oz (150 g) black candy melts/white chocolate tinted with black colour, melted

Preheat oven to 180 degrees C. Lightly grease/spray 6 silicone molds.
Beat the butter and sugar together until pale and fluffy. Add the eggs, one at a time, beating well after each addition until combined.
Stir in half the flour and yogurt until just combined. Stir in the remaining flour, yogurt and vanilla until combined.
Remove 1/3 of the batter into a small bowl. Add the black sesame powder and food colour if using. Dollop some of the uncoloured batter into the molds, followed by the black sesame batter. Swirl using a wooden skewer. Bake for 20 mins or until a skewer comes out clean. Remove from oven. Gently unmold and cool to room temperature.

Spread molds with melted candy melts. Place cakes back into each mold. Allow to set in the fridge (15 mins). Unmold and decorate. Enjoy!

  • « Previous Page
  • 1
  • …
  • 7
  • 8
  • 9
  • 10
  • 11
  • …
  • 111
  • Next Page »
Hey Sugar
Cake
Link to my Facebook Page
Link to my Instagram Page
Link to my Pinterest Page
Link to my Mail Page
Subscribe to this site
Fresh Awards
2019 Aus mumpreneur
2019 aus mumpreneur
Mumbrella

Copyright © 2025 · Sugar Et Al · Designed by Smitten Blog Designs · Log in