• Home
  • Recipe Index
    • Recipe Index
    • Breakfast/Brunch
    • Cakes and Puddings
    • Chocolate
    • Cookies and cupcakes
    • Custard and Mousse
    • Gluten Free
    • Ice Cream
    • Mains
    • Other Sweet Treats
    • Snack/Appetizers
    • Soups and Salads
    • Tarts and Pies
    • Vegetarian
  • About
  • Cookbook
  • Portfolio
  • Store
  • Press
  • Work with Me

Sugar et al

Because Life is a blend of flavours...

Ginger And White Chocolate Profilova (Profiteroles +Pavlova) With CSR Sugar

15|08|2016

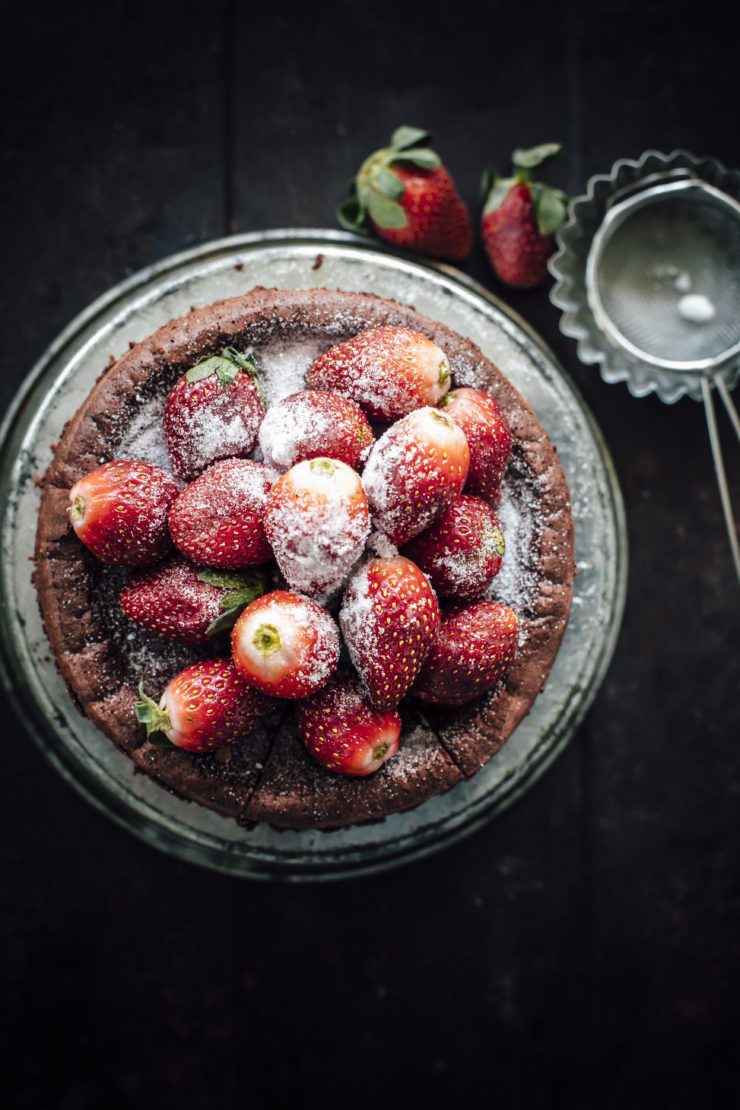
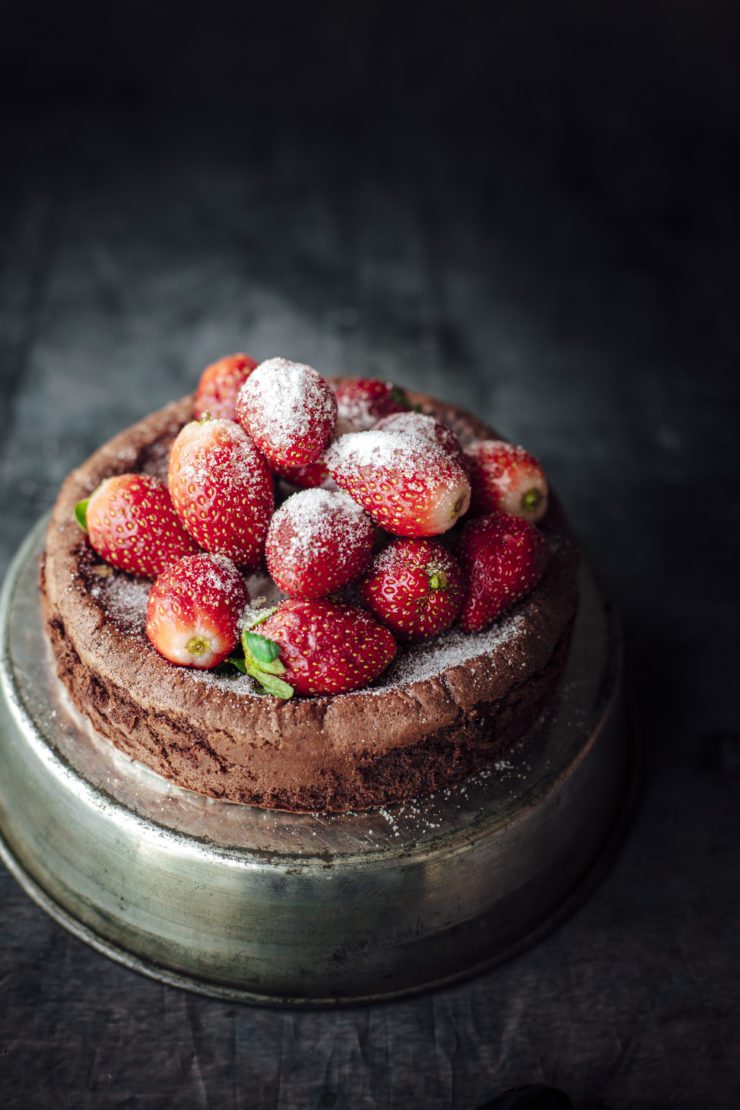
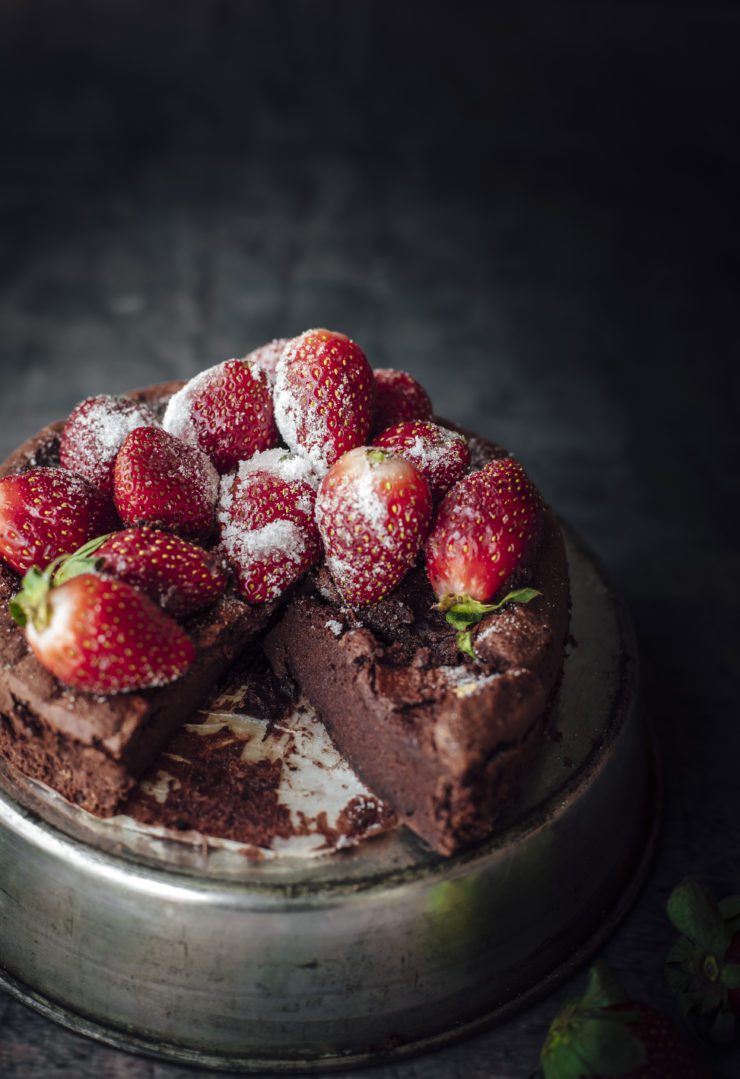
I have barely, ever seen it snow in winter in Sydney! However, a gentle dusting of sugar on baked goods reminds me of snow in winter. This is how I live my Alaskan fantasies in my own kitchen. With increased baking in the colder months, I ensure my pantry is armed with my favourite sugars (like caster sugar, brown sugar, icing sugar, jam setting sugar) and syrups (golden syrup, treacle) for me to be able to experiment with new and creative recipes for you. I love a good baking challenge and thanks to CSR Sugar for getting me excited once again this year. I was provided with the ingredients and asked to create a unique hybrid dessert. I wanted to create something different, one of a kind, something that would be a bit Aussie and represent our gorgeously, vibrant winters. Therefore I present to you my Profiterole-Pavlova hybrid, the Profilova. What do you think?

589A2485

This should come as no surprise to my regular readers that the only brand of sugar I use in my kitchen is CSR Sugar.  I have started my baking adventures with them years ago, stuck with them and cannot recommend them enough to others. A good quality sugar can create a world of difference in your baked goods and make for successful recipes every time.


589A2481-2

589A2484

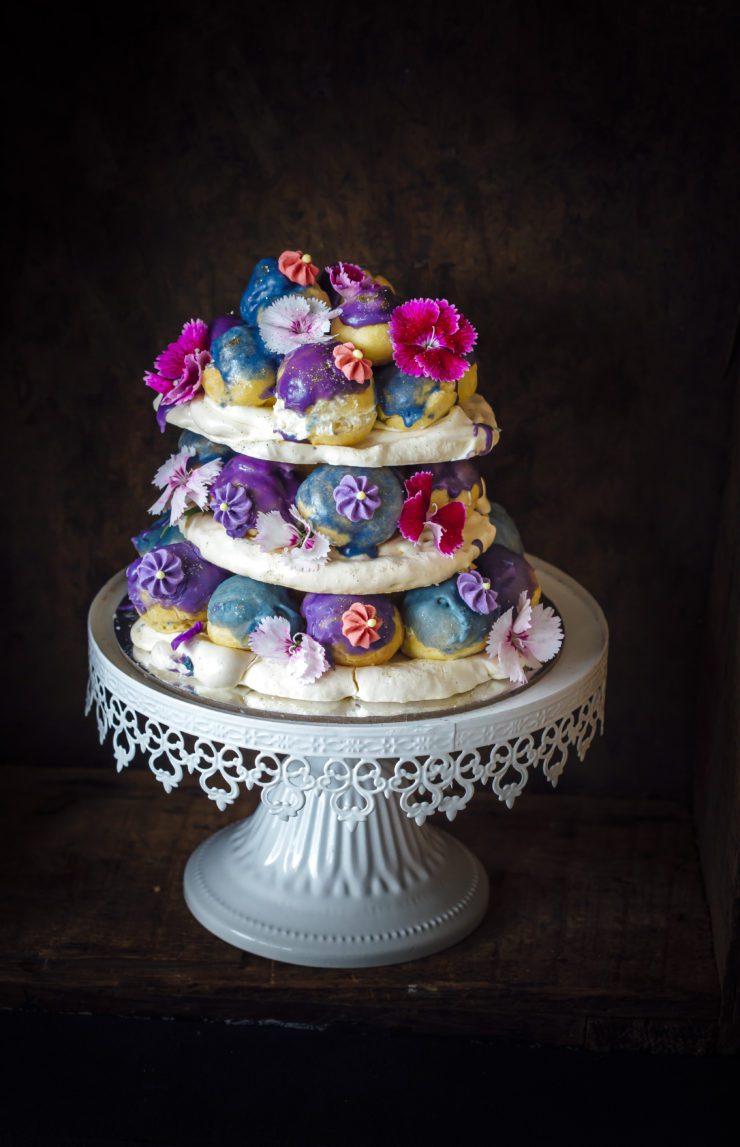
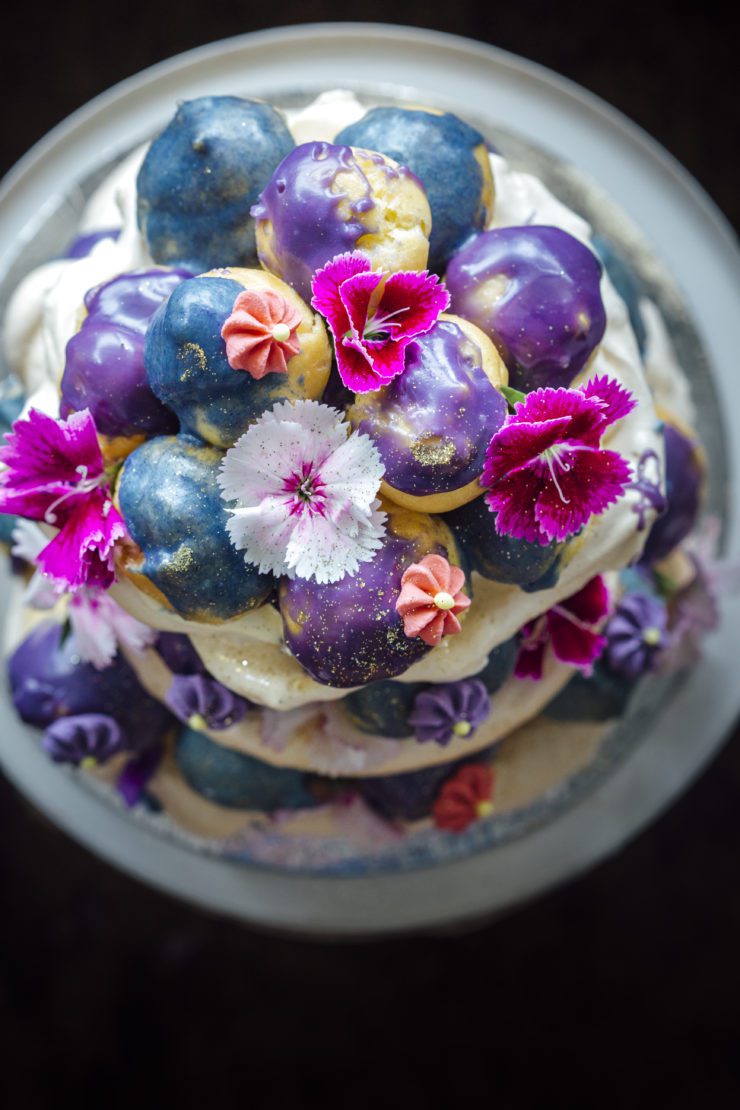
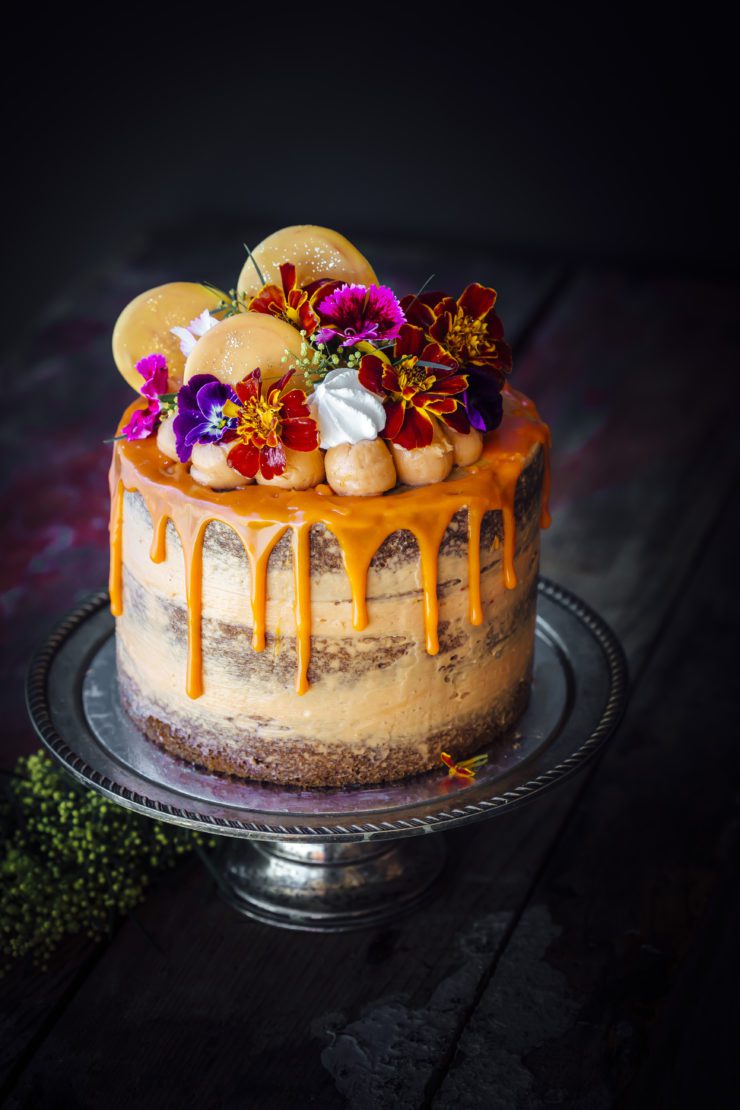
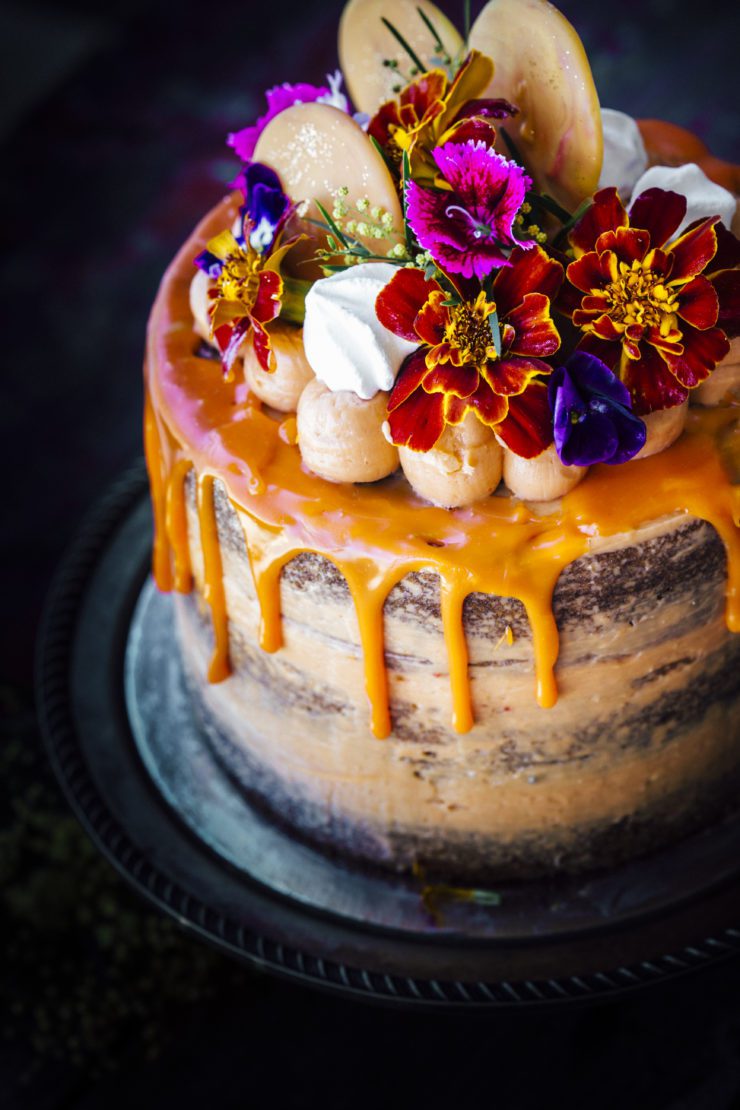
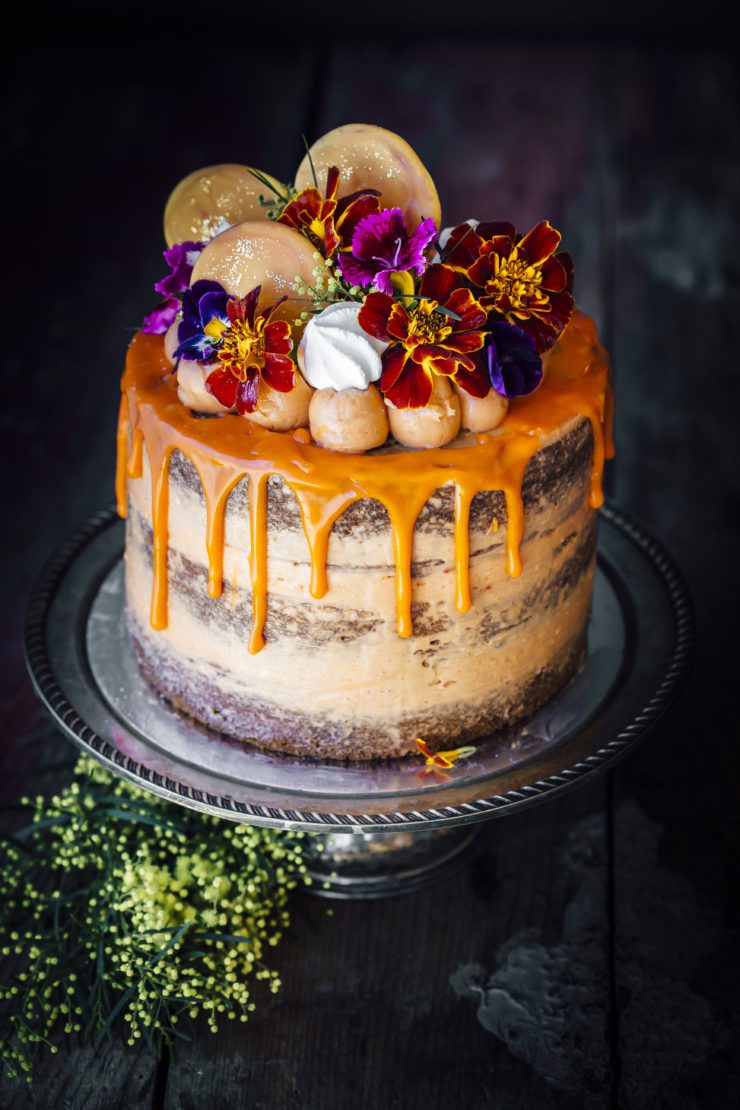
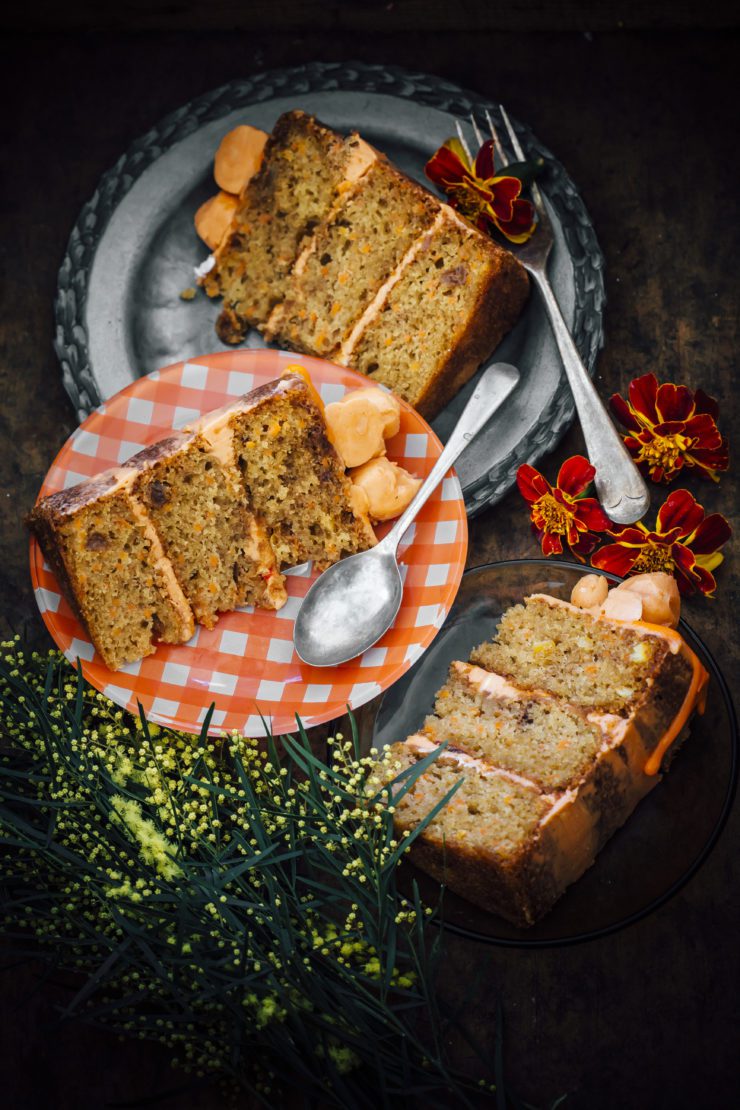
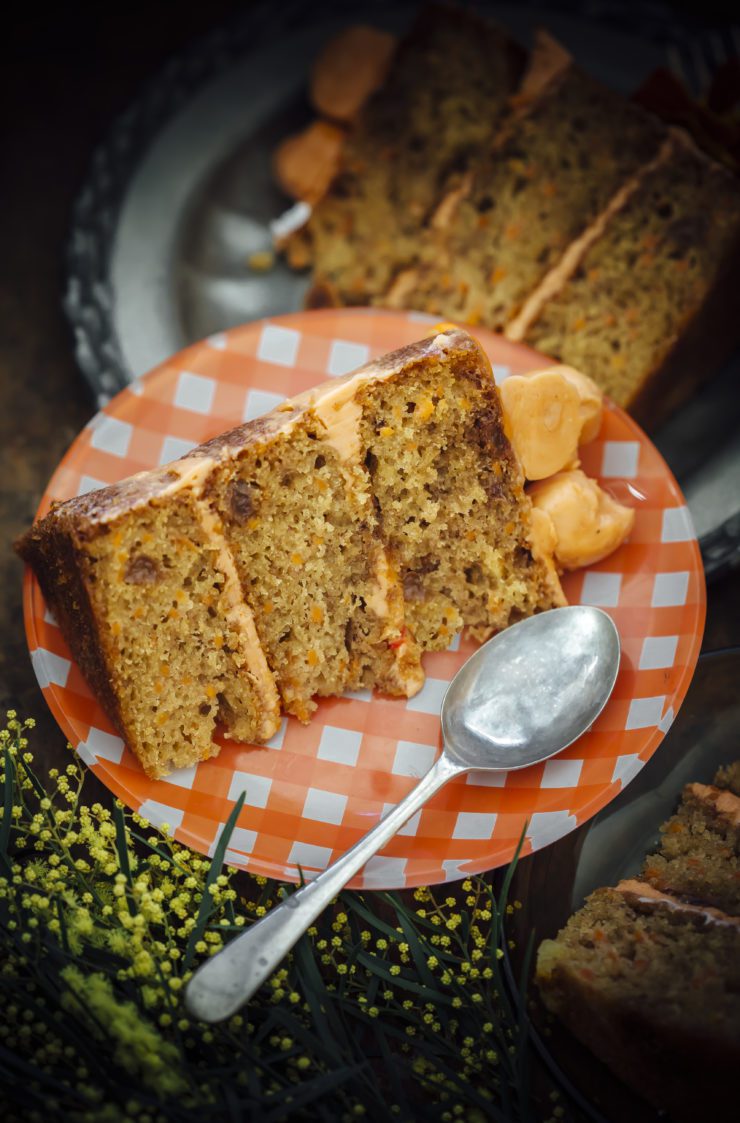
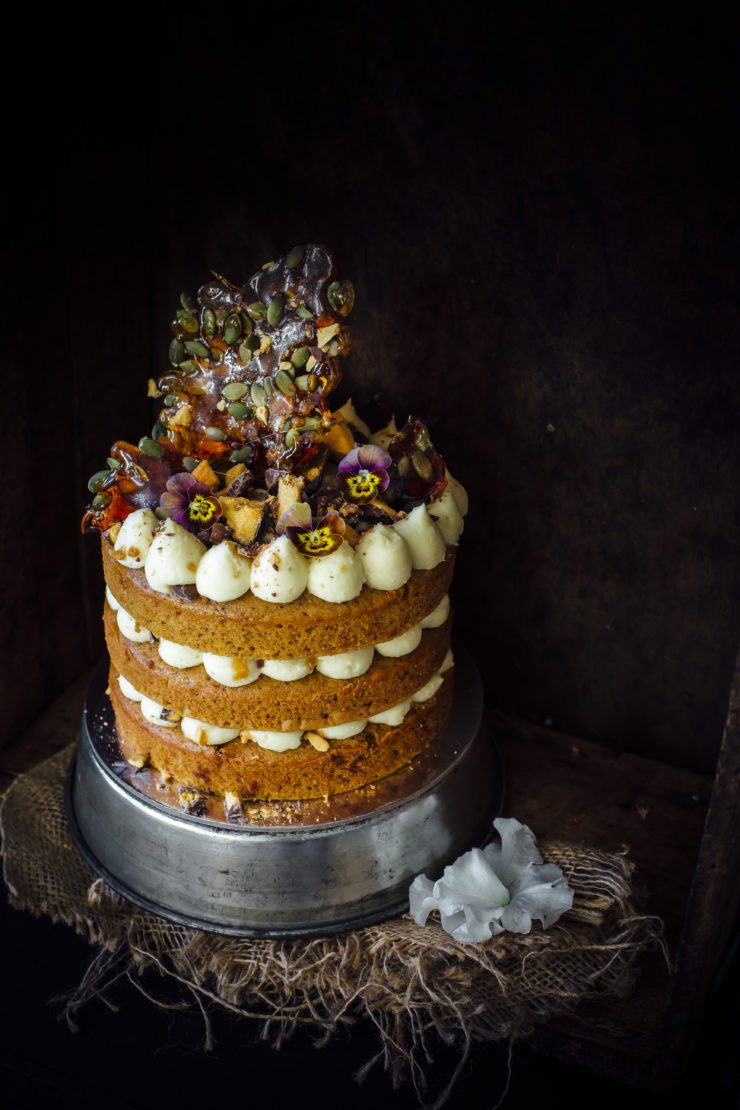
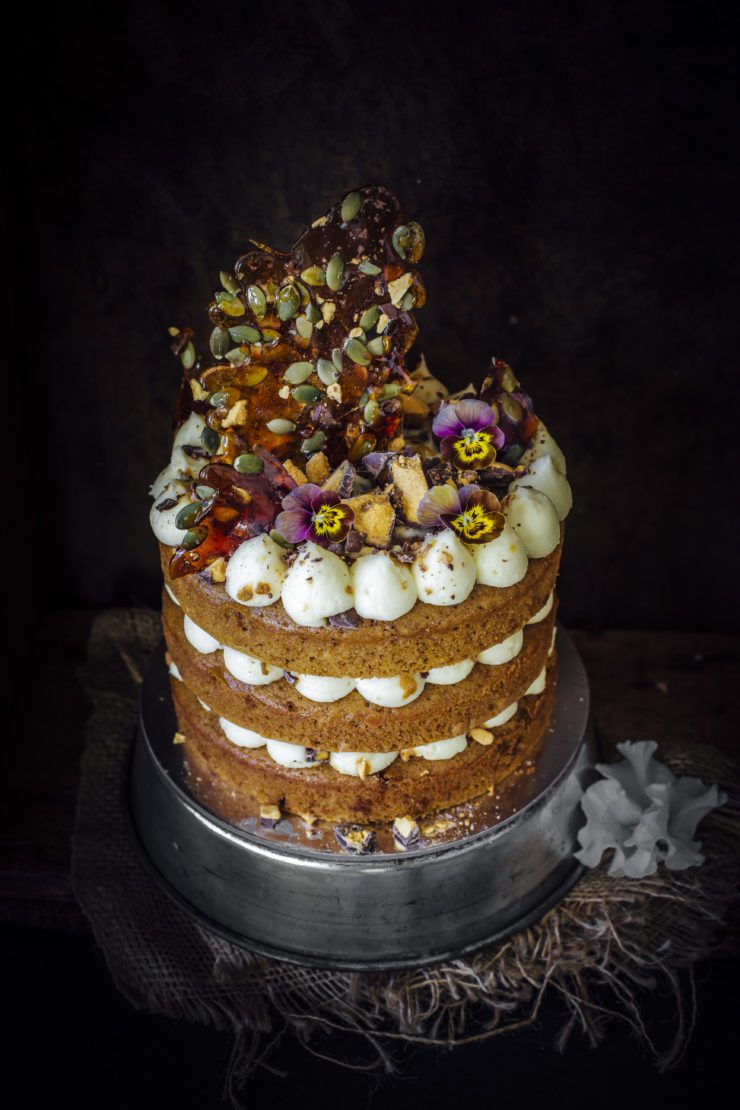
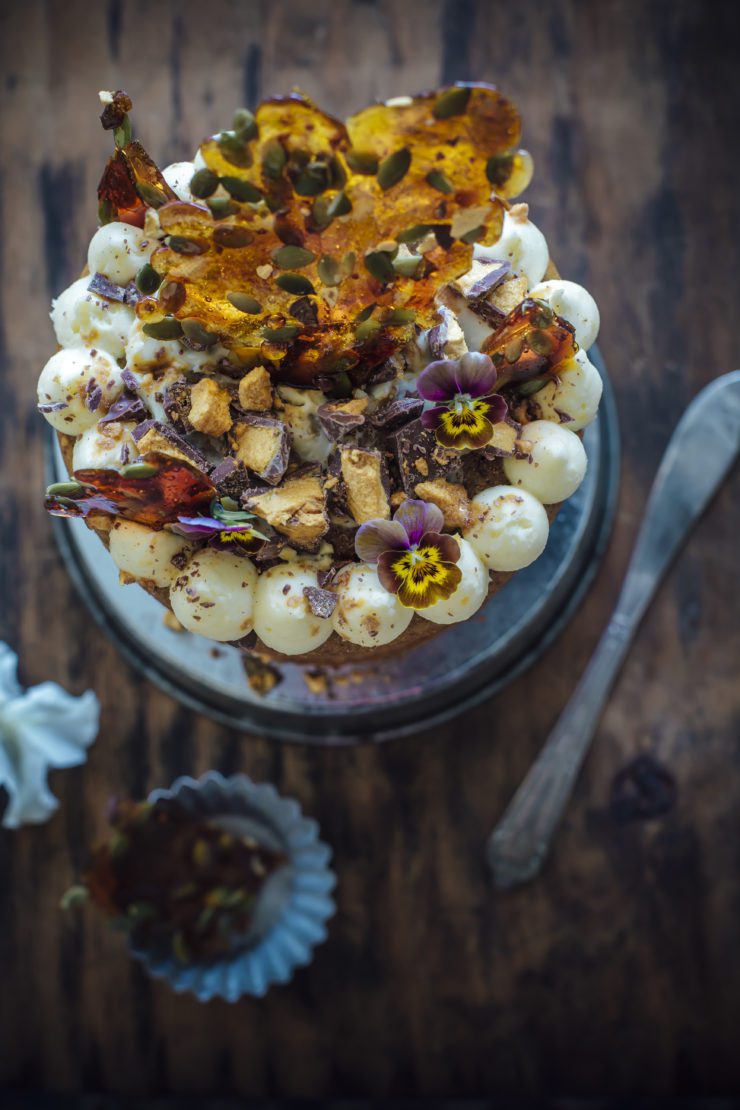
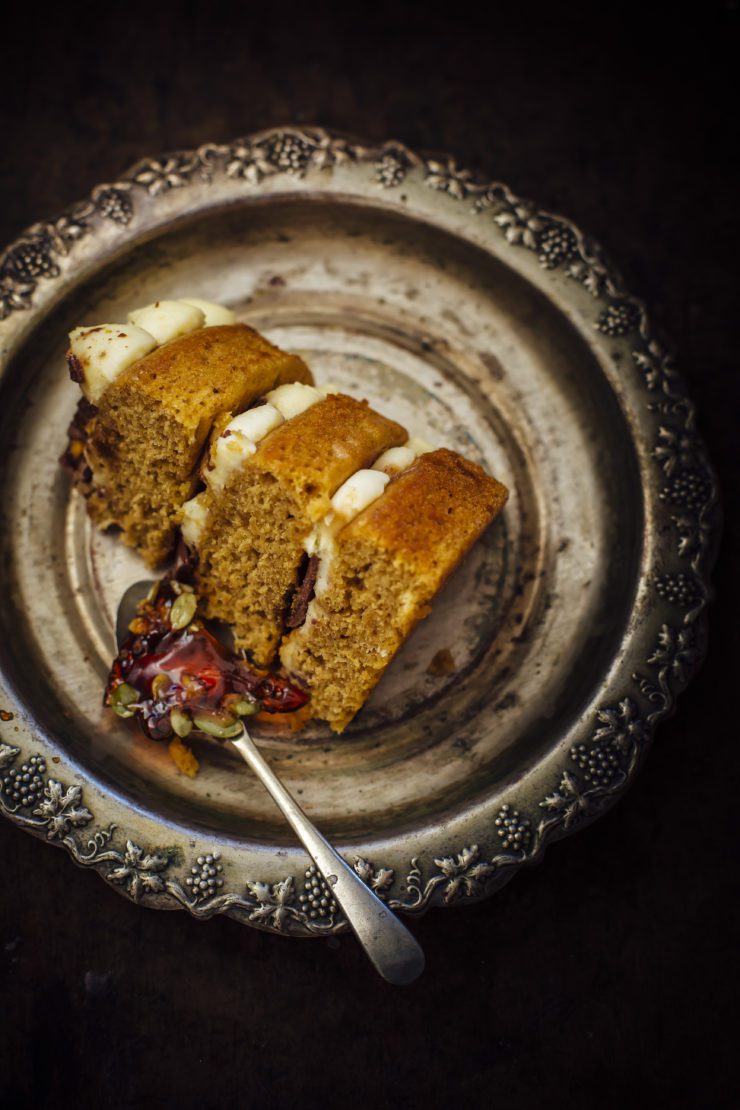
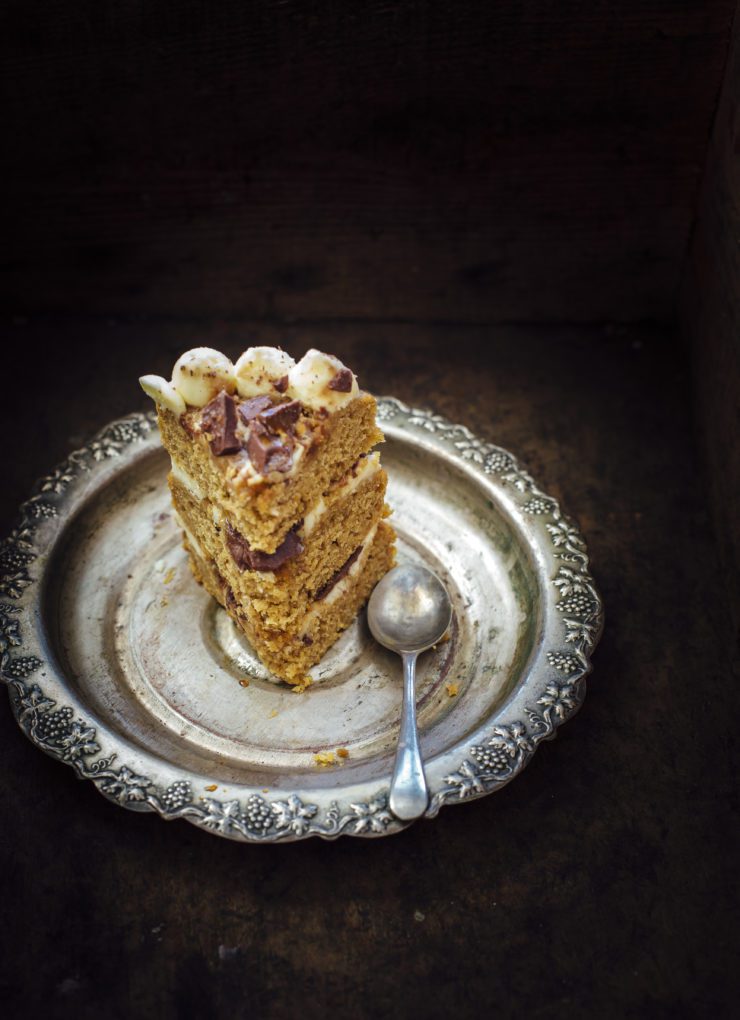
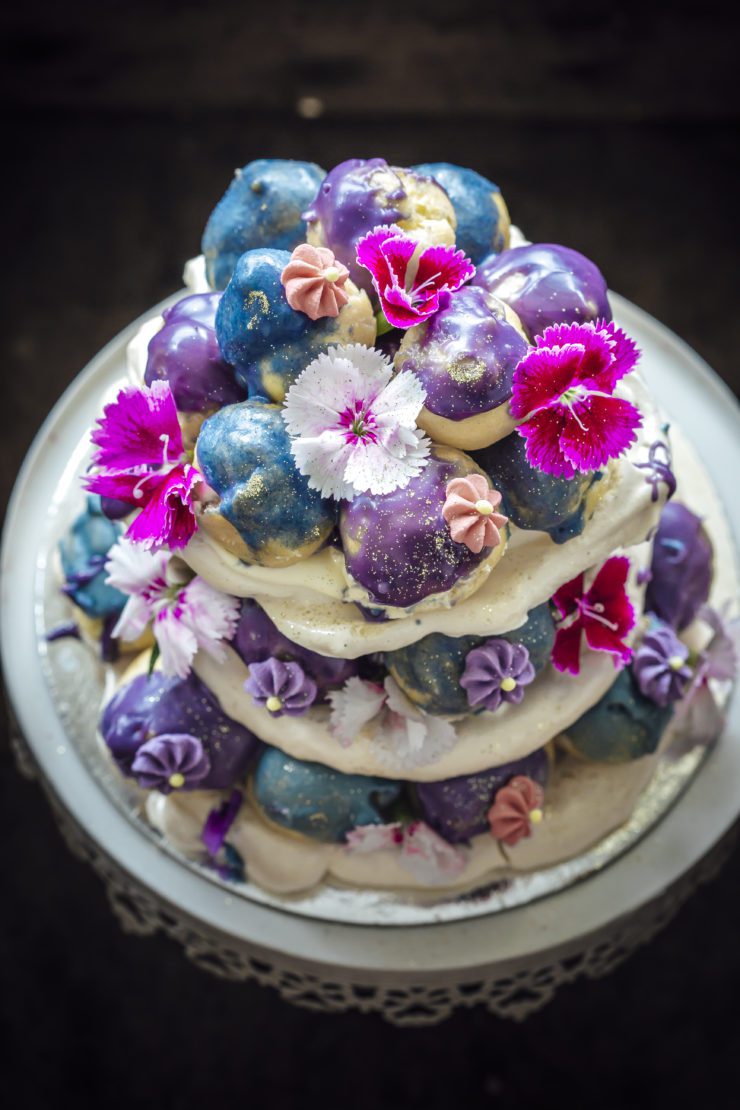
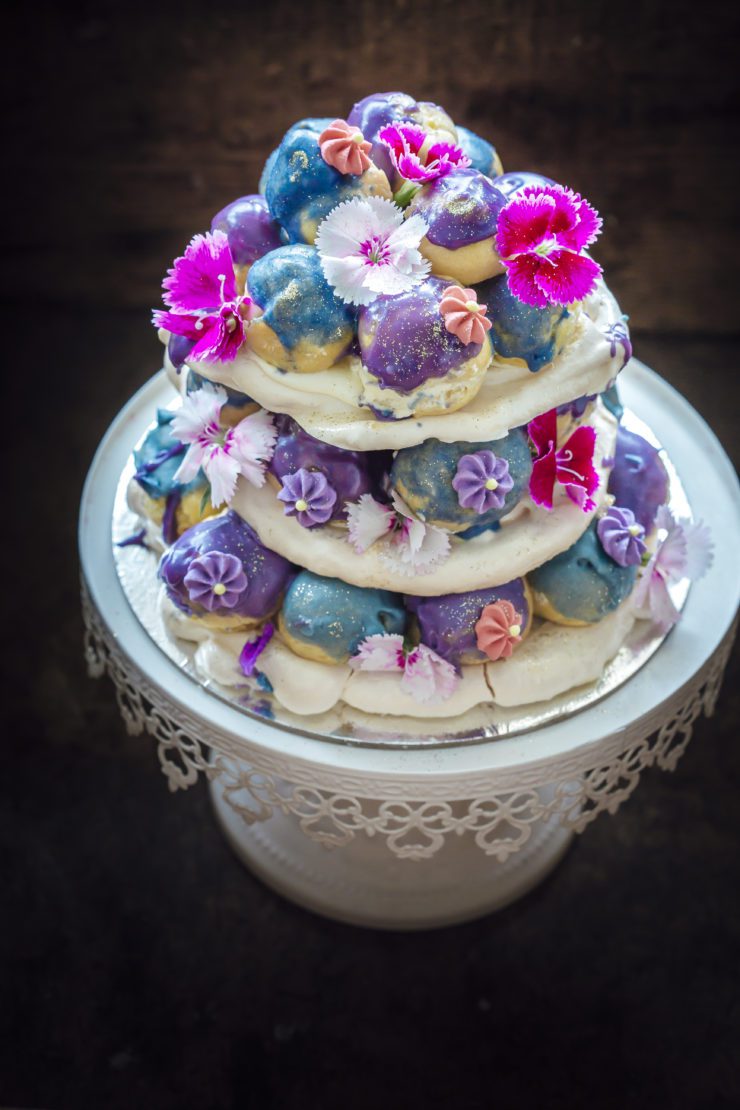
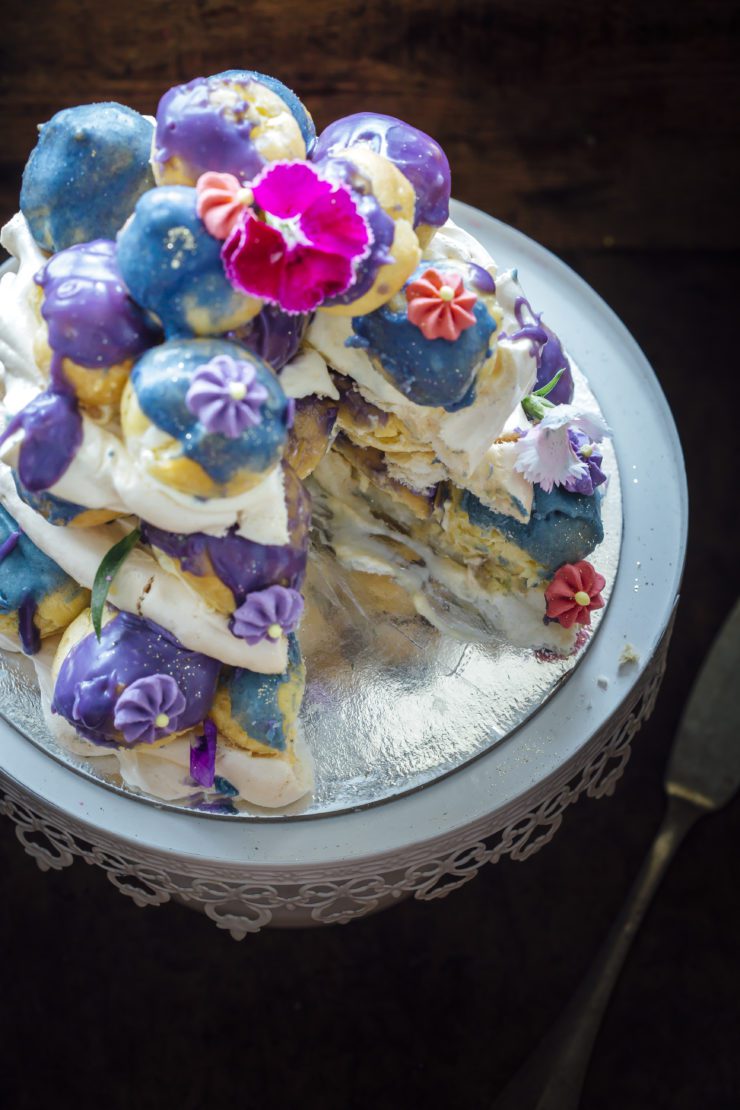
The Profilova is a layered Pavlova with 3 layers of crunchy ginger infused meringue. Sandwiched between the layers are delicious, soft profiteroles oozing with a ginger spiked whipped cream that are dipped in coloured white chocolate ganache for the ultimate flavour and texture explosion in your mouth. The amazing part of the Profilova is that all the elements can be made ahead and assembled a couple of hours before serving it to your guests. It makes for an impressive wedding table centrepiece or a celebration dessert or even a cosy Sunday treat to tuck into when the whole family is together,. Winter is all about comfort food, warm spices and indulgent sweet treats and the Profilova is all of that and more.

589A2483

So now tell me dear readers, what is your favourite winter baking fantasy? Do you try to be adventurous in the kitchen and combine two recipes into one, like a cake pop (cake +lollipop) or maybe a brookie (brownie +cookie)?

589A2486

Disclaimer : This post is brought to you by CSR Sugar and Baking Nation. All opinions expressed in this post are entirely my own.


Ginger and White Chocolate Profilova
Makes a 3 layered Pavlova stack with 24 profiteroles between the stacks that have been filled with ginger infused cream and dipped in tinted white chocolate ganache.

Layered Pavlova
11/2 cups CSR caster sugar
11/2 teaspoons cornflour
1/2 teaspoon powdered ginger
5 large egg whites (or 6 regular egg whites)

Profiteroles
60 g butter, chopped
3/4 cup (185 ml) water
3/4 cup (115 g) plain flour
3 eggs

Ginger Infused Cream
11/2 cups chilled whipping cream
3 tablespoon CSR caster sugar
¾ tsp powdered ginger

Coloured White Chocolate Ganache

1/2 cup heavy/thickened cream
1 cup white chocolate melts
a few drops of purple food colour
a few drops of blue food colour

Method
Make the layered Pavlova : It is best to make the pavlova layers the previous night and leave them in the oven all night to dry out.
Preheat oven to 120 degrees C (100 degrees C for fan-forced ovens) Draw 3 circles (7 inch, 6 inch and 4 inch) on a sheet of baking paper, turn the sheet over and place them on baking trays.
Combine sugar, cornflour and powdered ginger in a bowl.

Using electric beaters, whisk the egg whites in a clean, dry bowl until firm peaks form. Gradually add the sugar mixture, 1 tablespoonful at a time, until the sugar dissolves and the mixture is thick, glossy and holds stiff peaks. Divide among the circles on trays and spread over evenly. Bake for 1 hour 30 minutes, then leave to cool in switched-off oven for overnight (or at least for an hour if you are in a hurry). Leave the door ajar by sticking a wooden spoon in between. Remove from oven and cool completely.

Make the Profiteroles : Preheat oven to 200 degrees C (180 degrees C for fan-forced). Line a baking tray with non-stick baking paper.

Heat the butter and water in a medium saucepan over medium heat until butter melts and the mixture comes to the boil. Remove from heat. Sift in the flour. Use a wooden spoon to beat for 1-2 minutes or until mixture comes away from side of pan. Transfer mixture to a heatproof bowl. Set aside, stirring occasionally, to cool slightly.

Using an electric mixer, beat in the eggs, 1 at a time, beating well after each addition, until mixture is thick and glossy.

Pipe the mixture or place tablespoonful of mixture on the prepared baking tray 3 cm apart from each other. Use wet hands to pat down any peaks of dough. Sprinkle trays with water to create steam. Bake for 30-35 minutes or until puffed and golden.

Turn off the oven. Use a knife to pierce the base of each puff. Place the puffs in oven for 20 minutes to dry out. Transfer to a wire rack to cool. Store at room temperature until needed.

Make the ginger infused cream : In a bowl (which has been chilled in the freezer for 10 minutes) with an electric mixer, beat the cream until it just holds stiff peaks, add the sugar and the ground ginger, and beat the mixture until it holds stiff peaks.  Refrigerate until needed.

Make the purple and blue White Chocolate Ganache : In a small saucepan over low heat,  heat the cream until it is just about to boil (do not boil). Remove from heat and add the white chocolate melts. Allow the cream and chocolate to sit for a few minutes to allow the chocolate to melt. Then, whisk until all the chocolate is completely melted and you have a smooth and uniform mixture. Divide this into two bowls. To the first bowl add the purple food colouring and to the second one, add the blue food colouring until you reach the desired shade.

Assembly: Make a hole in the centre of each profiterole. Fill up a piping bag with the ginger infused cream and pipe a little cream inside the hollow of each profiterole. Dip the tops of the profiteroles in coloured white chocolate ganache. Decorate with sugar flowers or sprinkles if desired. Keep aside to set.

Place the largest Pavlova layer on a cake plate or stand. Spread 2 tablespoons of the ginger infused cream. Place profiteroles all over the base of the Pavlova. Place the second layer. Repeat with cream and more profiteroles. Place the last layer. Repeat. Sprinkle with gold dust and decorate with edible flowers.


Orange and Carrot Cake

27|07|2016

The best part about winter for a person like me who does not really enjoy the cold is definitely the food. I like a bit of spice in everything, sweet or savory! I noticed that I’ve been using nutmeg a lot this winter as compared to the rest of the year when the spice is lying quietly in one corner of my cupboard.  What is a Winter without Carrot Cake? The Internet is flooded with Carrot cake recipes and there is no point in me adding just another one. So I’ve combined the flavours of a classic carrot cake with zesty oranges and the marriage is nothing short of a flavour explosion! Think of warm spices, soft caramel kissed Carrot Cake, the bitterness of orange marmalade and just a touch of sweet white chocolate. I’ll let the pictures do the talking for you.

Orange and Carrot Cake

Orange and Carrot Cake

Cakes like these don’t need tonnes of buttercream. It is there in the cake to cement the flavours and the layers together. So I have applied a thin coat of swiss meringue buttercream and a generous amount of orange marmalade to complement the cake. One important factor that I always stress on is that making a cake should not mean toiling away in the kitchen or an elaborate prep. I did not even grate the carrots at home this time. The supermarkets sell shredded carrots that obviously differ in thickness. I’ve been meaning to try them out as I was pretty sure they would add a bit more texture to the soft cake. I was right! So I easily skipped the longest step in making a carrot cake. The top as quite a few of you asked me on Instagram is entirely edible. There are meringues, edible flowers and little candy discs that I created in a two-tone effect using candy melts. I sprinkled a bit of gold dust on them. They are are my favourite new experiment and they just take your desserts to a whole new level. You know what, I can’t wait till Christmas. I am all about sprinkles, chocolate and candy already.

Orange and Carrot Cake


Orange and Carrot Cake

Orange and Carrot Cake

Orange And Carrot Cake (carrot cake adapted with variation from Epicurious)
Makes a 6 inch, 3 layered round cake

1 1/2 cups vegetable oil
|1 cup (packed) golden brown sugar
3/4 cup castor sugar
4 large eggs
1/3 cup orange juice
1/4 cup citrus peel (or 1 tbsp freshly grated orange peel)
2 cups self-raising flour
11/2 tsp baking soda
1 tsp ground cinnamon
1 tsp ground ginger
1/2 tsp ground nutmeg
1/2 teaspoon salt
2 cups finely grated peeled carrot
1/2 cup raisins
Cinnamon swiss meringue buttercream (recipe below)
1/2 cup Orange Marmalade
Decorations- meringue kisses, edible flowers, candy discs, grated chocolate

Cinnamon Buttercream
4 egg whites
1 cup castor sugar
300 g unsalted butter, room temperature, cubed
1 tsp powdered cinnamon
1 tsp vanilla essence
2-3 drops of orange food colouring (I used a mix of red and yellow coloring)

For the orange colored, white chocolate ganache
100 g white chocolate, roughly chopped
3 tbsp heavy cream
3-4 drops of a mix of red and yellow food colour

Preheat oven to 170 degrees C. Lightly grease the sides and bottom and line the bottoms of 3, 6-inch pans with non-stick baking paper.

Using an electric mixer (or by hand), beat oil and both sugars in large bowl until well blended. Add eggs 1 at a time, beating well after each addition. Beat in orange juice and peel. Sift flour, baking soda, cinnamon, ginger, nutmeg and salt into large bowl; add to sugar mixture and beat to blend. Stir in carrots and raisins.

Pour batter into the prepared pans. Bake until a wooden skewer inserted into center of cake comes out clean, about 25 minutes. Remove from oven. Cool cake for 10 minutes. Turn cake out onto a wire rack. Remove baking paper and cool. (Can be prepared 1 day ahead. Wrap tightly in plastic and store at room temperature.)

To make the cinnamon swiss meringue buttercream
Place the egg whites and sugar in a large bowl that is placed over a saucepan of simmering water (over low heat), and whisk continuously, until the sugar has completely dissolved and the bottom of the bowl is warm to touch

Remove the bowl from the heat and whip on high speed until meringue holds stiff peaks and looks glossy. The bowl should have completely cooled by now.
Add the butter, 2 tablespoon at a time, until thick and fluffy. If it begins to look curdled, continue to whip until it comes back together, before adding in remaining butter.
When the buttercream is smooth and has come together, add the cinnamon, vanilla and  food color and whip gently again to blend.

To make the orange colored, white chocolate ganache: Heat the white chocolate and heavy cream over very low heat in a small saucepan. When cream just reaches boiling point, remove from heat and leave aside. Stir with a spoon to make a smooth mix. Add the food colour and stir to blend.

To assemble 
Once the cake layers are completely cool, start assembling..
On a cake plate or stand, spread a little buttercream in the centre and place one layer of the cake (so that the cake does not move about while frosting). Spread about 1/2 a cup of cinnamon swiss meringue buttercream. Spread half the quantity of orange marmalade. Place the second layer. Repeat. Place the last layer upside down (so you get a flat top). Spread buttercream on the top and sides. If you want to make it look like a naked cake, a thin layer of frosting is good enough.
Stick the cake into the refrigerator for 15-20 mins.
Make the white chocolate ganache 5 minutes before you take the cake out from the fridge.Once the ganche is cool, but still flowing freely when you lift it with a spoon, spoon it onto the cake slowly. Be gentle on the edges to create the drippy effect.
Decorate with meringues, candy and edible flowers.


Pumpkin Cake With Cream Cheese Frosting

8|07|2016

After making this cake and literally fighting for a small piece with friends and family to at least figure out what this was all about, I wondered why I haven’t made a pumpkin cake before. I seriously wonder! I mean how gorgeous is the combination of brown sugar, spices, cream cheese and salted caramel. Oh and chocolate coated honeycomb that is the crunch factor hidden between those layers. It is one of the best things I had lately.

pumpkin cake with cream cheese frosting

Pumpkin puree is probably one of the reasons if not the only one to blame. We don’t get canned puree in Australia which I feel is so unfair because a Pumpkin cake deserves to be a part of every cafe and bakery for it’s simplicity and beautiful flavours. The fact that it does not taste of pumpkin but more like a moist, spiced, caramel cake is perhaps unknown to many. Don’t get me wrong, It’s not that making puree from scratch is a big deal for me but I always felt that there is something extra special in those canned purees which is why they are so widely used in America in the colder months. But after a little research and a bit of testing, I succumbed to the fact that there is not going to canned puree anyway so if I want a Pumpkin cake, I might as well figure out my own way of doing it.

pumpkin cake with cream cheese frosting

pumpkin cake with cream cheese frosting

We had friends over for dinner and I decided to cook Italian. It should come as no surprise to you that I start planning backwards from dessert. So I whipped up a quick Tiramisu and the stress was off my back. When dessert is sorted out, I am relieved! Even if the meal is a disaster, there will be dessert to make up for everything. Ha! I think I am quite fortunate to have friends for guests who think that way too. Otherwise ,just imagine who would ever come to my place?! Anyway, no one even bothered to taste my Tiramisu. They wanted the Pumpkin cake and went back for seconds until I had to plead with them to spare a single piece for my photos. Did I tell you these kind of cakes have a name at my place? They are called ‘blob cakes’ by my dear children who declared that Mum is ‘blobbing’ frosting on the layers. Basically, the way the piping goes for these cakes.

‘Blobbing’ is actually a stress buster, especially when it yields such a delicious result!

pumpkin cake with cream cheese frosting

pumpkin cake with cream cheese frosting

Notes :

  • I made 3 layers out of the cake batter. You could make two as well. The cooking time will increase by 7-10 minutes.
  • Honeycomb is a light, crunchy toffee made out of brown sugar or golden syrup or molasses. It can be made at home or store bought. In this recipe, you could substitute it with chocolate chips or shaved chocolate.
  • Make sure the salted caramel sauce is thick enough to stay in one place. The consistency thicken  when stored in te refrigerator.
  • To make pumpkin puree from scratch, read here.

Pumpkin Cake
Makes a 6-inch, 3 layered, round cake (adapted with slight variation from Joy of Baking)

120 g unsalted butter, room temperature
11/4 cups firmly packed light brown sugar
2 large eggs
1 cup (about 220 g) pumpkin puree
1 tsp vanilla extract
2 cups self-raising flour
1/4 tsp salt
1/2 tsp ground cinnamon
1/4 tsp ground ginger
1/4 tsp nutmeg
1/2 cup buttermilk (120 ml), room temperature
Cream Cheese Frosting (recipe below)
Salted Caramel Sauce (recipe below)
Chocolate coated honeycomb (store bought). If not available, you could use, shaved dark chocolate or chocolate chips

Cream Cheese Frosting
225 g full fat, cream cheese
50 g unsalted butter, room temperature
11/2 tbsp maple syrup
2 cups icing/powdered sugar

Salted Caramel Sauce
50g butter
1 cup (220g) brown sugar
1 cup (250ml) cream
1 tsp sea salt

Preheat oven to 180 degrees C. Lightly grease and line the bottom of 3 round 6 inch cake tins with baking paper.

In the bowl of your electric mixer or with a hand mixer, beat the butter and sugar until light and fluffy (about 3 minutes). Add the eggs, one at a time mixing well after each addition. Add the pumpkin puree and vanilla extract and beat until incorporated (the batter will look curdled).

In a separate bowl, whisk together the flour, salt and spices. Add the flour mixture and buttermilk alternately to the batter in three additions beginning and ending with the flour mixture. Evenly divide the batter between the cake tins. Bake for approximately 15-20 minutes, or until a toothpick inserted in the center of the cake just comes out clean. Cool in the pan for 10 minutes, then turn the cakes out onto a wire rack to cool. Once completely cooled, frost the cakes.

To make the cream cheese frosting, place the cream cheese and butter in a bowl and whip until smooth and blended. Add the maple syrup and icing sugar and beat until light and creamy. Add more sugar or maple syrup as needed.

To make the salted caramel sauce, combine butter, sugar and cream in a saucepan over low heat until butter melts and sugar dissolves. Bring sauce to a boil, reduce heat and cook for 5-6 minutes or until sauce thickens slightly.  Remove from heat and add the salt.

To assemble : Spread a tiny bit of the frosting on a cake plate or stand and place the first layer in the centre. Using a round tip, pipe little kisses of frosting on the cake leaving a circle in the middle. I piped two rows. Spoon two tablespoons of the salted caramel in the middle and drizzle a bit on the frosting. Place the crushed honeycomb/chocolate chips on the frosting and sauce. Repeat with the other two layers. Decorate with sugar shards (optional)

2 Ingredient Chocolate Cake

10|06|2016

Remember a few days ago I shared an Eggless Chocolate Cake? Things have reversed in this post and now we are talking about the dynamics of the egg. So the 2 ingredient chocolate cake obviously has chocolate and the other ingredient is the egg. The incredible egg! (Actually eggs here). Eggs are powerful enough to provide structure, stability, richness and moisture to baked goods. The yolk and the egg whites separately are used in a variety of desserts because they have very different functions and outcomes. When they are separated and then used together they provide the basis of something unique like this cake. No flour, no leavening agent, no butter, just the incredible chemistry of the egg and the chocolate. Talking about chemistry, did I tell you that I have graduated with that subject? Maybe that’s why I enjoy baking and my little experiments so much.

2 Ingredient Chocolate Cake

You might wonder if the final outcome is a compromise in texture or flavour. Well, not at all! It’s stable, luscious, soft and just delicious. At first, it seems like a flan but it’s a lot lighter with a melt in your mouth feeling to it. My non-sweet loving husband finished half the cake when I first made it. The 2 ingredient chocolate cake has a cracked up rustic look that I simply adore. Some fresh fruit and a touch of icing sugar and that’s all you need.

2 Ingredient Chocolate Cake

The creator of this cake is not me! I found it while I was looking for a flourless cake. I had to give it a go just to see the magic for myself. And I just had to share it because I know many will benefit from this. I made it over and over again with flavoured chocolates to retain the 2 ingredient tag. I used Lindt Orange, Raspberry and Sea Salt and the results were amazing. I am not very fond of ultra bitter chocolates so I normally swap a quarter portion of the dark chocolate with milk chocolate.

2 Ingredient Chocolate Cake

2 Ingredient Chocolate Cake

The great news is that there is a video of the recipe so I am going to direct you there. Follow the instruction carefully and you will love the outcome! Let me know how it turns out. Have a wonderful weekend you guys! We have a long one and I realized I have too many sweet things sitting in my fridge. If you are on Instagram, I do share my adventures daily so you can see what I am making. Sweet, of course!

2 Ingredient Chocolate Cake

2 Ingredient Chocolate Cake
Makes a 6 inch round cake

165 g chocolate (dark, milk or a mix)
3 eggs

For directions and process you could watch the video here

Preheat oven to 170 degrees Celsius (338 F). Whisk three egg whites to form stiff, meringue-like peaks.

Melt 165 g of milk chocolate.

Add the three remaining egg yolks to the chocolate and whisk. Add the third of the of the whites and whisk. Continue with adding the rest of the whites with with a spatula.

Line a round 6 inch baking pan with baking paper and pour in the mixture. Drop the pan on the bench to get rid of any bubbles. Bake for 30-40 minutes, allow to cool.

Enjoy on it’s own or with fresh strawberries or ice cream.


  • « Previous Page
  • 1
  • …
  • 23
  • 24
  • 25
  • 26
  • 27
  • …
  • 46
  • Next Page »
Hey Sugar
Cake
Link to my Facebook Page
Link to my Instagram Page
Link to my Pinterest Page
Link to my Mail Page
Subscribe to this site
Fresh Awards
2019 Aus mumpreneur
2019 aus mumpreneur
Mumbrella

Copyright © 2025 · Sugar Et Al · Designed by Smitten Blog Designs · Log in