• Home
  • Recipe Index
    • Recipe Index
    • Breakfast/Brunch
    • Cakes and Puddings
    • Chocolate
    • Cookies and cupcakes
    • Custard and Mousse
    • Gluten Free
    • Ice Cream
    • Mains
    • Other Sweet Treats
    • Snack/Appetizers
    • Soups and Salads
    • Tarts and Pies
    • Vegetarian
  • About
  • Cookbook
  • Portfolio
  • Store
  • Press
  • Work with Me

Sugar et al

Because Life is a blend of flavours...

Dark and White Chocolate Gypsy Cake

15|04|2014

Responsibility is a such a big word. To some it means power…ownership to others…trust..possession and perhaps so much more to the rest. As the eldest of three children, the very first responsibility I was entrusted with was my baby sister. I was five something when she came. And to me that responsibility meant a metamorphosis. A slow but steady transformation of my entire being.

IMG_9306-text

As much as many would like to disbelieve today (yes, I talk a lot), I was a quiet and introvert-ish child. Perhaps the only conversations I would have were with my dolls, blankets and pillow. I would refuse to go to anybody or play with other children and hide behind the comfort of my mother’s back when I spotted another human being. Being a mother myself today, I can only imagine what a stress I might have been to my parents. Then came the little girl, cooing and gurgling into my world. At times I hated her for taking away the attention of my parents but unable to resist her charm as she stuck out her little fingers every time I went near her and returning my cold stares with her toothless grin. As I grew to love her, confide in her..I found myself being so utterly protective of my sister. That remains even today. With her arrival, I found my voice..I learnt to share..to open up and the world became a happier place for me. We grew closer, bonded like only sisters would and shared a friendship that was comparable to none other. We still do.

IMG_9304

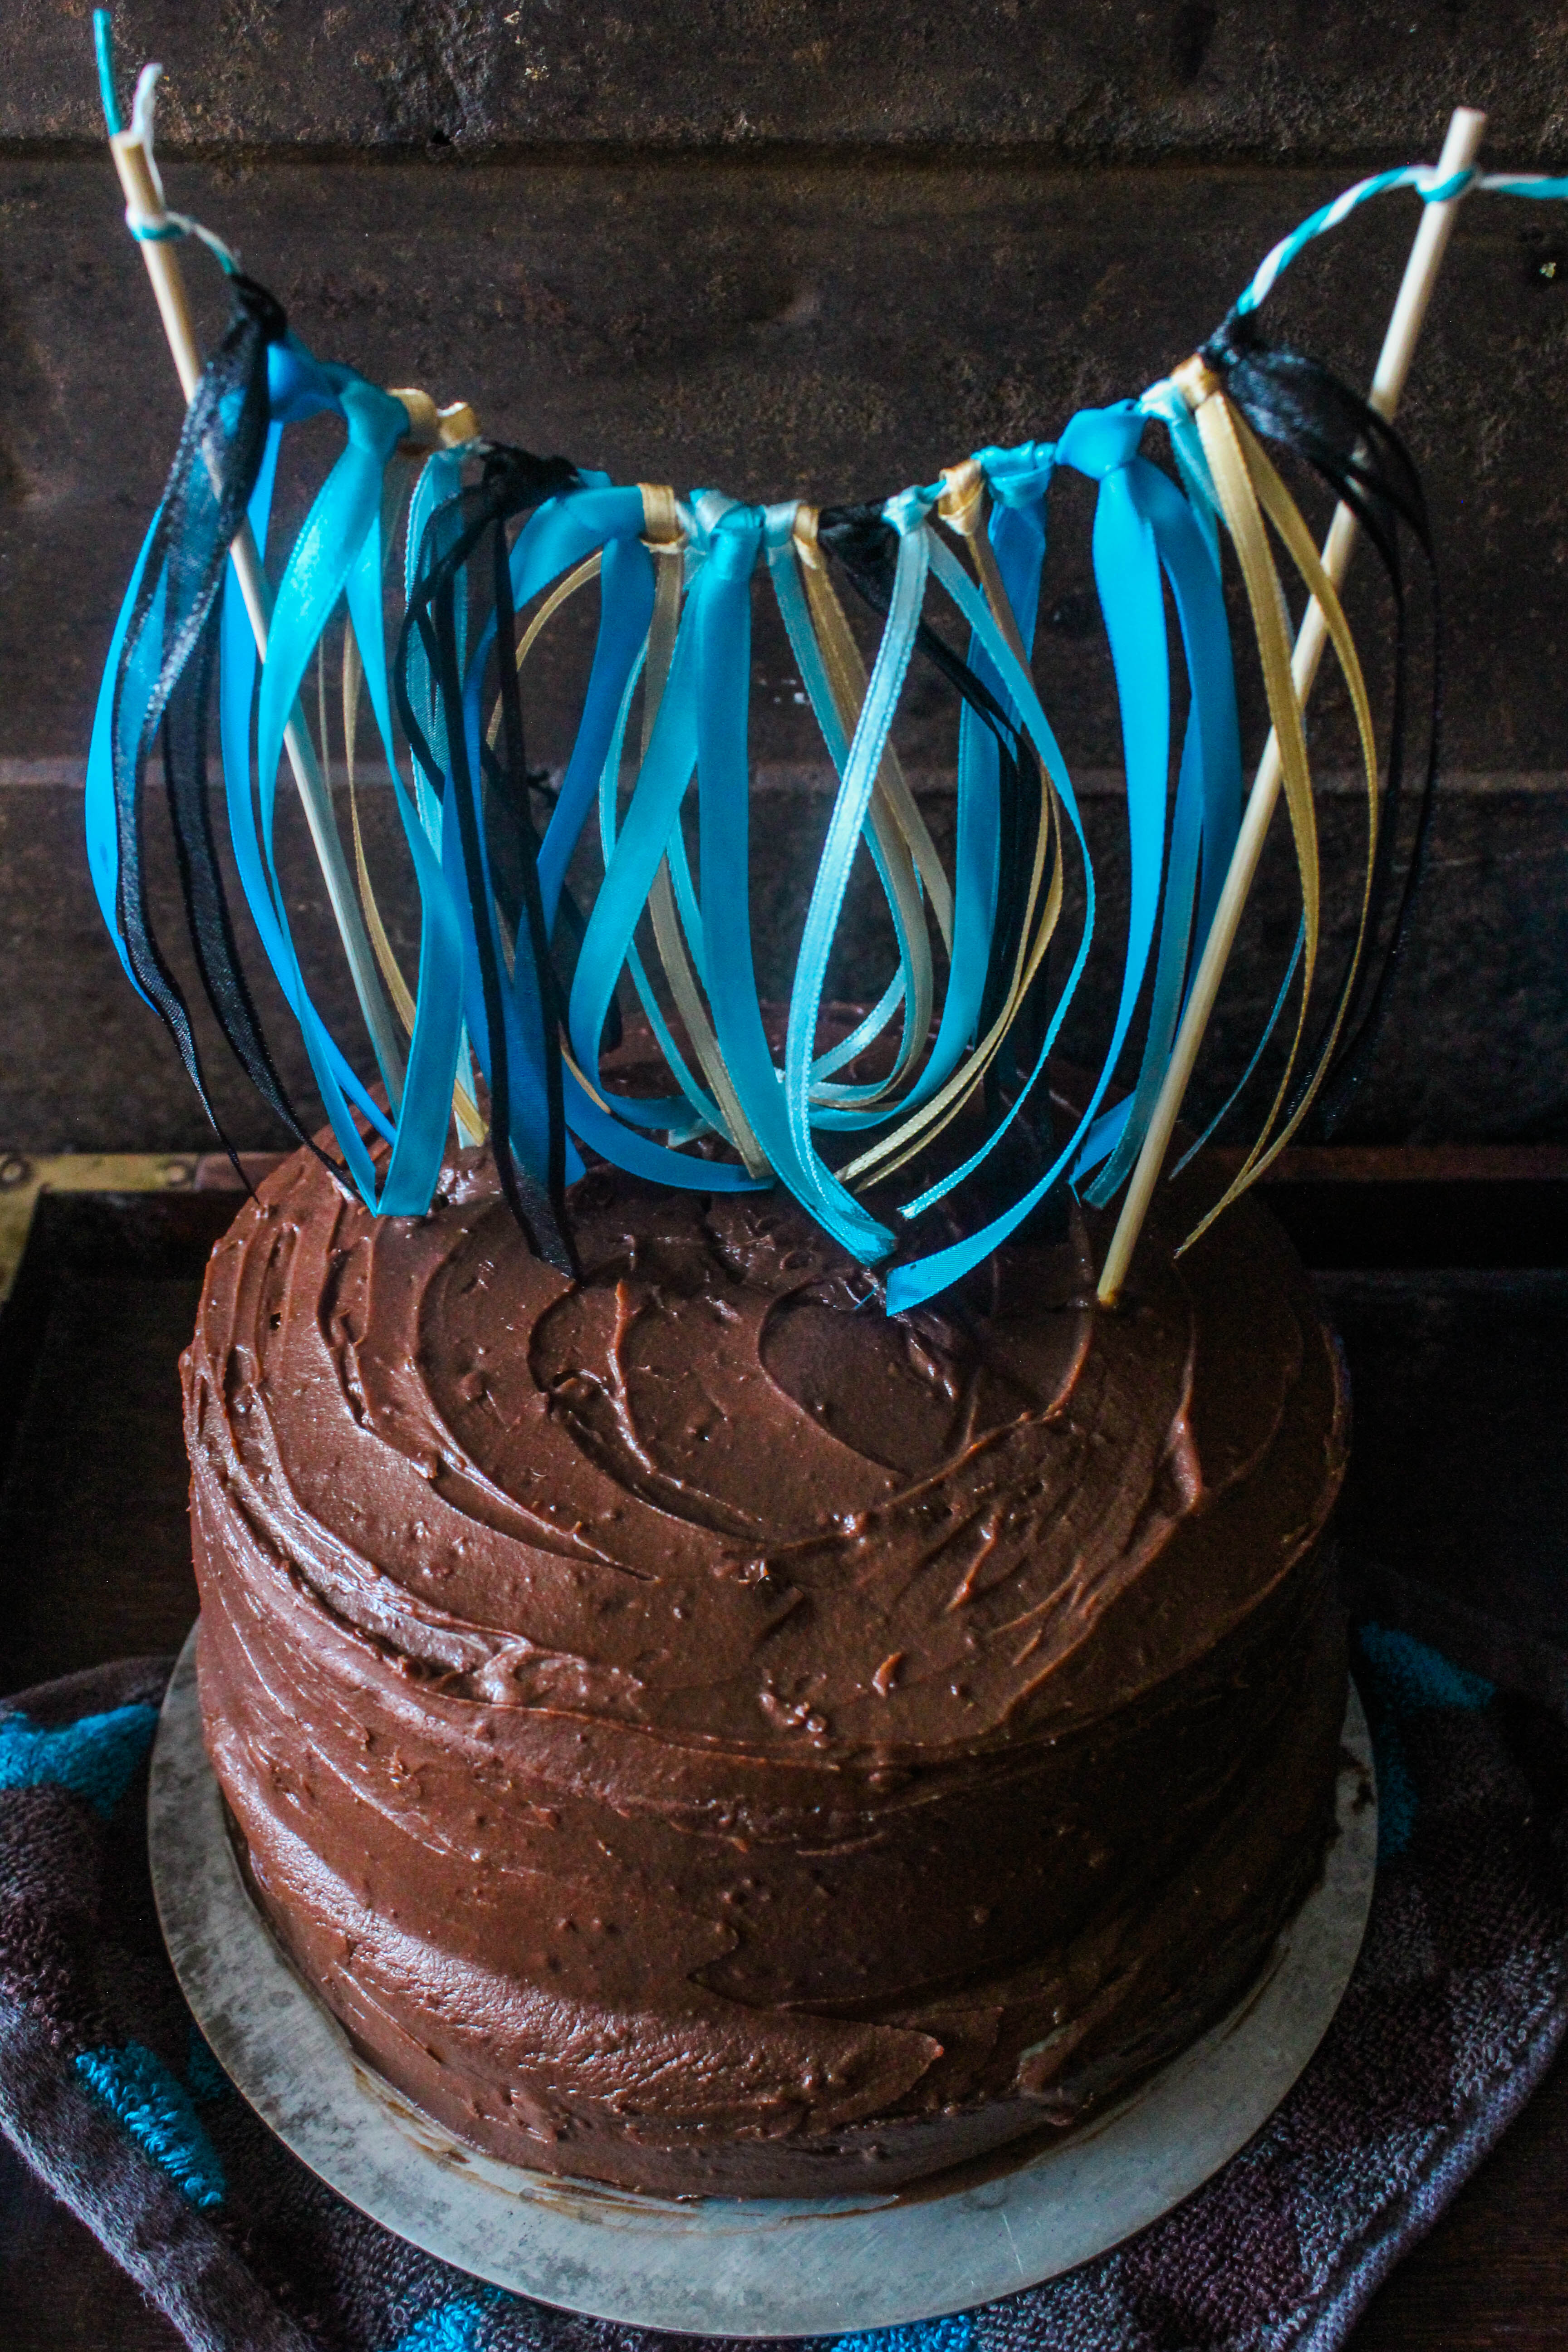
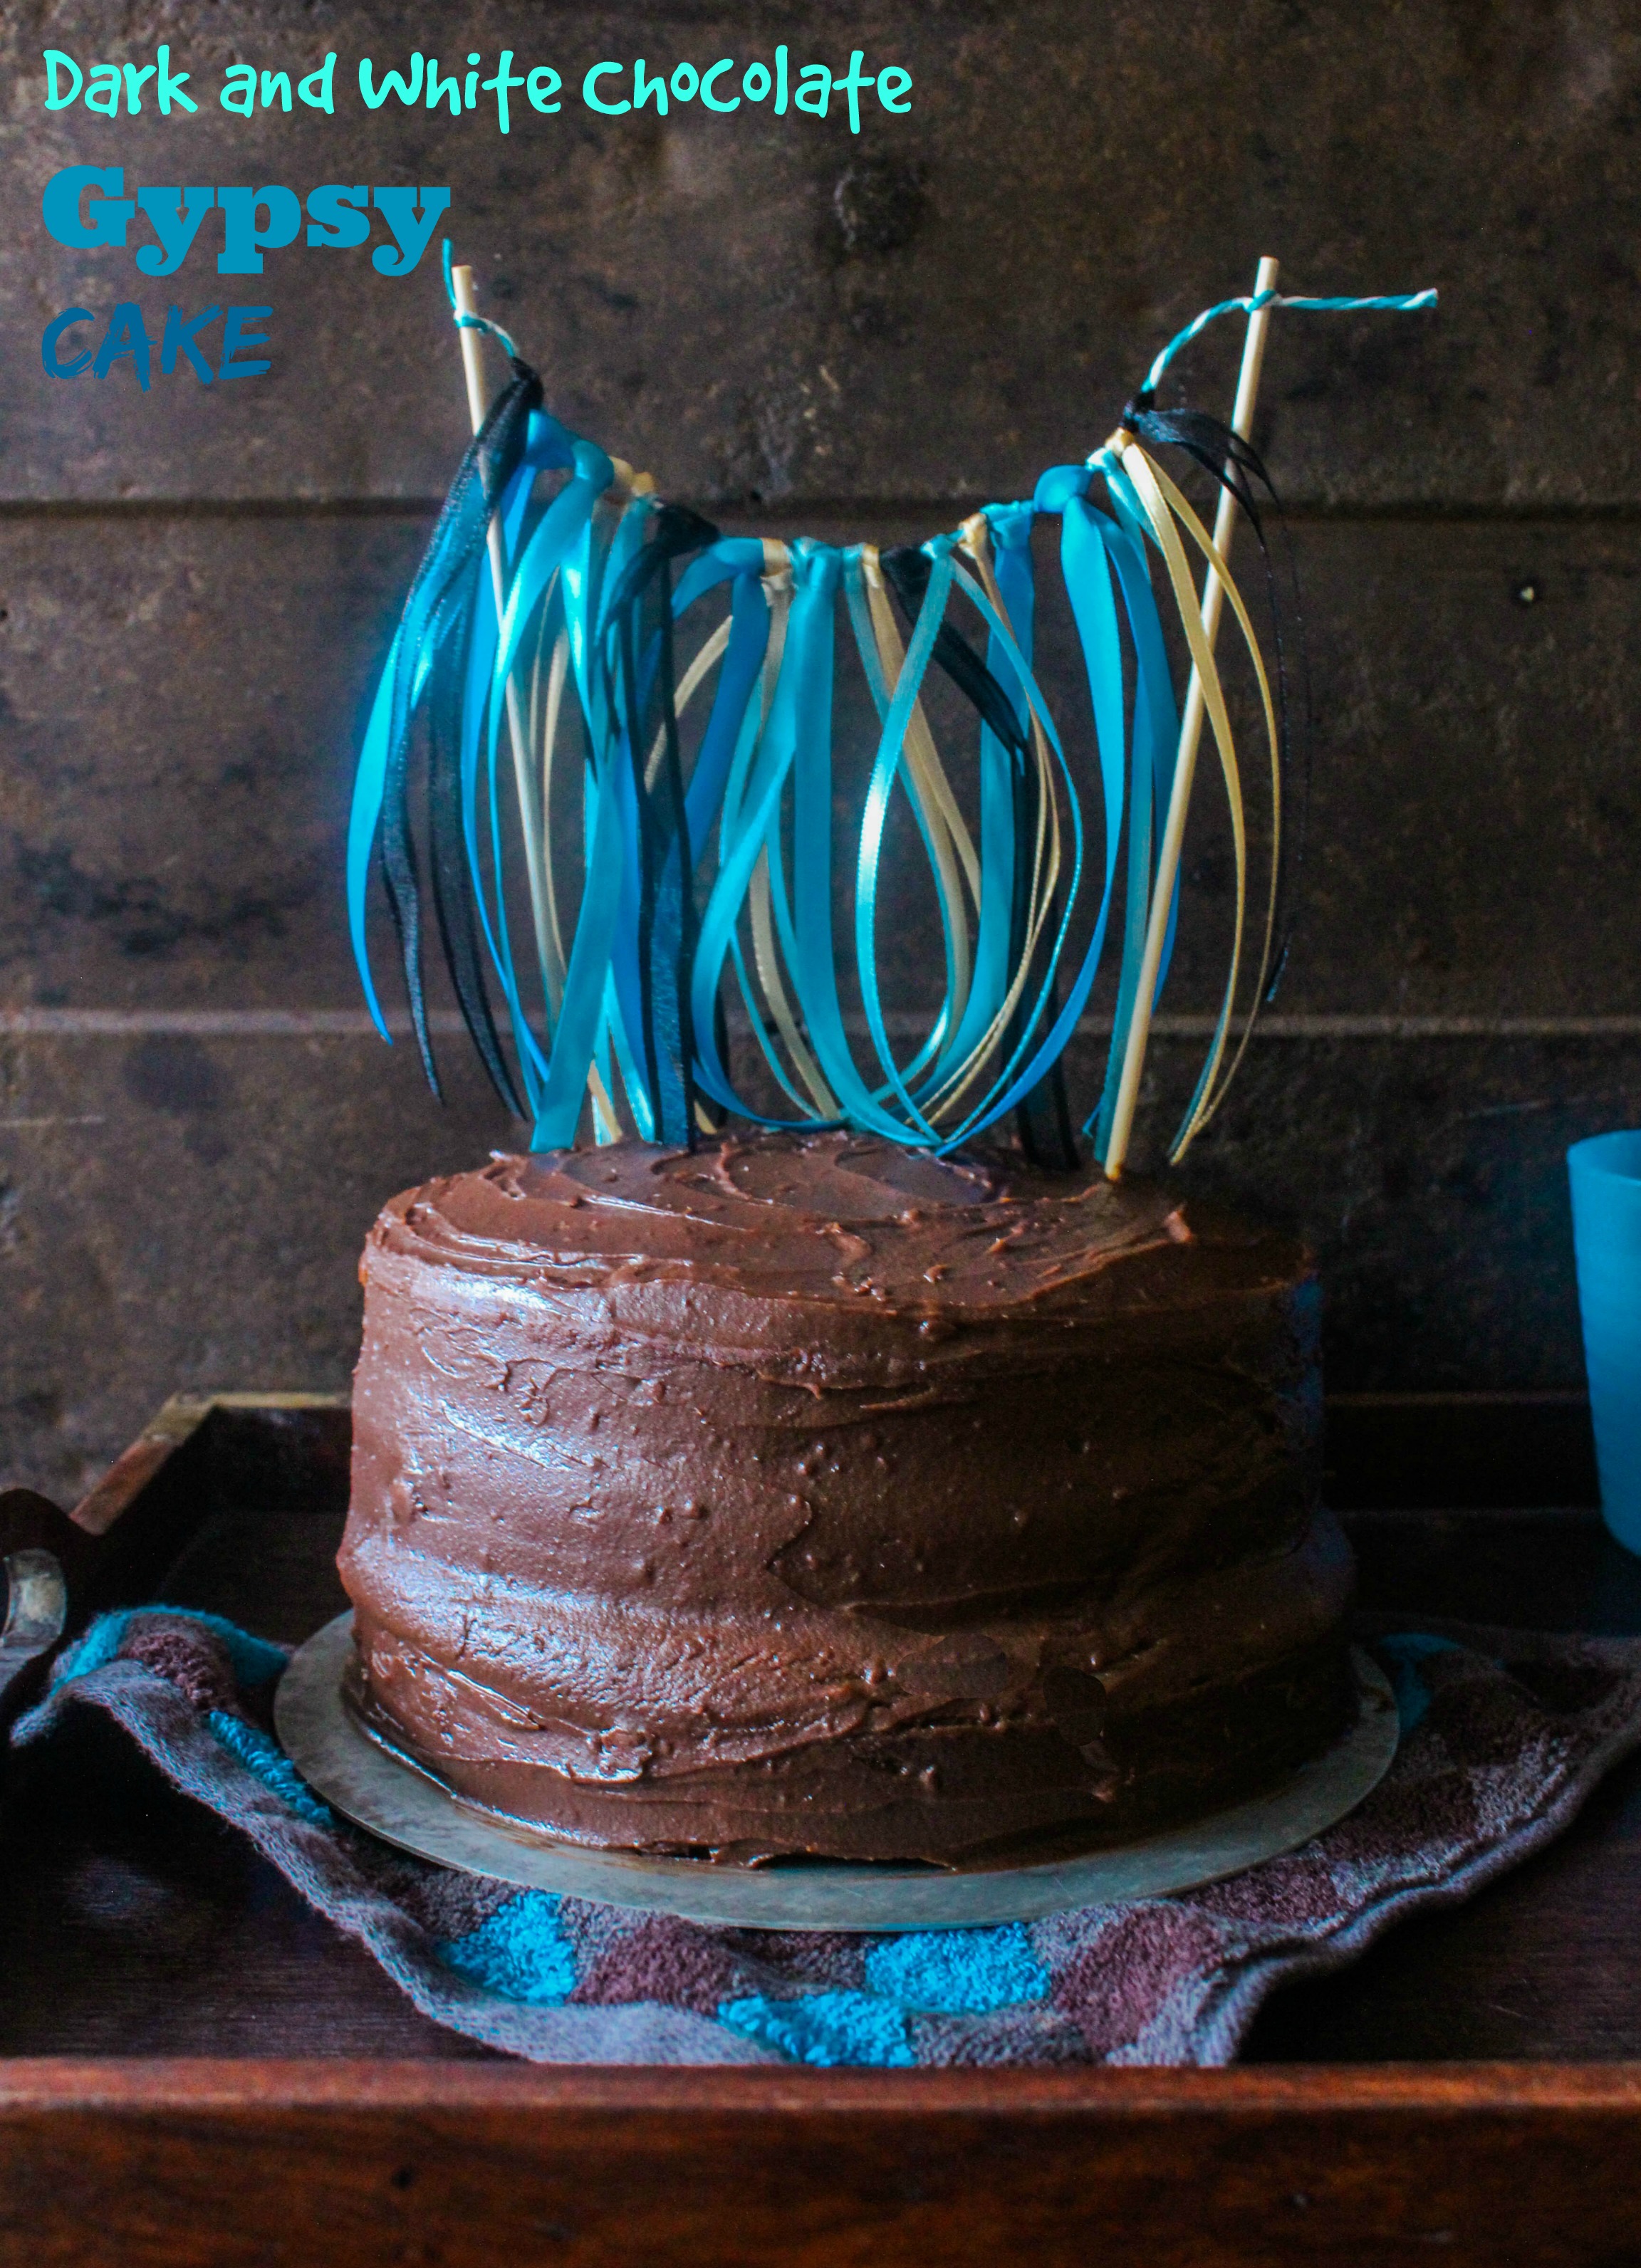
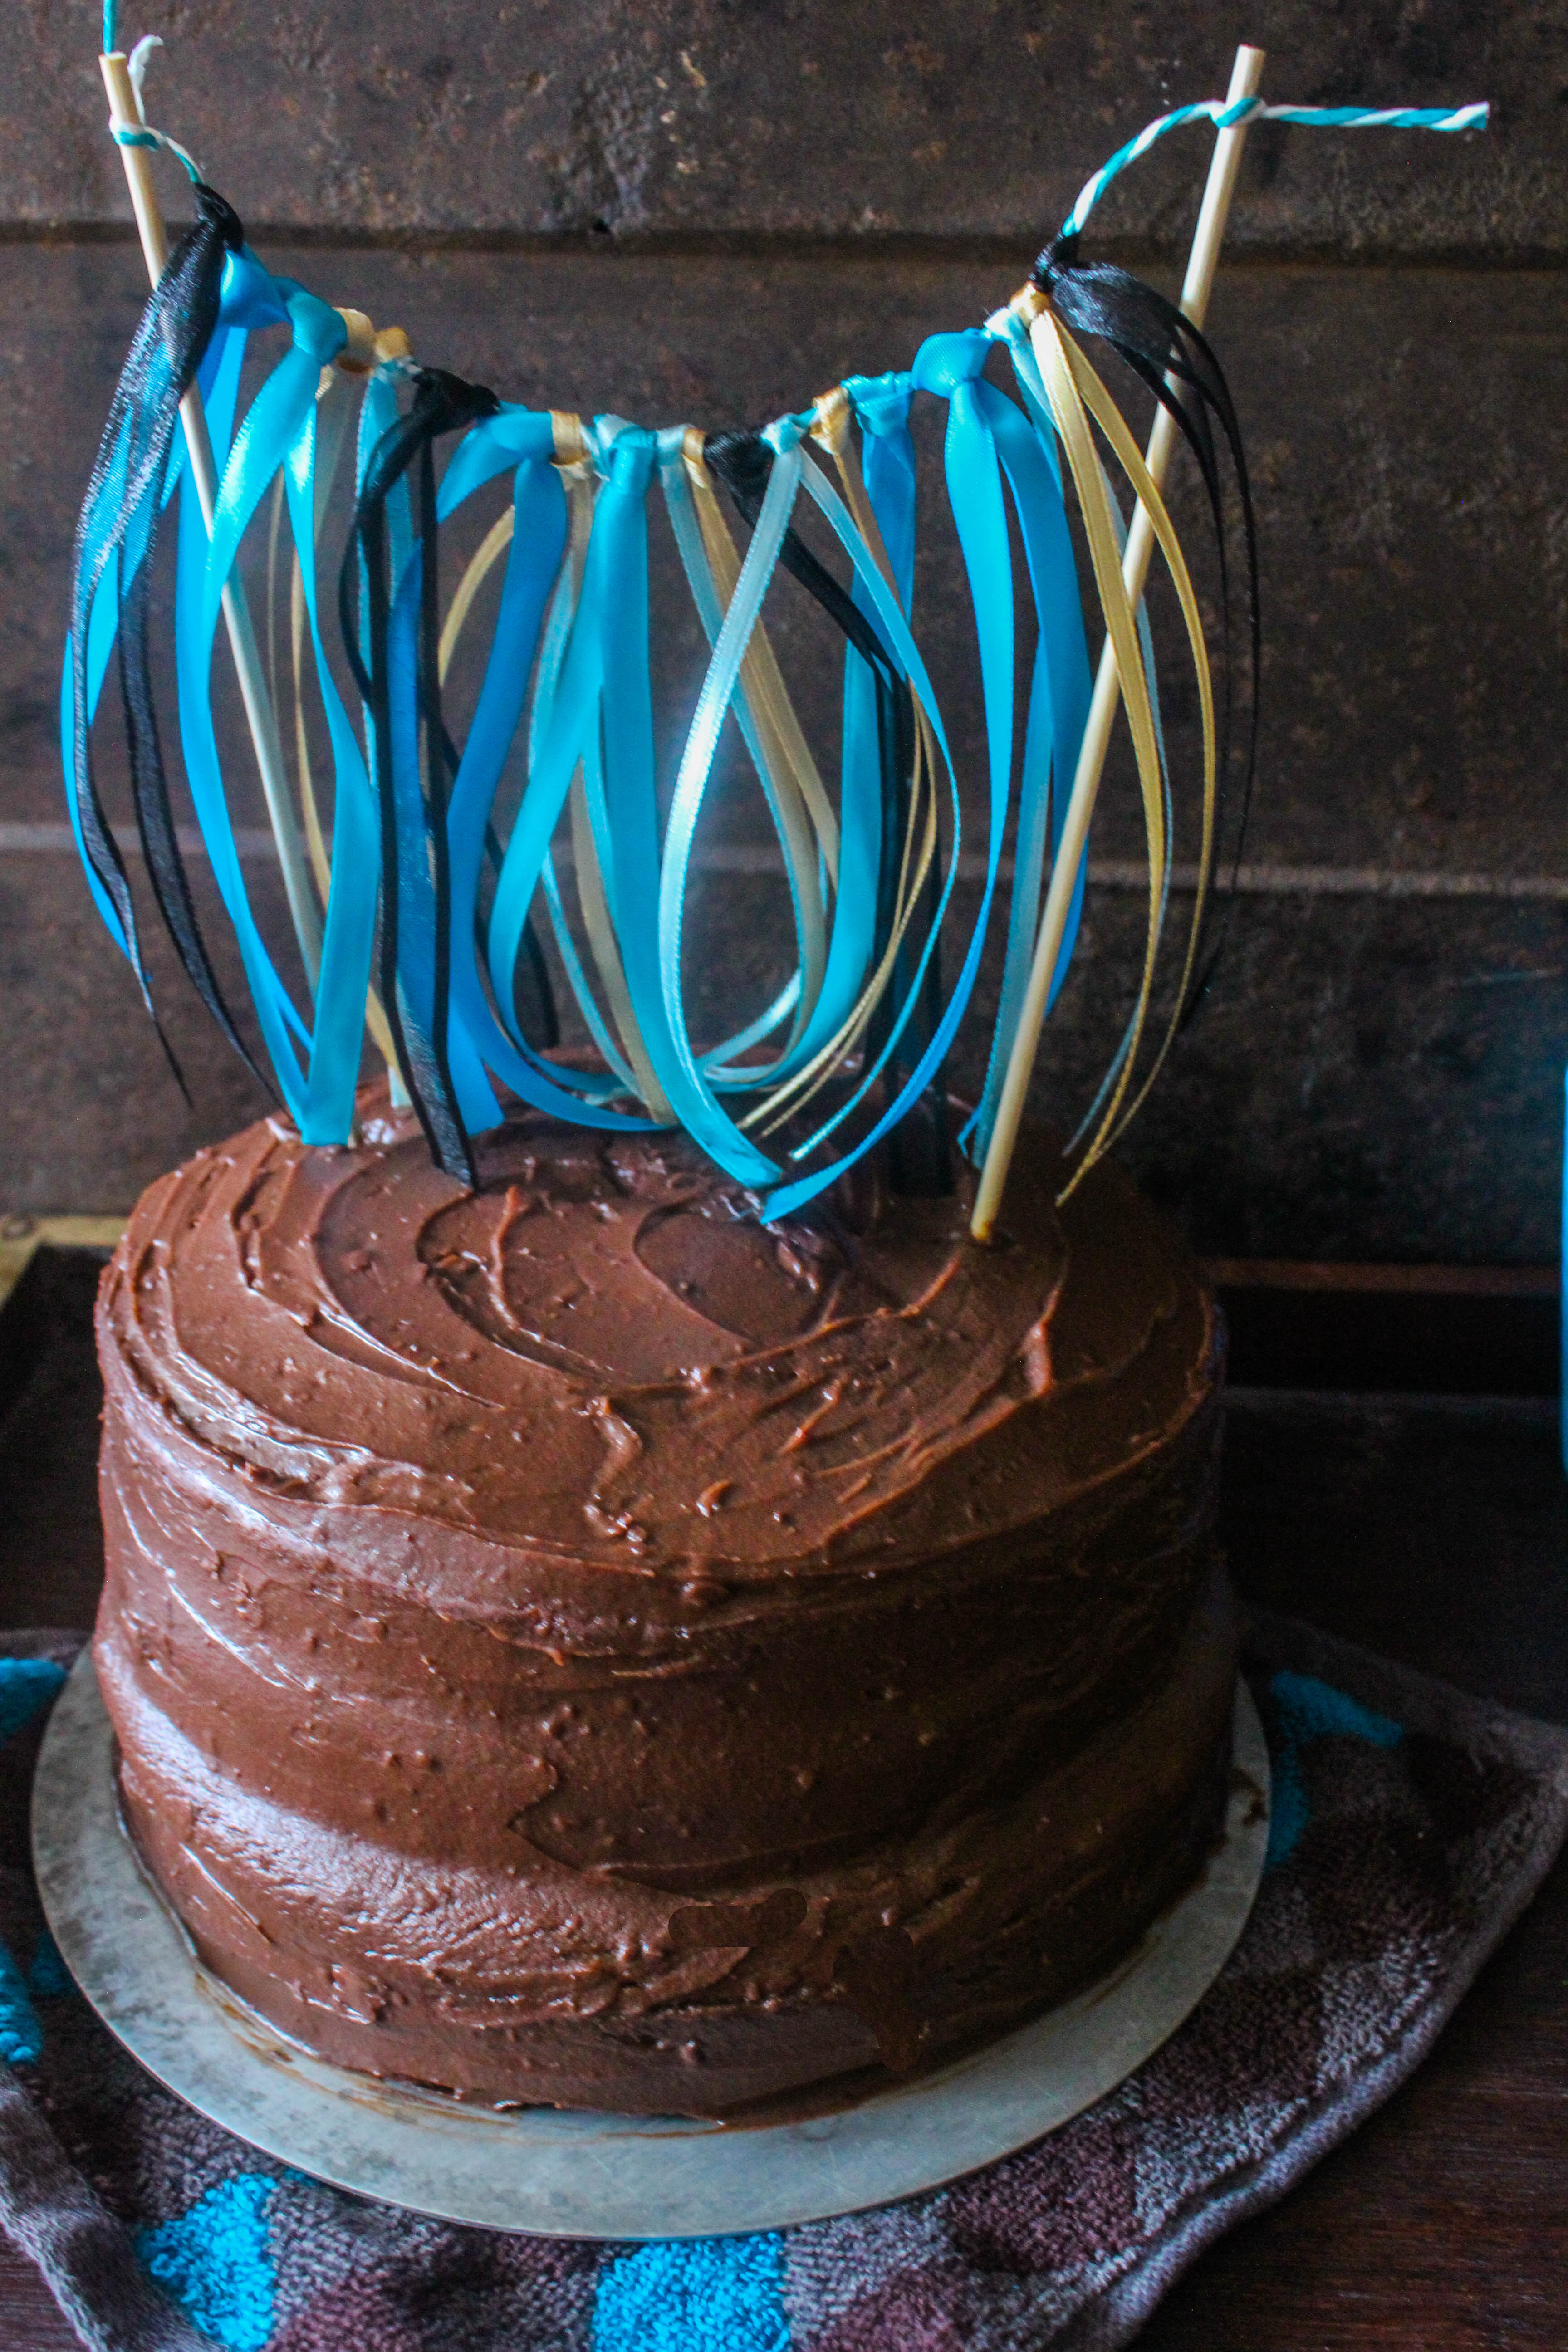
The little sister of mine celebrates her birthday today. Miles away but she knows I will be baking a cake for her. She wanted ‘a chocolate cake with a lovely topping…walnuts, almonds, orange’. But instead of a topping, I made a bunting filled with things she loves..frills, shiny ribbons, bold, bright blues. When my husband walked in from work in the evening..he took a good look at it and said ‘it’s got a gypsy-like appearance’. So the cake got a name.

IMG_9322

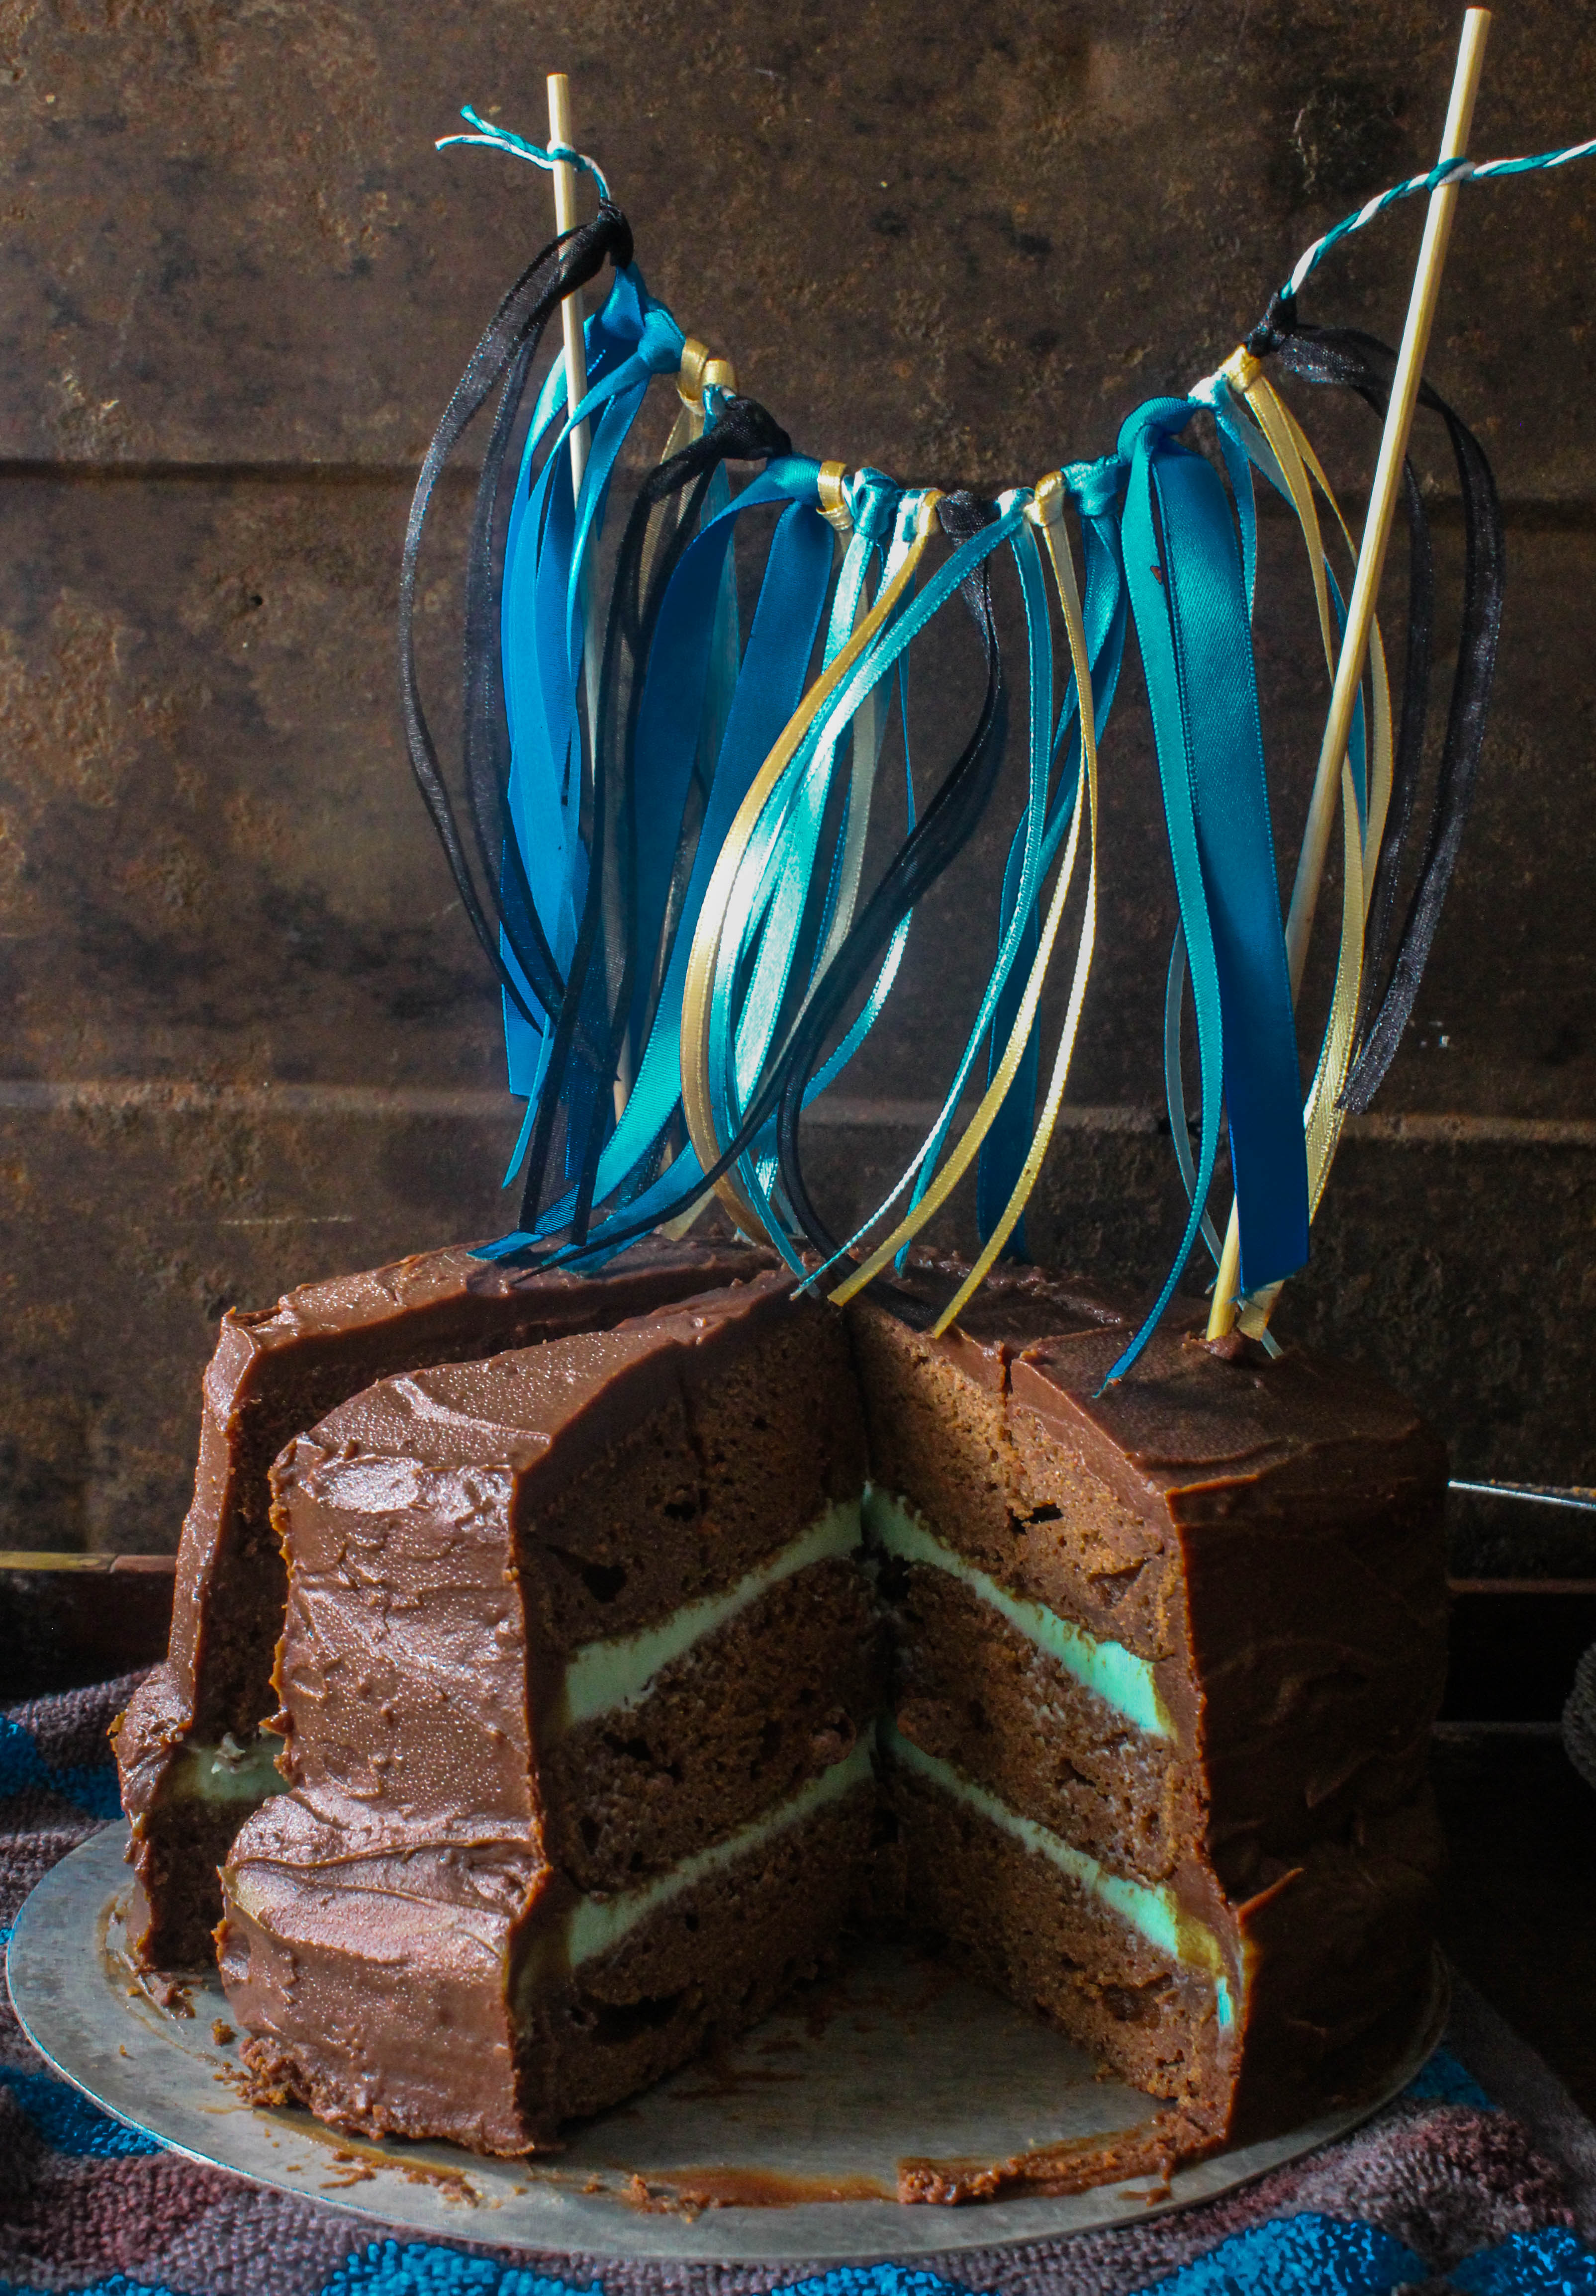
The cake is a devil’s food cake with layers of white chocolate ganache sandwiched between the cake and covered in a combination of dark and milk chocolate ganache. The white chocolate ganache has been tinted blue to go with the bunting. Basically, this is a gorgeous celebration of chocolate. I baked the layers in three 7 inch pans. Not very difficult to make because you can reduce the number of layers or make one cake and split it into layers. The dark and white chocolate ganache don’t require a lot of effort and you can go as fancy or as simple as you want with covering the cake with frosting. I’ve used a combination of dark and milk chocolate as my little boys are yet to enjoy the bittersweet flavour of dark chocolate. You can use dark chocolate alone, if that suits you. If you are concerned about the presence of mayonnaise in the cake, I was too but you don’t taste it at all. Instead it adds a richness and moisture to the batter. The bunting is a great way of sprucing up a simple cake and giving it a celebratory appearance and you can certainly go crazy with colours and prints.

IMG_9336

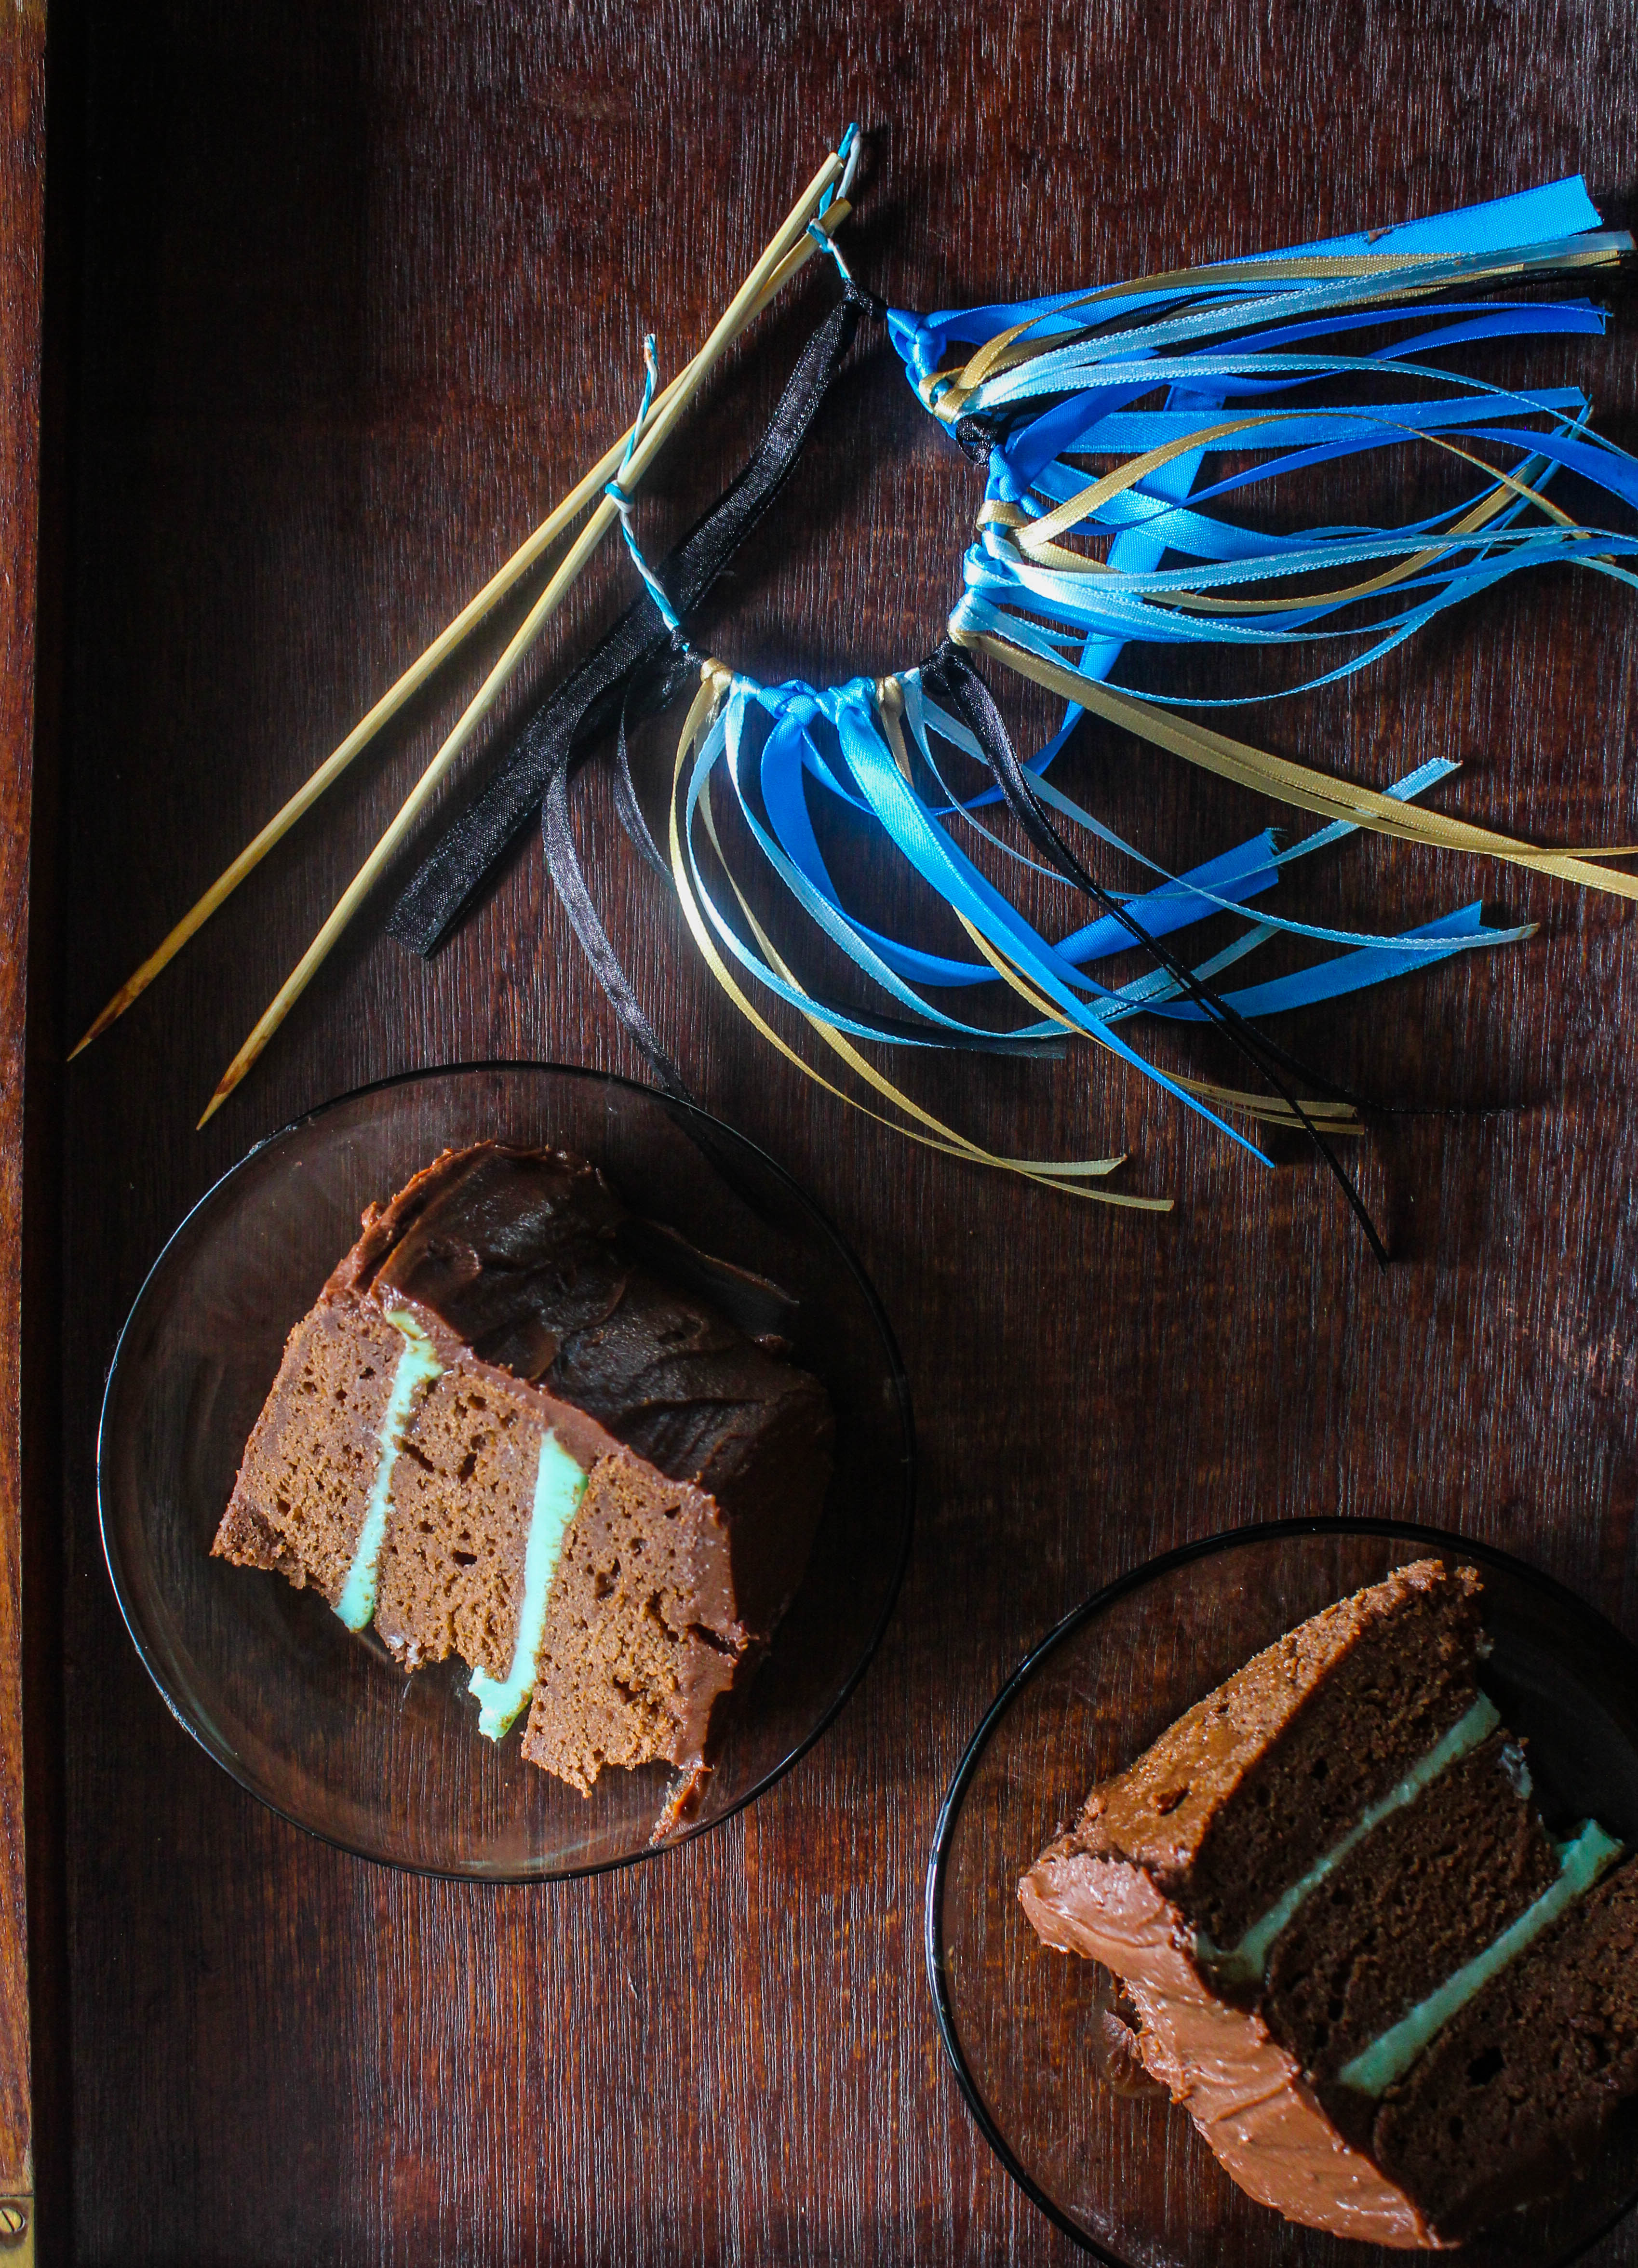
As you can see, I had to cut the cake and eat it myself, thinking of my sister all the way. The cake will go but the frills will remain. At least I will know I have a part of the cake specially reserved for her. Till we meet. And the good news is.. that day is not far.

IMG_9305

Dark and White Chocolate Gypsy Cake (adapted from Sweetapolita which in turn has been adapted from Fine Cooking)
Serves 8-10

For the Cake:
3/4 cup (170 g) unsalted butter, softened
2 cups (460 g) packed dark brown sugar
2 teaspoons (10 ml) pure vanilla extract
3 eggs, at room temperature
1-3/4 cups (220 g) all-purpose flour
3/4 cup (90 g) unsweetened Dutch-processed cocoa powder
1-1/4 teaspoon (7 g) baking soda
1 teaspoon (5 g) baking powder
1 teaspoon (10 g) kosher salt
1-1/2 cup (360 ml) buttermilk, at room temperature
1/4 cup (59 ml) mayonnaise

For the White Chocolate Ganache

250 g good quality white chocolate, finely chopped
150 ml thickened or heavy cream
Blue Food Colouring (optional)(I used a gel based food colour)

For the Dark Chocolate Ganache

300 g dark chocolate, finely chopped
100 g milk chocolate, finely chopped (can be left out if using dark chocolate only)
300 ml thickened or heavy cream

To make the Cake: Preheat oven to 180 degrees C.  Butter three 7-inch round cake pans, line with parchment rounds, and dust with flour, tapping out the excess.

In a stand mixer fitted with the paddle attachment, beat the butter, brown sugar and vanilla on medium-high speed until lighter in color and slightly increased in volume, about 5 minutes. Lower the speed to medium and add the eggs, one at a time, mixing until each is fully incorporated before adding the next.

Sift the flour, cocoa powder, baking soda and baking powder into a medium bowl. Add the salt to the dry ingredients after sifting, and whisk dry ingredients.

Alternate dry ingredients and buttermilk into creamed mixture, beginning and ending with dry ingredients. Mix until just incorporated, or finish by hand gently. Fold mayonnaise into batter with a whisk, until just blended.

Divide the batter evenly between the prepared pans. If possible, weigh the batter in each cake pan for a uniform weight. This ensures even layers. Smooth with small offset palette knife, and bake for about 30 minutes, rotating once after 20 minutes. Cake is done when toothpick or skewer comes barely clean. Try not to over-bake.

Let pans cool on wire rack for 20 minutes, then invert cakes onto racks, gently, peeling away parchment rounds. Let cool completely. Cake can be baked the night before and stored in an airtight container overnight before assembly

To make the White Chocolate Ganache: Place chocolate in a large mixing bowl. Heat cream over low-medium heat in saucepan until just boiling, pour over cream and set aside for 5 minutes. Use a whisk to combine mixture until smooth. Add food Colouring if using, little at a time till the desired shade is reached.

To make the Dark Chocolate Ganache: Place chocolate in a large mixing bowl. Heat cream over low-medium heat in a saucepan until just boiling, pour over cream and set aside for 5 minutes. Use a whisk to combine mixture until smooth. Chill until it thickens and just holds
its shape but is still pourable.

Assembly: I find it best to chill the cakes before frosting. Place one layer of chocolate cake on your cake stand and cover with white chocolate ganache.
Sandwich second layer on top and repeat. Using a spatula, spread the dark chocolate ganache over the outside of the cake. Chill cake before serving. Remove from refrigerator at least 30 minutes before serving.

Banana Poppy Seed Cake with Cream Cheese Frosting

10|04|2014

If this banana cake is looking anything different to you than…well, a banana cake, let me assure you this is the same one, you and me bake in a loaf pan and slice up for breakfast or bake into muffins to put into your lunchboxes. Yeah, the same one that transforms the fate of overripe bananas and they end up with some dessert love (a lot of love in my house) than entering the dustbin.
IMG_9211

I started out the usual, predictable way. Ignoring the bananas while they turned black and made the cupboard smell serving as a reminder each time I opened the door that it was time to use them up. I put the batter together intending to bake it in my loaf tin. But the loaf tin was nowhere in sight. And that was because it was sitting in the freezer with a semifreddo I made a few days back. I didn’t want muffins so the batter landed up in a cake pan.

IMG_9213-2

You know I have a weakness for round cakey objects. I feel the urge to spice it up or add nuts or anything that would go with the cake.And frost and decorate and just do something to it. So, before it hit the cake pan I added some poppy seeds to the batter. I frosted it with a quick cream cheese frosting which I’ve been meaning to try out in a while. This one uses whipped cream instead of butter along with the cream cheese so it is lighter and naturally uses far less sugar to get a piping consistency. The frosting can be easily spread on top of the cake if you are not comfortable with piping bags. A drizzle of caramel sauce (store bought) finished the cake. Both the recipe for the cake and the frosting have been separately adapted with some variation from Joy Of Baking

IMG_9196-2

The flavours are lovely together. I was amazed how good the poppy seeds tasted in a banana cake. I think this is by the far the easiest cakes I have made despite having a dressed up look.

IMG_9221

Banana Poppy Seed Cake with Cream Cheese Frosting
Serves 6-8

For the Banana Poppy Seed Cake
13/4 cups all purpose flour
3/4 cup castor sugar
1 tsp baking powder
1/4 tsp baking soda
1 tsp ground cinnamon
2 tbsp. poppy seeds
2 eggs, lightly beaten
1/2 cup (113 g) unsalted butter, melted and cooled
3 large ripe bananas, mashed with a fork
1 tsp vanilla essence
Cream Cheese Frosting, to frost
3-4 tbsp. thick caramel sauce, to drizzle (I used store bought)

For the Cream Cheese Frosting
125g cream cheese, room temparature
1/2 tsp vanilla extract
1/4 cup icing sugar, sifted
1/3 cup cold whipping cream or heavy cream.

Preheat oven to 180 degree C. Grease and line the base of a 19 cm round cake tin with baking paper.

In a large bowl, combine the flour, sugar, baking powder, baking soda, cinnamon and poppy seeds.
In a medium sized bowl combine the mashed banana, eggs, melted butter and vanilla with a wooden spoon. Lightly fold the wet ingredients into the dry ingredients just until combined. Take care not to over mix the batter or it might result in a rubbery cake. Pour the batter into the prepared cake tin and bake for about 35-40 minutes or until a toothpick inserted into the centre come out clean.

Remove the cake from the oven and keep aside for 5 minutes. Carefully turn the cake onto a wire rack and cool till room temperature. Once cooled, pipe or dollop cream cheese frosting onto the cake. Drizzle with caramel sauce.

To make the cream cheese frosting: In the bowl of your electric mixer, or with a hand mixer, beat the cream cheese  until smooth. Add the vanilla and confectioners sugar and beat until smooth. Gradually add the heavy cream and whip until the frosting is thick enough to pipe. Add more sugar or cream as needed to get the right consistency. In case you are using a brand of heavy cream that does not whip easily, then whip the cream separately to stiff peaks and fold it gradually into the cream cheese mixture. Refrigerate till needed.


Chocolate Fudge Cake with Red Berry Ganache

5|04|2014

I experience a unique thrill when I am posting a cake. More than satisfaction…more than excitement. Some kind of inexplicable joy. Right from the planning…the cake pans…dressing the cake, the props that will go alongside…the mood…the post processing to actually eating the cake. It’s almost like painting a picture. I finish with one and before that I am thinking about the next one.

IMG_9161-2

When I made the Chocolate Raspberry Brownie Cake, I remember telling myself that there wasn’t going to be a red-brown combo my blog for a while. I was worried I was giving you an overdose of chocolate and raspberries in my posts. I even resisted the urge of pouring luscious chocolate ganache over the brownie cake. And maybe that’s why I had good reason to post a sauce dripping chocolate cake this time.

IMG_9121

IMG_9145

This a fudge cake therefore it is rich. The sweet berry ganache pairs well with the bittersweet fudgy cake. Pink is such a beautiful colour . And the sprinkles make it shine. Overall, this is quite simple to make with a great outcome. The texture is great for a bundt cake pan as it holds shape well.

IMG_9167

IMG_9156

Chocolate Fudge Cake with Red Berry Ganache
Serves 6-8

Chocolate Fudge Cake (adapted with variation from Taste.com)
250g butter, chopped
200g dark chocolate, chopped
1 cup castor sugar
1/3 cup cocoa powder, sifted
2 cups, cold water
2 eggs, lightly beaten
1 1/2 cups plain flour, sifted
1 cup self-raising flour, sifted
Fresh Strawberries and Raspberries, to decorate
Pink Sprinkles, to decorate

Red Berry Ganache
10-12 Strawberries and/or Raspberries (I used a mix), cleaned and hulled (fresh or frozen)
100 g white chocolate, roughly chopped
1/3 cup thickened or heavy cream
2-3 drops of pink food colouring (optional)

Preheat oven to 160 degrees C. Lightly grease a 20 cm bundt cake pan.

Place butter, chocolate, sugar, cocoa and 2 cups cold water in a saucepan over medium heat. Cook, stirring, for 8 to 10 minutes or until melted and smooth (do not boil). Remove from heat. Cool for 20 minutes.

Add eggs. Whisk to combine. Add plain flour and self-raising flour. Whisk until smooth. Pour into prepared pan. Bake for 40-50 minutes or until a skewer inserted in cake comes out clean. Cool in pan for 20 minutes. Turn out onto a wire rack to cool completely.

To make the ganache: Puree and strain the berry mixture to discard seeds. Combine chocolate and cream in a heatproof bowl and place over a saucepan of simmering water (don’t let the bottom of the bowl touch the water). When chocolate is about halfway melted, remove bowl from pan. Stand, stirring occasionally, until chocolate has melted and mixture is smooth. Add the strained berry puree and stir till well blended. Add food colouring if using. Cool for 10 minutes and pour over the cake. Ganache will thicken and set on cooling. Top with fresh berries and decorate with sprinkles.


Blueberry Pistachio Crumble Cake

30|03|2014

I’ve been a bit under the weather. I don’t enjoy being tied down to the bed so it was not the best of times for me. I love standing on my two feet even if it means standing long hours without a break so this was a kind of situation-imposed rest from which I was desperate to recover. Not being able to bake or photograph or shop for ingredients can affect me in a big way and I was really looking forward to some baking action.
Finally I did. After a whole week.

IMG_9060

As it turns out, this is my 100th post. I’ve been slow that way. Taking a little over a year to reach here while also enjoying every bit of this journey. So it goes without saying that this had to be a cake post. I would have loved to do a fancy one with a few candles but honestly I didn’t have the stamina to do so. This crumble cake has been on my mind since months…I wanted to use pistachios in a crumble cake and I had pictured this rustic blue-green pairing so clearly in my mind that I could hardly wait for the cake to finish baking. I was almost certain the cake would look the way it did.

IMG_9063

IMG_9071This is the kind of cake I enjoy baking and eating. Simple yet satisfying. There’s something so gorgeous about a crumble cake. Especially if the base is as moist and soft as this one. So many textures with each mouthful…almost like eating a cake and cookie together. And juicy blueberries tying the two layers together.
I blitzed the pistachios in the food processor in a way so as to keep a mix of finely ground as well as coarser crumbs in the crumble. They taste and look better. Any other nut would work just as well. Or any other berry in the cake.

IMG_9061-2

IMG_9049-2

Blueberry Pistachio Crumble Cake
Serves 10-12

Melted butter, to grease
200g butter, room temperature
3/4 cup castor sugar
2 teaspoons vanilla essence
2 eggs, room temperature
1 cup self-raising flour
1 cup plain flour
3/4 cup milk
200g blueberries fresh or frozen (I used fresh)

Crumble Topping
1/2 cup plain flour
50 g butter, chilled and chopped into cubes
1/4 cup brown sugar
1/3 cup pistachios, skinned and ground to a coarse powder in the food processor

Preheat oven to 180 degrees C. Brush a round 20 cm spring form pan with melted butter to lightly grease. Line the base with non-stick baking paper. Place the prepared pan on a baking tray.

Using an electric mixer or with a hand mixer, beat the butter, sugar and vanilla until pale and creamy. Add the eggs, 1 at a time, beating well after each addition. Use a large metal spoon to fold in the combined flour and the milk until well combined.

Spoon into the prepared pan. Use the back of the spoon to smooth the surface. Arrange the blueberries on the top.

To make the crumble topping, place all the ingredients in a bowl. Use your fingertips to rub the butter into the mixture until the mixture contains large and small crumbs.

Sprinkle the crumble topping over the blueberry layer. Bake in oven for 1 hour 10 minutes or until a skewer inserted into the centre comes out clean. Set aside in the pan for 10 minutes before transferring to a wire rack to cool slightly. Serve cake warm or at room temperature

  • « Previous Page
  • 1
  • …
  • 47
  • 48
  • 49
  • 50
  • 51
  • …
  • 57
  • Next Page »
Hey Sugar
Cake
Link to my Facebook Page
Link to my Instagram Page
Link to my Pinterest Page
Link to my Mail Page
Subscribe to this site
Fresh Awards
2019 Aus mumpreneur
2019 aus mumpreneur
Mumbrella

Copyright © 2025 · Sugar Et Al · Designed by Smitten Blog Designs · Log in