• Home
  • Recipe Index
    • Recipe Index
    • Breakfast/Brunch
    • Cakes and Puddings
    • Chocolate
    • Cookies and cupcakes
    • Custard and Mousse
    • Gluten Free
    • Ice Cream
    • Mains
    • Other Sweet Treats
    • Snack/Appetizers
    • Soups and Salads
    • Tarts and Pies
    • Vegetarian
  • About
  • Cookbook
  • Portfolio
  • Store
  • Press
  • Work with Me

Sugar et al

Because Life is a blend of flavours...

5 Ingredient Caramel Choc Chip Cookies

30|03|2020

Caramel Choc Chip Cookies

During this phase of lock down and uncertainty, one of the ways to remain calm is to create. Creating not only gives you a sense of direction and channelizes your energy into something positive, but it also gives you hope. I find baking immensely rewarding but now accompanied by family in the kitchen, the joy is ten-folds. We are baking a lot of cookies.

Caramel Choc Chip Cookies

If you always wanted your kids to start baking, there is no better time than now. Children are scared and lonely just like adults even though they may not know how to express it. Baking distracts them, teaches them a new skill and the allows them to use their hands and their minds to be creative.

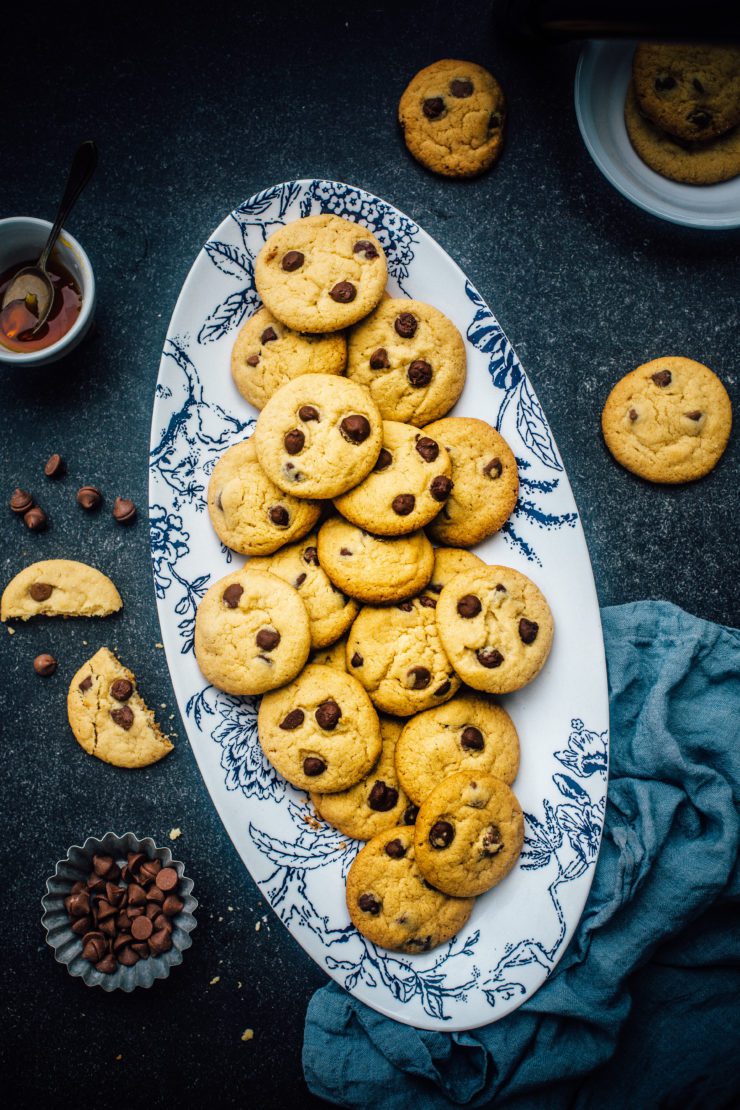
These caramel choc chips cookies are not only super easy, they can be adapted to add nuts, seeds, dried fruits. What’s more, they are eggless! I hope you enjoy baking them with your family.

Caramel Choc Chip Cookies
Makes 30 medium sized cookies

200 g unsalted butter, softened
1 cup brown sugar
4 tbsp golden syrup
2 cups self raising flour
1 cup dark chocolate chips

Preheat oven to 180 degrees C. Line 2 baking sheets with baking paper.
Beat butter and sugar until fluffy. Add golden syrup and beat until combined.
Mix in the flour, then add the chocolate chips.
Taking one teaspoon at a tie, roll into balls and place on the baking sheets, leaving room for cookies to spread. Bake for approx 15 minutes or until edges turn golden brown.
Repeat with remaining dough.

Blackberry and Rose Sheet Cake

23|02|2020

Blackberries are so beautiful and affordable at this time of the year. As soon as I bought a sheet pan, that has been on my list for a while, I knew I had to inaugurate with an easy and divine tasting blackberry and rose sheet cake.

Blackberries not only look stunning on their own but the purple-pink hue they leave behind when pureed or cooked is phenomenal. Hence, the highlight of this cake is the colour of frosting. Otherwise, it is a simple cake put together in one bowl and infused with rosewater.

We are at the tail end of summer in Australia and it’s sad to say goodbye to all the berries and stone fruits. I would love to squeeze in a few more summery recipes if I can. Meanwhile enjoy the season at your end of the world.

Blackberry and Rose Sheet Cake
Serves 16

4 eggs, lightly whisked
3/4 cup canola oil
1 cup milk
1/2 tsp rosewater
3 cups self raising flour
1 and 1/2 cup castor sugar
1/2 cup blackberries (fresh or frozen)

Blackberry Buttercream
250 g unsalted butter, softened
3 cups icing sugar
3 tbsp fresh blackberry puree, strained
1/2 tsp vanilla bean paste

Preheat oven to 180 degrees C. Grease the base and sides of a sheet pan and line the base with baking paper.

Whisk the eggs, oil, milk, rosewater together. Add the flour and sugar, beat until smooth Fold in the blackberries.
Pour mixture into the sheet pan. Bake for 20-25 minutes or until cake is lightly browned and springs back when gently pressed with a finger.

Remove from oven. Allow to cool in pan or turn on to a wire rack. Once cooled completely, frost with blackberry buttercream. Decorate with edible rose petals and fresh blackberries.

To make the frosting, using an electric mixer, beat butter in a bowl until pale. Add 1 cup icing sugar and beat till smooth. Add the blackberry puree and remaining icing sugar and beat slowly until well combined.

Papaya Lover’s Cake

12|02|2020

Disclaimer: This post is brought to you by Ruby Rise Papaya. All thoughts and opinions expressed in this post are entirely my own.

papaya lover's cake

I know what you are thinking. Papaya and Cake? Not a common combination, though I really wonder why? Papayas, especially the Ruby Rise papaya is not only a delicious sweet treat for the tastebuds, it is ridiculously refreshing and that gorgeous orange-red colour is so eye
catching. In case you didn’t know Ruby Rise is Australia’s newest red papaya brand, 100% Australian grown and owned and a perfectly healthy way to bring a taste of the tropics to your homes round the year.

For a lot of people, papayas are that exotic fruit that you use occasionally to elevate your salad or include in your tropical smoothie. However, what they don’t know is that papayas are a powerful superfood. The benefits of eating papayas are tremendous! Papayas a rich source of antioxidants, minerals and fibre. They are known for their natural laxative and immune boosting abilities and enzymes that balance stomach acid for healthy digestion. They’re great for skin, anti-aging, hair and for easing menstrual pain. Papayas lower cholesterol, help in weight loss and they’re good for diabetes too. Truly a fruit with superpowers!

The Red papaya has such a smooth, buttery flesh that it can be consumed in a variety of ways. With Valentine’s day around the corner, I wanted to create a dessert that is special and unique and one that celebrates this beautiful fruit. If you love papayas, this is your cake. If you don’t prepare to be converted. Nothing evokes the senses like luscious, sweet fruit atop a nutty, rich cake sandwiching a creamy layer of mascarpone frosting and the highlight of the cake, the cardamom papaya jelly. Every bite is a textural delight!

papaya lover's cake

As always, this cake is really simple to put together and the flavours work very well. You could dress it up as simple or as over the top as you’d like.

papaya lover's cake

Papaya Lover’s Cake
Makes a 7 inch, two-layered round cake

Almond Cake

250 g unsalted butter, softened
1 cup castor sugar
2 and ½ cups self-raising flour
1 cup almond meal (ground almonds)
4 eggs
1 cup milk
1 tsp vanilla extract
1 Ruby Rise Papaya, peeled, seeds removed and cubed
Edible flowers, to decorate
Sprinkles, to decorate

Papaya- Cardamom Jelly
1 Ruby Rise Papaya
1/2 cup castor sugar
½ tsp powdered cardamom
1 tsp lemon juice

Mascarpone Frosting
125 g mascarpone cheese
2 tbsp. icing sugar
150 ml thickened cream

Preheat oven to 160 degrees C (140 degrees C for fan forced ovens). Grease the base and sides of two 7 inch pans and line the bases with baking paper.

Using an electric mixer beat butter and sugar until light and fluffy. Add the eggs, one at a time, beating well after each addition. Add the flour, almond meal, milk and vanilla extract and beat on low speed until just combined. Divide the batter uniformly between the two prepared pans.

Bake for 45-50 minutes or until cooked through and a skewer inserted in the middle of the cakes come out clean. Remove from oven, leave aside for 5 mins. Gently turn onto a wire rack to cool completely.

To make the papaya jelly, peel the papaya and cut it in half. Scrape out the seeds and thinly slice the flesh. In a medium saucepan, place the sliced papaya, sugar, cardamom and ½ cup water. Cook until papaya starts to break down and mixture thickens. Add lemon juice, mix, remove from heat. Allow to cool to room temperature. Store in the refrigerator until needed. 

To make the mascarpone frosting, beat mascarpone and icing sugar until smooth. Add cream. Beat until stiff peaks form. Refrigerated until needed.

To assemble, place a layer of almond cake on a cake plate or stand. Dollop ½ the frosting and spread it with an offset spatula. Spread 4 tablespoon of the papaya chutney. Top with the second layer. Spread with the remaining mascarpone frosting. Top with fresh papaya cubes. Decorate with edible flowers/sugar flowers and sprinkles.

Raspberry Ganache Tart

8|02|2020

raspberry ganache tart

Of course, it is the season of hearts and pretty, pink desserts. I make them round the year anyway so coming up with another pink dessert is not that hard. I actually enjoy it! This raspberry ganache tart is made with real raspberries that add a lovely tart flavour and a beautiful pastel pink colour to the tart.

raspberry ganache tart

It’s summer in Australia so a no-bake dessert is perfect for us plus being egg free , it’s a great option for vegetarians too. If you don’t want to use gelatine, you can swap it with agar that’s a plant based setting agent. The taste is unique, berry like and also sweet and I definitely recommend, you give it a go for flavour alone.

raspberry ganache tart

What are your favourite Valentine’s day treats? If you like to bake, check out this easy Raspberry and Yoghurt Cake or this Neapolitan Cake topped with buttercream roses.

Raspberry Ganache Tart
Makes an 8 inch round tart

200 g digestive biscuits or cookies of your choice
100 g unsalted butter, melted
1 cup raspberries
2 tbps castor sugar
1 tsp powdered gelatine
200 ml thickened cream
250 g white chocolate buttons
25 g unsalted butter
pink food colour (optional)

Place the biscuits in a food processor and pulse until fine crumbs form. Add the melted butter into the processor and pulse again to combine. Press the biscuit mixture onto the base and sides of a 8 inch fluted tart pan until uniform. Place the tart pan on a baking tray for ease of movement and store the tray with the pan in the fridge for the base to firm up.

Meanwhile make the raspberry ganache filling. Place the raspberries, sugar and 3 tbsp water in a medium saucepan and cook till raspberries cook down and mixture is slightly reduced. Add the gelatine, stir and simmer for further 5 minutes. Strain the mixture into a bowl.

In a separate saucepan, over low heat, bring the cream to a boil (do not boil). Remove from heat, add the white chocolate buttons. Leave aside for 5 minutes, then stir until buttons have fully melted and mixture is smooth. Add the unsalted butter, raspberry puree and food colour, if using. Stir to combine.

Cool mixture to room temperature, then pour onto prepared crust. Place tray in the fridge for at least 4-5 hours or until filling has set. Decorate with fresh raspberries, heart sprinkles and sugar flowers. Enjoy chilled.

  • « Previous Page
  • 1
  • …
  • 15
  • 16
  • 17
  • 18
  • 19
  • …
  • 111
  • Next Page »
Hey Sugar
Cake
Link to my Facebook Page
Link to my Instagram Page
Link to my Pinterest Page
Link to my Mail Page
Subscribe to this site
Fresh Awards
2019 Aus mumpreneur
2019 aus mumpreneur
Mumbrella

Copyright © 2025 · Sugar Et Al · Designed by Smitten Blog Designs · Log in